What Tools Are Needed For Laminate Flooring
Installing laminate flooring can be a rewarding DIY project, offering the aesthetic appeal of hardwood at a more affordable price. However, achieving a professional finish requires the right tools. This article provides a comprehensive guide to the essential tools needed for a successful laminate flooring installation.
Essential Tools for Cutting and Measuring
Accurate cutting and measuring are vital for achieving a seamless laminate flooring installation. The following tools are indispensable for these tasks:
- Tape Measure: A reliable tape measure with clear markings is essential for accurately measuring the room and individual planks. A 25-foot tape measure is generally sufficient for most residential spaces.
- Utility Knife: A utility knife equipped with a sharp blade is used for trimming laminate planks to fit around obstacles and corners.
- Circular Saw with Laminate Blade: A circular saw with a dedicated laminate blade ensures clean and precise cuts through the laminate planks. The blade should have fine teeth specifically designed for cutting through laminate material without chipping.
- T-Bevel: A T-bevel helps transfer angles accurately from existing corners or edges to the laminate planks, ensuring a precise fit for corners and transitions.
- Pencil: A pencil is used to mark cutting lines on the laminate planks.
Installation and Finishing Tools
Once the planks are cut, you need the proper tools to secure and finish the installation. These tools include:
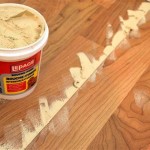
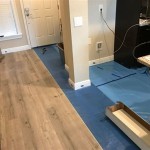
- Underlayment: Underlayment serves as a moisture barrier and sound dampener, enhancing the overall comfort and performance of the laminate floor. Choose a suitable underlayment based on the specific needs of the room and the type of subfloor.
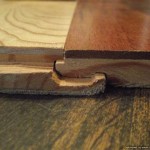
- Tapping Block: A tapping block is a wooden block used in conjunction with a hammer to gently tap laminate planks into place, ensuring a tight and even fit.
- Pull Bar: A pull bar is a tool used to gently pull laminate planks together, ensuring a tight and flush fit during installation.
- Spacer Blocks: Spacer blocks create uniform gaps between laminate planks, allowing for expansion and contraction due to changes in temperature and humidity. These gaps are crucial for preventing warping or buckling.
- Hammer: A hammer is used in conjunction with the tapping block to gently tap laminate planks into place. However, avoid using excessive force, as this can damage the planks.
- Crowbar: A crowbar is helpful for removing any existing baseboards or molding that might obstruct the installation process. It can also be used to pry up laminate planks if needed.
- Safety Glasses: Safety glasses are essential to protect your eyes from flying debris during cutting and installation.
Tools for Transition Strips and Molding
Transition strips and molding help create a seamless and aesthetically pleasing finish at doorways, transitions between flooring types, and along walls. For these tasks, you will need:
- Transition Strips: Transition strips connect different types of flooring, such as laminate and tile, creating a smooth transition between areas. Choose transition strips that match the style and color of the flooring.
- Molding: Molding adds a decorative and finishing touch to the perimeter of the laminate flooring. Select molding that complements the style of the room and the flooring.
- Miter Saw: A miter saw, with its precise cutting capabilities, is ideal for cutting molding and transition strips at precise angles. It allows for creating clean and professional-looking corners.
- Nail Gun: A nail gun is a convenient and efficient tool for securing molding and transition strips to the subfloor or wall. Choose a nail gun that is appropriate for the materials being used.
- Level: A level ensures that the molding and transition strips are installed straight and flush, creating a professional finish.
While this list provides a comprehensive overview of the essential tools, the specific requirements may vary based on the complexity of the project and individual preferences. Always research and choose tools that are suitable for the materials being used and the type of installation being performed. This ensures safety, efficiency, and a professional outcome for your laminate flooring project.

How To Install Laminate Flooring On Your Own Diy Hq Longwood Fl

Guide To Fitting Laminate Up 50 Off Free Samples

The Laminate Flooring Tools Needed For Installing This

See Which Laminate Flooring Tools And Cutters I Have In My Kit

8 Essential Tools For Laminate Flooring Installations The Family Handyman

Pergo Wheaton Oak Our Basement Bar Laminate Flooring Construction2style

Tools Needed To Install Laminate Flooring Find The Home Pros

5 Diffe Tools You Can Use To Cut Laminate Flooring

Laminate Flooring Checklist Finfloor

Guide To Installing Laminate Flooring Diy Family Handyman
Related Posts