Vinyl Flooring Stair Nose Installation: A Comprehensive Guide
Vinyl flooring has become a popular choice for homeowners due to its durability, affordability, and aesthetic versatility. When extending vinyl flooring onto staircases, the installation of stair noses is a crucial step. Stair noses provide a finished edge, improve safety by offering a defined tread, and protect the flooring material from wear and tear at the point of highest impact. This article will provide a detailed guide to the installation of vinyl flooring stair noses, covering preparation, methods, and best practices.
Before commencing the installation, proper planning and preparation are essential. This involves assessing the staircase, selecting the appropriate stair nose profile, and gathering the necessary tools and materials. A thorough approach at this stage will significantly impact the quality and longevity of the finished staircase.
Preparation and Assessment
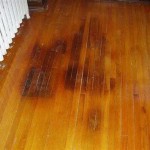
The initial step is to thoroughly inspect the existing staircase. Identify any unevenness, damage, or structural issues that need to be addressed before installing the vinyl flooring and stair noses. A solid and level subfloor is paramount for a successful installation. If the subfloor is wood, ensure it is securely fastened and free from rot or warping. Concrete subfloors should be level and free from cracks or debris. Any imperfections must be rectified with leveling compounds or shims before proceeding.
Next, measure the width of each stair tread. This measurement is critical for selecting the correct length of stair noses. It is advisable to measure each tread individually, as slight variations in width may exist, especially in older homes. Purchase stair noses that are slightly longer than the widest tread to allow for precise trimming during installation. The depth or overhang of the stair nose is also a consideration. Standard overhangs range from 1 to 1.5 inches, but the specific dimension should be selected based on aesthetic preference and building codes.
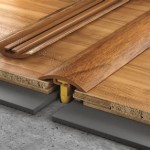
Choosing the right type of stair nose is also crucial. Stair noses are available in various materials, including vinyl, wood, and metal. When installing vinyl flooring, it is generally recommended to use vinyl stair noses that match or complement the floor's color and style. Vinyl stair noses are durable, water-resistant, and provide a seamless transition between the flooring and the stair edge. Consider the profile of the stair nose as well. Common profiles include bullnose, square nose, and overlap nose. The choice depends on the flooring thickness, the desired aesthetic, and the existing staircase design.
Gather all necessary tools and materials before beginning the installation. This typically includes:
- Stair noses
- Vinyl flooring
- Measuring tape
- Pencil
- Circular saw or miter saw
- Construction adhesive
- Caulk gun
- Level
- Rubber mallet
- Safety glasses
- Hearing protection
- Trowel (for applying adhesive)
- Clamps (optional)
Ensure all tools are in good working condition and that you are familiar with their proper use. Safety glasses and hearing protection are essential for protecting yourself during the cutting and installation process.
Installation Methods and Techniques
The installation process can vary slightly depending on the type of stair nose and the specific vinyl flooring being used. However, the following steps outline a general procedure for installing vinyl flooring stair noses:
Step 1: Prepare the Stair Tread
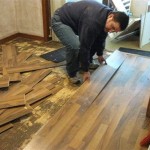
Clean the stair tread thoroughly to remove any dust, dirt, or debris. Use a broom or vacuum cleaner to remove loose particles, followed by a damp cloth to wipe the surface clean. Ensure the tread is completely dry before proceeding. If you are installing new vinyl flooring on the tread, do so before installing the stair nose. This ensures the stair nose overlaps the flooring, providing a secure and professional finish. Apply adhesive to the tread according to the manufacturer's instructions, and carefully place the vinyl flooring, pressing it firmly into place. Allow the adhesive to cure completely before moving on to the next step.
Step 2: Cut the Stair Nose to Size
Using the measurements taken earlier, mark the stair nose at the required length. Use a circular saw or miter saw to make a precise cut. When cutting, ensure the stair nose is properly supported to prevent chipping or splintering. It is advisable to make a slightly longer cut initially and then fine-tune the length as needed. After cutting, smooth any rough edges with sandpaper or a file.
Step 3: Apply Adhesive to the Stair Nose
Apply a generous bead of construction adhesive to the underside of the stair nose, focusing on the areas that will make contact with the stair tread and riser. Use a trowel to spread the adhesive evenly, ensuring complete coverage. Avoid applying too much adhesive, as this can cause it to squeeze out from under the stair nose during installation, creating a mess. Follow the adhesive manufacturer's instructions for application and curing times.
Step 4: Position and Secure the Stair Nose
Carefully position the stair nose on the stair tread, aligning it with the edge of the vinyl flooring. Ensure the stair nose overhangs the tread by the desired amount. Press the stair nose firmly into place, applying even pressure along its entire length. Use a rubber mallet to gently tap the stair nose, ensuring it is fully seated and bonded to the tread. If necessary, use clamps to hold the stair nose in place while the adhesive cures. This is particularly helpful for staircases with irregular shapes or uneven surfaces.
Step 5: Clean Excess Adhesive
After installing the stair nose, immediately clean any excess adhesive that has squeezed out from under the edges. Use a damp cloth or the adhesive manufacturer's recommended solvent to remove the adhesive. Allowing the adhesive to dry can make removal significantly more difficult.
Step 6: Caulk the Edges (Optional)
For enhanced aesthetics and to prevent moisture from penetrating under the stair nose, consider applying a bead of caulk along the edges where the stair nose meets the vinyl flooring and the riser. Use a caulk that is compatible with vinyl and paintable, if desired. Apply the caulk smoothly and evenly, and use a wet finger or a caulking tool to create a neat, professional finish.
Step 7: Allow Adhesive to Cure
Allow the adhesive to cure completely before using the staircase. Refer to the adhesive manufacturer's instructions for the recommended curing time. Typically, this is at least 24 hours. Avoid walking on the staircase during the curing period to prevent the stair noses from shifting or becoming dislodged.
Addressing Common Challenges
Several challenges may arise during the installation of vinyl flooring stair noses. Addressing these issues proactively can prevent delays and ensure a successful outcome.
Uneven Stair Treads: If the stair treads are significantly uneven, it may be necessary to use shims to level them before installing the vinyl flooring and stair noses. Shims can be placed under the vinyl flooring to create a level surface. Alternatively, self-leveling compounds can be used to fill in low spots and create a smooth substrate.
Difficult Cuts: Cutting stair noses to fit around curved or irregular staircases can be challenging. In such cases, it may be necessary to use a template to accurately trace the shape of the stair tread onto the stair nose. Use a jigsaw or coping saw to make precise cuts along the traced lines. Take your time and make multiple passes if necessary to avoid chipping or damaging the stair nose.
Adhesive Issues: Selecting the right adhesive is critical for a successful installation. Use a construction adhesive that is specifically designed for bonding vinyl to wood or concrete. Ensure the adhesive is compatible with the vinyl flooring and stair nose materials. Follow the manufacturer's instructions carefully, and allow the adhesive to cure completely before using the staircase. If you experience issues with adhesive not bonding properly, clean the surfaces thoroughly and reapply the adhesive.
Loose Stair Noses: If the stair noses become loose after installation, check the adhesive for proper bonding. If the adhesive has not cured properly, allow more time for it to dry. If the adhesive is fully cured but the stair nose is still loose, it may be necessary to remove the stair nose, apply fresh adhesive, and re-secure it. Use clamps to hold the stair nose in place while the adhesive cures.
By following these guidelines and addressing common challenges proactively, homeowners can successfully install vinyl flooring stair noses, enhancing the safety, durability, and aesthetics of their staircases. Proper planning, careful execution, and attention to detail are key to achieving a professional and long-lasting result.

How To Install Vinyl Plank Flooring On Stairs

Vinyl Flooring Stair Nosing Installation For Safety And Style Melbourne

How To Install Lvp Or Laminate Stair Nose

The Comprehensive Guide To Stair Nose Treads And Flooring Harm D R

How To Install Vinyl Plank Flooring On Stairs In 6 Steps

Pros And Cons Of Installing Vinyl Flooring On Stairs Lx Hausys

Installing Stair Nose For Diy Installation Tampa Bay Fl

How To Make A Vinyl Plank Stair Nosing

Project Source 1 88 In X 78 7 32 Delft Finished Vinyl Overlap Stair Nosing The Department At Com

Standard Wrap Around Stair Nosing Proper Floors
Related Posts