Tools Required for Successful Wooden Flooring Installation
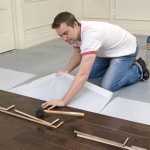
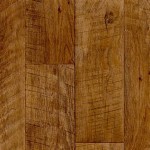
Installing wooden flooring, whether solid hardwood, engineered wood, or laminate, is a significant home improvement project that can enhance the aesthetics and value of a property. Successful installation hinges not only on the quality of the flooring material but also on having the right tools. Utilizing the appropriate tools ensures precision, efficiency, and a professional-looking finish. This article outlines the essential tools needed for a smooth and successful wooden flooring installation, grouped by category to facilitate organization and understanding.
Essential Measuring and Marking Tools
Precise measurements are paramount for accurate cuts and a seamless flooring layout. Inaccurate measurements can lead to material waste, uneven gaps, and an unprofessional-looking result. The following tools are indispensable for accurate measurement and marking:
Tape Measure: A durable tape measure, preferably one that extends at least 25 feet, is crucial for determining the dimensions of the room and marking cutting lengths. Choose a tape measure with a wide blade for increased stability, especially when taking long measurements. A tape measure with both metric and imperial units can be beneficial depending on the project requirements.
Measuring Square: A measuring square, also known as a speed square or combination square, is essential for ensuring right angles when cutting boards. It helps in creating precise, square edges and is particularly useful for marking cut lines on flooring planks. A combination square can also be used to measure depth and height, adding to its versatility.
Chalk Line: A chalk line is used to create long, straight lines for marking cut lines or indicating reference points on the subfloor. It consists of a reel containing chalked string. When the string is pulled taut and snapped against the surface, it leaves a clear, visible chalk line. This is especially useful for marking long, straight lines for the first row of flooring.
Pencil: A standard carpenter's pencil is necessary for marking cut lines, reference points, and identifying specific boards. Choose a pencil with a medium-hard lead that provides a clear, visible mark without smudging easily. A mechanical pencil may also be used for greater precision.
Level: A level is essential for ensuring that the subfloor is even and that the flooring is installed on a level surface. Uneven subfloors can lead to squeaks, uneven wear, and an unstable finished floor. Both a standard spirit level and a longer level (at least 4 feet) are useful for checking the flatness of the subfloor and the finished flooring.
Cutting and Shaping Tools
Accurate and clean cuts are crucial for a professional-looking flooring installation. The appropriate cutting and shaping tools allow for precise adjustments and minimize material waste. These tools are designed for both straight cuts and intricate shaping around obstacles.
Circular Saw: A circular saw is a powerful tool used for making long, straight cuts through flooring planks. It is essential for cutting boards to the required length and ripping boards to the correct width. Choosing a circular saw with a sharp blade designed for wood flooring is crucial for achieving clean, splinter-free cuts. A cordless circular saw offers greater maneuverability and convenience.
Miter Saw: A miter saw, also known as a chop saw, is used for making precise angled cuts, such as those needed for corners and doorways. It allows for accurate and repeatable cuts at various angles, ensuring a seamless and professional finish. A compound miter saw can make both bevel and miter cuts, providing even greater versatility. This is especially useful for complex room shapes or intricate trim work.
Jigsaw: A jigsaw is used for making curved or irregular cuts, such as those needed to fit around pipes, door frames, or other obstacles. It employs a reciprocating blade that moves up and down to cut through the material. A jigsaw with variable speed control allows for greater precision and control, particularly when cutting delicate materials. A jigsaw with orbital action can speed up cutting but may sacrifice some precision.
Utility Knife: A utility knife with a sharp, replaceable blade is useful for scoring flooring planks before snapping them, as well as for trimming underlayment and vapor barriers. It can also be used for fine-tuning cut edges and removing excess adhesive. Always use a safety knife with a retractable blade to minimize the risk of injury.
Hand Saw: While power tools are generally preferred for efficiency and precision, a hand saw can be useful for making small, intricate cuts or for situations where power tools are not practical. A backsaw is particularly useful for making precise cuts in trim and molding.
Installation and Fastening Tools
Securing the flooring planks to the subfloor requires specialized tools that ensure a tight, uniform, and stable installation. The choice of fastening method depends on the type of flooring being installed and the subfloor material. These tools are designed to minimize damage to the flooring and provide a secure, long-lasting bond.
Tapping Block: A tapping block is a small, rectangular block made of wood or plastic that is used to gently tap the flooring planks into place without damaging the edges. It helps to create tight joints between the planks and ensures a uniform surface. A tapping block with a tongue-and-groove profile is particularly useful for installing click-lock flooring systems.
Pull Bar: A pull bar is a tool used to pull the last row of flooring planks into place, especially in areas where there is limited space for maneuvering. It hooks onto the edge of the plank and provides leverage for pulling it tight against the adjacent row. A pull bar is essential for achieving a tight, seamless finish along walls and other obstructions.
Rubber Mallet: A rubber mallet is used to gently tap the tapping block or pull bar, applying force without damaging the flooring. It provides a softer impact than a steel hammer, minimizing the risk of dents or scratches. A rubber mallet with a comfortable grip is recommended for prolonged use.
Nail Gun or Stapler: For solid hardwood flooring, a nail gun or stapler specifically designed for flooring installation is often used to secure the planks to the subfloor. These tools drive nails or staples at a consistent angle and depth, ensuring a secure and uniform fastening. The choice between a nail gun and a stapler depends on personal preference and the type of flooring being installed. A pneumatic nail gun or stapler requires an air compressor.
Floor Scraper: A floor scraper is used to remove old adhesive, paint, or other debris from the subfloor before installing the new flooring. It consists of a long handle and a sharp blade that is used to scrape the surface clean. A floor scraper is essential for preparing the subfloor and ensuring proper adhesion of the new flooring.
Subfloor Preparation Tools
The subfloor is the foundation for the new flooring, and its condition directly impacts the quality and longevity of the finished floor. Proper subfloor preparation is critical for ensuring a stable, level, and moisture-resistant surface. These tools are used to clean, level, and prepare the subfloor for the new flooring installation.
Shop Vacuum: A shop vacuum is essential for cleaning the subfloor before installing the underlayment and flooring. It removes dust, debris, and other contaminants that can interfere with adhesion and create an uneven surface. A shop vacuum with a hose and various attachments is recommended for accessing hard-to-reach areas.
Sandpaper and Sanding Block: Sandpaper and a sanding block are used to smooth out any imperfections in the subfloor, such as raised edges or rough spots. This helps to create a level and uniform surface for the underlayment and flooring. Different grits of sandpaper may be needed for different types of imperfections.
Self-Leveling Compound: Self-leveling compound is used to correct minor imperfections in the subfloor, such as dips or uneven areas. It is a cement-based mixture that flows freely and self-levels to create a smooth, even surface. Self-leveling compound is essential for ensuring a level and stable foundation for the new flooring.
Moisture Meter: A moisture meter is used to measure the moisture content of both the subfloor and the flooring planks. Excessive moisture can lead to warping, cupping, and other problems. A moisture meter is essential for ensuring that both the subfloor and the flooring are within acceptable moisture levels before installation.
Safety Equipment
Safety is paramount when undertaking any home improvement project. Protecting oneself from potential hazards is crucial for preventing injuries and ensuring a safe working environment. The following safety equipment is essential for wooden flooring installation:
Safety Glasses: Safety glasses protect the eyes from flying debris, such as sawdust and wood splinters. Always wear safety glasses when cutting, sanding, or hammering.
Hearing Protection: Power tools can generate significant noise levels that can damage hearing over time. Wear earplugs or earmuffs to protect your hearing.
Dust Mask or Respirator: Cutting and sanding wood can create a significant amount of dust, which can irritate the lungs and respiratory system. Wear a dust mask or respirator to protect your respiratory health.
Gloves: Gloves protect the hands from cuts, splinters, and abrasions. Choose gloves that provide a good grip and allow for dexterity.
Knee Pads: Installing flooring often requires prolonged kneeling, which can put strain on the knees. Knee pads provide cushioning and support, reducing discomfort and preventing injuries.

List Of Tools Equipment Needed To Install Hardwood Flooring

How To Install Wood Flooring Lowe S

6 Steps To Installing Laminate Flooring Do It Best

How To Lay Laminate Flooring 2024 Step By Guide Esb

How To Install Wood Flooring Lowe S

Tools For Laying Services

Wood Installation Tools

8 Essential Tools For Laminate Flooring Installations The Family Handyman

How To Install An Engineered Hardwood Floor

How To Lay Vinyl Flooring
Related Posts