Tips For Hardwood Floor Installation
Hardwood flooring offers a timeless elegance and durability that can enhance any home. While professional installation is often preferred, it is possible for skilled homeowners to tackle this project themselves. To ensure a successful hardwood floor installation, careful planning and attention to detail are crucial. This article will outline essential tips for achieving a professional-looking and long-lasting hardwood floor.
1. Planning and Preparation
A successful hardwood floor installation starts with meticulous planning and preparation. Begin by carefully measuring the area where the flooring will be installed. Determine the exact square footage needed to ensure you purchase enough material. Consider the direction of the wood planks, aligning them with the longest length of the room for a more spacious appearance.
Next, prepare the subfloor. Ensure it is level, smooth, and free from any defects that may hinder the installation. This could involve filling in gaps or sanding down high spots. Also, consider the moisture content of the subfloor, as excessive moisture can lead to warping or damage.
2. Acclimate the Hardwood Flooring
Before embarking on the installation, acclimate the hardwood flooring to the environment. This involves storing the boards in the room where they will be installed for at least 48 hours, allowing them to adjust to the local humidity and temperature. Acclimation helps prevent warping or expansion after installation.
The acclimation process is essential, especially for solid hardwood flooring. Engineered hardwood flooring is generally less susceptible to moisture changes, but it's still a good practice to acclimate it to the environment.
3. Select the Right Tools
To achieve professional results, having the right tools is crucial. Invest in or rent the following tools:
- Circular saw or table saw
- Measuring tape and pencil
- Hammer and nail gun
- Wood glue
- Floor scraper
- Utility knife
- Tape measure
- Level
- Safety glasses
- Knee pads
The specific tools needed may vary depending on the type of hardwood flooring and installation method chosen.
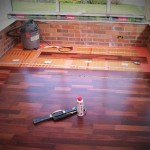
4. Lay the First Row of Hardwood Flooring
Start the installation by laying the first row of hardwood flooring along the longest wall of the room. This row should be level and straight, serving as a reference point for the remaining boards. Use spacers to ensure that the boards are spaced correctly for expansion and contraction.
If the wall is not perfectly straight, you may need to cut the first row of boards to fit snugly against the wall. Use a pencil to mark the desired length and then cut the boards using a circular saw or a table saw.
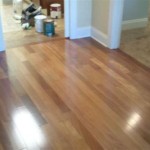
5. Installing Subsequent Rows of Hardwood Flooring
Once the first row is installed, the rest of the boards are laid in a staggered pattern, overlapping the end joints from the previous rows. This staggered pattern, known as a "brick pattern," helps prevent the floor from looking too uniform and reduces the risk of gaps or cracks.
Align the boards carefully and use a rubber mallet to tap them into place. Be sure to apply a bead of wood glue to the tongue of each board before connecting it to the groove of the previous board. Wood glue helps create a strong bond between the boards.
6. Finishing Touches
Once the hardwood flooring is installed, the final step is to apply a finish. This can involve using a sealant, a stain, or both. A sealant will help protect the wood from scratches, stains, and moisture. A stain can alter the color of the wood, creating a customized look.
The type of finish you choose will depend on your personal preference and the desired look and feel of your hardwood floor. Consider the traffic level in the room, as well as the type of wood used.

Tips For Diy Hardwood Floors Installation She Wears Many Hats

5 Common Hardwood Flooring Installation Mistakes And How To Avoid Them Scvfloorsmith

Top Tips For Preparing To Install Hardwood Flooring

How To Install Wood Flooring Diy Kährs

Tips Tools And Techniques For A Flawless Hardwood Floor Installation Panel Town Floors

Hardwood Flooring On A Budget Tips For Affordable Options And Installation Ottawa Diamond

Sub Flooring Installation Tips When Using Hardwood West Fraser Integrated Forestry Company

Tips For Diy Hardwood Floors Installation She Wears Many Hats

Installing Hardwood Timber Floors Tips To Make The Job Go Easier Better Flooring

Essential Hardwood Floor Installation Tips For Homeowners
Related Posts