Staggering laminate flooring is an important aspect of any DIY flooring project. It provides a professional looking finish to your flooring and makes it look much more appealing than if the planks were laid in a straight line. In this article, we’ll discuss the technique of staggering laminate flooring, why it’s important, and how to achieve the best results.
Why Stagger Laminate Flooring?
Staggering laminate flooring is important for a number of reasons. It helps to reduce the appearance of seams in the floor, which can be noticeable when the planks are laid in a straight line. It also helps to strengthen the floor, as the staggered pattern prevents the planks from shifting when they expand and contract due to changes in temperature and humidity.
Another benefit of staggering laminate flooring is that it helps to reduce the number of cut pieces that are needed. This can save time and money, as cut pieces are generally more expensive than full-length planks.
How to Stagger Laminate Flooring
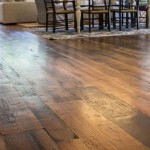
The technique of staggering laminate flooring is relatively simple. The basic rule is to stagger the end joints of each plank by at least 8 inches. This means that the end of one plank should not line up with the end of the next plank, but should instead be offset by at least 8 inches. It’s also important to avoid having two planks with the same pattern line up next to each other.
When starting a new row, it’s important to offset the end joints of the first and last plank by at least 8 inches. This will help create an even pattern throughout the room. To ensure that the planks lock together correctly, it’s important to use the manufacturer’s recommended installation tools and techniques.
Tips for Staggering Laminate Flooring
To achieve the best results when staggering laminate flooring, it’s important to plan ahead. Before starting the installation process, it’s a good idea to lay out the planks in the room and measure the distances between the end joints. This will help to ensure that the pattern is even and that the planks lock together correctly.
It’s also important to leave a gap of at least 1/4 inch between the walls and the planks. This gap will allow the flooring to expand and contract with changes in temperature and humidity.
Conclusion
Staggering laminate flooring is an important aspect of any DIY flooring project. It helps to reduce the appearance of seams, strengthens the floor, and reduces the number of cut pieces that are needed. When staggering laminate flooring, it’s important to follow the manufacturer’s instructions and stagger the end joints of each plank by at least 8 inches. With the right tools and techniques, it’s possible to create a professional looking finish that is sure to impress.

![How to Stagger Laminate Flooring? [Step by Step Guide]](https://i2.wp.com/www.impressiveinteriordesign.com/wp-content/uploads/2021/06/rubb.jpg)

:max_bytes(150000):strip_icc()/Installing-Laminate-Stagger-Joints-56a49e453df78cf772834b1f.JPG)


:max_bytes(150000):strip_icc()/Installing-Laminate-Eyeballing-Layout-56a49d075f9b58b7d0d7d693.JPG)


Related Posts