Replacing Carpet with Vinyl Flooring: A DIY Guide
Replacing carpet with vinyl flooring is a popular home improvement project. Vinyl flooring offers durability, water resistance, and a wide range of aesthetic options, making it an attractive alternative to carpet. While professional installation is always an option, a competent DIY enthusiast can achieve excellent results with careful planning and execution. This article provides a comprehensive guide to undertaking this project, outlining the necessary steps, tools, and considerations.
Preparing for the Project: Assessment and Planning
Before commencing the installation, a thorough assessment of the existing space is crucial. This involves evaluating the subfloor, measuring the room, and selecting the appropriate vinyl flooring material. The success of the project hinges on meticulous preparation.
The first step is to remove the existing carpet. This typically involves cutting the carpet into manageable sections with a utility knife. Be cautious when cutting to avoid damaging the subfloor. Once cut, roll up each section and secure it for disposal. After the carpet is removed, the tack strips along the perimeter of the room must be carefully pried up. Use a pry bar and protect the wall baseboards with a piece of wood to prevent damage. Remove any staples or nails remaining in the subfloor using pliers or a nail puller. Wear gloves to protect your hands from sharp objects.
Next, inspect the subfloor for any imperfections. Vinyl flooring requires a smooth, level surface. Common issues include cracks, holes, and unevenness. Concrete subfloors may have cracks that require patching, while wood subfloors may have loose or damaged boards that need repair or replacement. Use a self-leveling compound to address minor imperfections in concrete subfloors. For wood subfloors, use wood filler to fill small holes and sand it smooth. Larger holes or damaged sections require patching with new plywood. Ensure that any replacement boards are the same thickness as the existing subfloor.
Measuring the room accurately is essential for ordering the correct amount of vinyl flooring. Measure the length and width of the room at the longest points. Add a waste factor of at least 10% to account for cuts and errors. For rooms with irregular shapes or alcoves, divide the space into smaller rectangles and calculate the area of each. Sum the areas to determine the total square footage needed. It is always better to overestimate slightly than to underestimate, as running out of flooring mid-project can cause significant delays and inconsistencies.
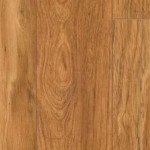
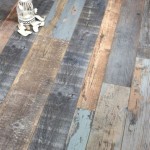
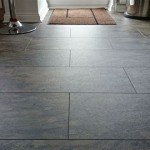
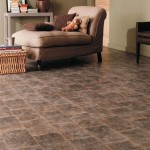
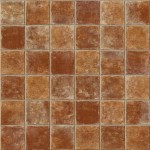
Selecting the right type of vinyl flooring is another critical decision. Vinyl flooring comes in various formats, including sheet vinyl, vinyl tile, and vinyl plank. Sheet vinyl offers a seamless appearance but can be more challenging to install. Vinyl tile is available in peel-and-stick or glue-down options and is easier to handle. Vinyl plank mimics the look of hardwood and comes in click-lock or glue-down varieties. Consider factors such as foot traffic, moisture levels, and aesthetic preferences when choosing the flooring material. Luxury vinyl plank (LVP) and luxury vinyl tile (LVT) offer enhanced durability and realistic appearances, making them popular choices.
Before starting the installation, allow the vinyl flooring to acclimate to the room's temperature and humidity for at least 48 hours. This prevents expansion and contraction issues after installation. Stack the boxes of flooring in the room where they will be installed, ensuring they are not exposed to direct sunlight or extreme temperatures.
Tools and Materials Required for the Installation
Having the right tools and materials on hand will streamline the installation process and ensure a professional finish. Assemble all necessary items before beginning the project. A well-prepared workspace contributes significantly to the overall efficiency and quality of the installation.
Essential tools include a utility knife with sharp blades, a measuring tape, a straight edge or T-square, a rubber mallet, a tapping block, a spacer kit, a pencil, and a moisture meter. The utility knife is used for cutting the vinyl flooring to size. A sharp blade ensures clean cuts and prevents tearing. The measuring tape and straight edge are used for accurate measurements and markings. A rubber mallet and tapping block are used to engage the click-lock mechanisms of vinyl plank flooring without damaging the edges. A spacer kit ensures consistent gaps between the flooring and the walls, allowing for expansion and contraction. A pencil is used for marking cut lines. A moisture meter is crucial for assessing the moisture content of the subfloor, particularly in concrete subfloors. High moisture levels can compromise the adhesive bond and lead to flooring failures.
In addition to the essential tools, specific materials are required for the installation. These include the vinyl flooring itself, adhesive (if using glue-down flooring), underlayment (if required), seam sealer (for sheet vinyl), baseboards or quarter-round molding, and fasteners (nails or screws) for the baseboards. The type of adhesive will depend on the specific type of vinyl flooring being installed. Follow the manufacturer's recommendations for adhesive selection and application. Underlayment provides additional cushioning and sound insulation, and is often recommended for concrete subfloors. Seam sealer is used to create a waterproof seal at the seams of sheet vinyl. Baseboards or quarter-round molding are used to cover the expansion gaps around the perimeter of the room. Select fasteners that are appropriate for the type of wall material.
Safety gear is also essential. Wear safety glasses to protect your eyes from dust and debris. Wear knee pads to protect your knees during prolonged periods of kneeling. Wear gloves to protect your hands from sharp objects and adhesives. Consider using a dust mask or respirator to protect yourself from dust and fumes, especially when working with adhesives or cutting materials.
The Installation Process: Laying the Vinyl Flooring
The actual installation process varies depending on the type of vinyl flooring being used. However, the fundamental principles of starting with a straight line, maintaining consistent spacing, and securing the flooring properly remain the same. Patience and attention to detail are crucial for achieving a satisfactory result.
For sheet vinyl, begin by unrolling the sheet vinyl and positioning it in the room, allowing for excess material around the perimeter. Carefully trim the excess material using a utility knife, leaving a small gap between the flooring and the walls. Use a seam roller to ensure the flooring is flat and free of air bubbles. Apply seam sealer to the seams according to the manufacturer's instructions. Finally, install baseboards or quarter-round molding to cover the expansion gaps.
For vinyl tile (peel-and-stick), ensure the subfloor is clean, dry, and free of debris. Peel off the backing from the first tile and carefully position it in the corner of the room. Press firmly to ensure a good adhesive bond. Continue laying tiles, maintaining consistent spacing between them. Use a utility knife to cut tiles to fit around obstacles or along the edges of the room. Install baseboards or quarter-round molding to cover the expansion gaps.
For vinyl tile (glue-down), apply adhesive to the subfloor using a notched trowel, following the manufacturer's instructions. Allow the adhesive to become tacky before laying the first tile. Carefully position the tile and press firmly to ensure a good adhesive bond. Continue laying tiles, maintaining consistent spacing between them. Use a utility knife to cut tiles to fit around obstacles or along the edges of the room. Roll the installed tiles with a floor roller to ensure even adhesion. Install baseboards or quarter-round molding to cover the expansion gaps.
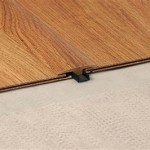
For vinyl plank (click-lock), start in one corner of the room and lay the first plank with the tongue side facing the wall. Use spacers to maintain a consistent gap between the wall and the plank. Connect the second plank to the first by angling the tongue of the second plank into the groove of the first and pressing down until it locks into place. Continue laying planks in the first row. When you reach the end of the row, measure the remaining space and cut a plank to fit, using a utility knife. Start the second row by cutting a plank in half to create a staggered pattern. This enhances the aesthetic appeal and provides structural stability. Connect the planks in the second row to the first row, ensuring the click-lock mechanisms engage properly. Use a rubber mallet and tapping block to gently tap the planks together if necessary. Continue laying planks, row by row, until the entire floor is covered. Install baseboards or quarter-round molding to cover the expansion gaps.
Throughout the installation process, regularly check for alignment and levelness. Use a level to ensure the flooring is flat and even. If any issues are detected, correct them immediately to prevent problems later on. Take breaks as needed to avoid fatigue and maintain focus. Rushing the installation can lead to errors and a subpar finish.

How To Remove Carpet And Install Vinyl Flooring Duralux Luxury Plank Lvp Over Concrete

Diy Vinyl Flooring How To Replace Carpet With Easy Affordable Transformation

Carpet To Vinyl Plank Transition Made Easy Step By Tutorial

Installing Vinyl Plank Flooring Over Carpet Padding

Diy Vinyl Flooring To Replace Carpet Nursery Makeover Nashville Wifestyles

Rv Slide Out Woven Vinyl Flooring Install Carpet Replacement Easy Diy Upgrade

Easiest 5 Diy Flooring Solutions Learn To Install On Your Own

Diy Vinyl Flooring To Replace Carpet Nursery Makeover Nashville Wifestyles

How To Install Vinyl Plank Flooring As A Beginner Home Renovation

The Best Vinyl Flooring For Over Carpet
Related Posts