Vinyl flooring is a popular choice for homeowners looking for a durable and affordable flooring option. Vinyl floors are easy to maintain and can last for years, making them a great choice for busy households. However, if your vinyl flooring ever gets damaged, you may need to patch it. Patching vinyl flooring can be a tricky task, but with the right tools and techniques, you can get the job done quickly and easily.
1. Assess the Damage
The first step in patching your vinyl flooring is to assess the damage. Take a close look at the area and determine the extent of the damage. If the damage is minor, such as a few scratches or small gouges, then a simple patch may be all you need. However, if the damage is more extensive, you may need to replace part of the floor. In this case, you should consider contacting a professional flooring contractor for assistance.
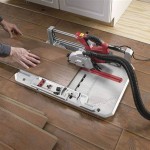
2. Gather Your Supplies
Once you’ve assessed the damage, you’ll need to gather the necessary supplies for patching your vinyl floor. You’ll need a few basic tools, such as a utility knife, a putty knife, a hammer, and a screwdriver. You’ll also need a patch kit, which should include the vinyl patch material, adhesive, and a small brush. Make sure to read the instructions on the patch kit carefully to ensure you have all the supplies you need.
3. Prepare the Area
Before you apply the patch, you’ll need to prepare the area. Use the utility knife to clean up any jagged edges or rough spots on the floor. Then, use the putty knife to scrape away any dirt or debris. Once the area is free of dirt and debris, you can apply the patch.
4. Apply the Patch
Once the area is prepared, you can apply the patch. Use the brush to apply the adhesive to the back of the patch. Then, press the patch firmly into the hole or gouge. Use the hammer to tap the patch into place. Make sure to press firmly and evenly to ensure a secure fit. Allow the patch to dry for at least 24 hours before walking on it.
5. Sand and Paint
Once the patch is dry, you can sand it to make it flush with the surrounding area. Use a medium-grit sandpaper and sand it in a circular motion. Once the patch is smooth, you can use a touch-up paint to cover any remaining imperfections. Make sure to use a paint that matches the color of your floor.
6. Clean Up
Once the patch is complete and the paint is dry, you can clean up the area. Use a damp cloth to remove any dust or debris. Then, use a vacuum to pick up any remaining dirt or debris. Once the area is clean, you can enjoy your newly patched vinyl floor.
7. Conclusion
Patching your vinyl flooring can be a tricky task, but with the right tools and techniques, you can get the job done quickly and easily. Make sure to assess the damage before you begin, and gather the necessary supplies. Then, prepare the area, apply the patch, sand, and paint. Finally, clean up the area and enjoy your newly patched vinyl floor.


/vinyl-floor-mat-via-smallspaces.about.com-56f5c32f3df78c78418a1a10.jpg)


Related Posts