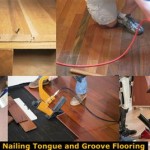
Nailing hardwood flooring can be a challenging task. It requires precision and skill to ensure you get the perfect finish. This guide will provide you with a step-by-step overview of the process, as well as tips and tricks for getting the best results. Read on to learn more about nailing hardwood flooring.
What You’ll Need
Before you get started, make sure you have the following materials and tools:
- Hardwood flooring boards
- Nails
- Hammer
- Measuring tape
- Pencil
- Vacuum cleaner
- Flooring adhesive
Preparing the Floor
Before you begin nailing down your hardwood flooring, you’ll need to prepare the surface. Start by vacuuming the area to get rid of any dirt and debris. Then, use a damp cloth to wipe down the floor and make sure it’s completely clean. Once the floor is clean, use a measuring tape to mark and measure the area you’ll be working in.
Nailing Down the Boards
Now it’s time to start nailing down the hardwood flooring boards. Start by laying down the first board, making sure it’s lined up with the measurements you marked earlier. Take a nail and hammer it into the board, making sure it’s firmly in place. Repeat this process for the other boards, making sure to keep the boards even and aligned.
Applying Adhesive
Once you’ve nailed down all the boards, you’ll need to apply adhesive to ensure they stay in place. Start by applying the adhesive to the boards with a trowel. Make sure to apply a thin layer of adhesive and spread it evenly. Once the adhesive has been applied, press down firmly on the boards to make sure they are properly adhered.
Finishing Touches
Once the adhesive has been applied and the boards are firmly in place, you can move on to the finishing touches. Start by using a vacuum cleaner to get rid of any excess dust and debris. Then, use a damp cloth to wipe down the floor and make any final adjustments to the boards. Finally, use a sealant to protect the wood and make sure the boards are completely secure.
Conclusion
Nailing hardwood flooring can be a challenging task, but with the right tools and techniques, you can get the perfect finish. This guide provided an overview of the process, as well as tips and tricks for getting the best results. Now that you know how to nail hardwood flooring, you’re ready to start your project!


/installing-hardwood-floor-155149312-57e967d45f9b586c35ade84a.jpg)


Related Posts