Are you looking for an easy and cost-effective way to update your home? Installing laminate flooring is a great option! Laminate flooring is a great option for busy households because it’s durable and easy to clean. Plus, you can easily install it yourself and save a few bucks in the process. This guide will walk you through the steps to install laminate flooring, from choosing the right type to the final touches.
1. Choose the Right Laminate Flooring
The first step to installing laminate flooring is to choose the right type for your home. There are many different types of laminate flooring, so you’ll want to consider factors like budget, style, and durability. You can also choose between different colors, textures, and thicknesses to find the perfect fit for your home.
2. Prepare the Floor
Once you’ve chosen the laminate flooring for your home, it’s time to prepare the floor. Start by removing any existing flooring such as carpet, tile, or vinyl. Make sure to get rid of any nails, staples, or other debris. Then, clean the surface and make sure it’s level.
3. Measure and Cut the Laminate Flooring
Once the floor is ready, you’ll need to measure and cut the laminate flooring to fit the space. Measure the length and width of the room and mark the measurements on the back of the laminate flooring. Then, use a saw to cut the pieces to the right size.
4. Install the Underlayment
Once the laminate flooring is cut to size, it’s time to install the underlayment. The underlayment will provide a cushion between the floor and the laminate flooring. You’ll want to make sure the underlayment is installed in the same direction as the laminate flooring.
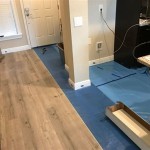
5. Install the Laminate Flooring
Once the underlayment is installed, you’re ready to start installing the laminate flooring. Start in one corner of the room and work your way out. Make sure to leave a gap between the wall and the flooring for expansion. Make sure the pieces are firmly pressed together and use a rubber mallet to make sure they’re secure.
6. Apply the Finishing Touches
Once the laminate flooring is installed, you’ll need to apply the finishing touches. Start by caulking any gaps between the wall and the flooring. You may also want to add transition strips to cover any gaps between different types of flooring. You can also use a flooring sealer to protect the floor from dirt and moisture.
7. Enjoy Your New Laminate Flooring!
You’re all done! You should now be able to enjoy your new laminate flooring. Make sure to regularly clean and maintain your floor to keep it looking great for years to come.


/how-to-lay-laminate-flooring-1822250-Final-e1fefff7d6d34e43ac59e4733738b472.png)


:max_bytes(150000):strip_icc()/how-to-lay-laminate-flooring-1822250-01-0b84ff37785a4f8b94ab8bd30c300bfb.jpg)

Related Posts