Installing Engineered Hardwood Flooring On Stairs
Installing engineered hardwood flooring on stairs can dramatically enhance a home's aesthetic appeal and value. While it presents a more complex installation than flooring a flat surface, careful planning and execution can yield professional-looking results. This article provides a comprehensive guide to installing engineered hardwood flooring on stairs, covering essential tools, materials, and step-by-step instructions.
1. Preparation and Planning
Before beginning the installation, thorough preparation is crucial. Acclimate the engineered hardwood flooring to the room's environment for at least 48-72 hours. This allows the wood to adjust to the temperature and humidity, minimizing the risk of expansion or contraction after installation. Measure the stair treads and risers accurately to determine the required amount of flooring. Adding 10% extra material is recommended to account for cuts and potential errors.Inspect the existing stairs for any damage or squeaks. Loose treads or risers should be secured, and any necessary repairs completed before proceeding. Ensure the subfloor underneath is clean, level, and free of debris.
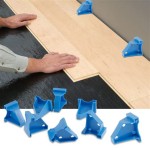
Choosing the right type of engineered hardwood is essential for stair installations. Opt for planks specifically designed for high-traffic areas, with a thicker wear layer for increased durability. Consider pre-finished options for a simpler installation process. Gather the necessary tools, including a miter saw, jigsaw, measuring tape, pencil, safety glasses, construction adhesive, wood glue, a nail gun or staple gun with appropriate fasteners, and a tapping block.
2. Installing the Risers
Installing the risers typically begins the process. Measure each riser individually, as slight variations can occur. Cut the engineered hardwood pieces to the precise dimensions of each riser using a miter saw for clean, straight edges. Apply construction adhesive to the back of the riser piece and firmly press it against the existing riser. Secure the riser further using a nail gun or staple gun, ensuring the fasteners are driven flush with the surface. Maintain consistent spacing between fasteners for optimal hold. Use a tapping block to ensure a tight fit against the tread and adjacent riser.
For a seamless look, consider pre-drilling nail holes to prevent the wood from splitting, especially with denser hardwood species. If using unfinished hardwood, sanding and finishing the risers is necessary after installation. Ensure proper ventilation during the finishing process.
3. Installing the Treads
Installing the treads requires precision and attention to detail. Measure each tread carefully, accounting for any overhang or nosing. Cut the engineered hardwood pieces to the correct size and shape using a miter saw or jigsaw. If using a nosing, install it first before placing the tread piece. Apply construction adhesive to the top of the riser and the subfloor where the tread will sit. Carefully position the tread onto the adhesive, ensuring a tight fit against the riser and adjacent tread.
Secure the tread with a nail gun or staple gun, driving the fasteners at an angle through the tongue and into the subfloor. This technique hides the fasteners and ensures a more secure hold. Use a tapping block to ensure the tread is flush with the riser and adjacent tread. Repeat this process for each tread, maintaining consistency in spacing and alignment.
For stairs with complex shapes or curves, custom cutting and fitting may be required. In such cases, using templates can help ensure accurate measurements and cuts. If installing engineered hardwood directly over concrete, use a concrete adhesive appropriate for wood flooring.
4. Finishing Touches
Once all the risers and treads are installed, inspect the staircase for gaps or imperfections. Fill any small gaps with wood filler and allow it to dry completely before sanding. If using unfinished hardwood, sand the entire staircase smooth and apply the desired finish according to the manufacturer's instructions. For pre-finished hardwood, minimal finishing work is required. Install stair nosing if not already done. This not only enhances the aesthetics but also protects the front edge of the treads from wear and tear.
Consider adding transitions between the staircase and the surrounding flooring to create a seamless look. These transitions can be made of wood, metal, or other materials and are designed to bridge the height difference between the flooring materials. Clean the staircase thoroughly to remove any dust or debris from the installation process. Regular cleaning and maintenance will help preserve the beauty and longevity of the engineered hardwood flooring on the stairs.

You Want To Install Hardwood On Stairs Reallyfloors America S Est Flooring

Cladding A Staircase With Engineered Wood Flooring And Beyond Blog

How To Install Wood Flooring On Stairs Esb

Engineered Wood Flooring Up Close With Mikasa Staircase Solution Blog By

Flooring For Stairs Hardwood Direct

How To Make Stair Treads With Prefinished Flooring And Floormade Nosing Rw Supply Design

How To Install Laminate Flooring On Stairs Direct Wood

Can You Put Hardwood Flooring On Stairs Ll

Can I Used Engineer Hardwood Floors On Rounded Stairs Doityourself Com Community Forums

Installing Engineered Wood Stair Risers And Treads Part 1
Related Posts