How To Replace Laminate Floors
Replacing laminate flooring is a manageable DIY project that can significantly enhance a room's appearance. This guide provides a comprehensive step-by-step process for replacing existing laminate flooring with new laminate planks.
1. Preparation and Planning
Proper preparation is crucial for a successful installation. Begin by accurately measuring the room's dimensions to determine the square footage of laminate flooring needed. Add 10% to this figure to account for cuts and waste. Next, gather the necessary tools and materials. These typically include a measuring tape, utility knife, pry bar, tapping block, pull bar, saw (circular saw or miter saw recommended), safety glasses, gloves, underlayment, and the new laminate flooring.
Ensure the subfloor is clean, level, and dry. Existing laminate flooring does not need to be removed if it is level and in good condition. However, if the subfloor is uneven, it may require leveling compound or additional underlayment. If installing over concrete, a moisture barrier should be installed to prevent moisture damage. Clean the subfloor thoroughly to remove any debris, dust, or old adhesive.
Acclimate the new laminate flooring by storing it in the room where it will be installed for at least 48 hours before installation. This allows the flooring to adjust to the room's temperature and humidity, minimizing the risk of expansion or contraction after installation.
2. Removing Existing Baseboards and Flooring (If Necessary)
If replacing existing laminate, carefully remove the baseboards using a pry bar. Take care not to damage the walls. Once the baseboards are removed, begin removing the old laminate flooring. Start at a corner and carefully pry up the planks. If the flooring is glued down, a floor scraper may be necessary to remove any remaining adhesive.
If the subfloor is damaged or uneven after removing old flooring, repair it as necessary before installing new laminate. This might involve filling in cracks or low spots with leveling compound or patching damaged areas. A smooth and level subfloor is essential for a stable and visually appealing finished floor.
3. Installing Underlayment
Underlayment is essential for laminate flooring. It provides cushioning, sound reduction, and a moisture barrier. Roll out the underlayment, ensuring the seams are butted together tightly and taped to prevent shifting. Trim the underlayment to fit the room, leaving a small gap around the perimeter. This gap allows the laminate flooring to expand and contract naturally without buckling.
The type of underlayment needed will depend on the subfloor and the specific requirements of the laminate flooring. Refer to the manufacturer's instructions for guidance on the appropriate underlayment.
4. Laying the Laminate Flooring
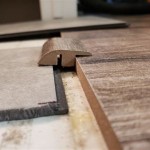
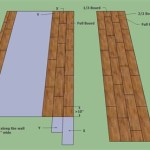
Begin laying the laminate flooring in a corner of the room, working from left to right. Insert the tongue of the first plank into the groove of the next plank at an angle, then lower it into place. Use a tapping block and hammer to gently tap the planks together, ensuring a tight fit. Continue laying the first row, ensuring consistent spacing between the wall and the flooring using spacers. This expansion gap is crucial to accommodate the natural expansion and contraction of the laminate.
Subsequent rows should be staggered to create a more visually appealing and structurally sound floor. Cut planks as necessary to fit around corners, doorways, and other obstacles. A miter saw or circular saw is recommended for clean and accurate cuts. Use a pull bar to tighten the planks in tight spaces where the tapping block cannot be used effectively.
Continue laying the laminate flooring row by row, ensuring a tight fit and consistent spacing. As you approach the final row, you will likely need to rip the planks to fit. Measure carefully and make precise cuts to achieve a professional finish.
5. Finishing Touches
Once the laminate flooring is installed, reinstall the baseboards. Use finishing nails to secure the baseboards to the wall, ensuring they are flush against the flooring. Fill any nail holes with wood filler and touch up with paint if necessary.
Finally, clean up the work area. Remove any debris, dust, or leftover materials. Inspect the flooring for any imperfections and make any necessary adjustments. Allow the flooring to settle for a few days before placing heavy furniture or rugs on it.

How To Install Laminate Flooring For Beginners

How To Install Laminate Flooring Forbes Home

3 Ways To Repair Laminate Flooring Wikihow

How To Easily Replace A Damaged Laminate Floor Plank Interior Design Wonderhowto

How To Replace Laminate Floor In Your House Thediyplan

How To Remove Laminate Flooring Bob Vila

Laminate Flooring Installation A Step By Guide

How To Install A Laminate Floor Lv Hardwood Flooring Toronto

How To Repair Laminate Flooring The Home Depot

Laminate Floor Repair Diy Family Handyman
Related Posts