How to Repair Vinyl Plank Flooring Seams
Vinyl plank flooring is a popular choice for both residential and commercial spaces due to its durability, water resistance, and aesthetic versatility. However, even with proper installation and maintenance, seams between vinyl planks can sometimes separate, creating unsightly gaps and potential tripping hazards. Addressing these issues promptly and effectively can extend the life of the floor and maintain its overall appearance. This article provides a comprehensive guide to repairing vinyl plank flooring seams.
Understanding the Causes of Separated Seams
Several factors can contribute to the separation of seams in vinyl plank flooring. Identifying the root cause is crucial for a successful and lasting repair. Some common culprits include:
Improper Installation: A poorly installed floor is prone to seam separation. This can stem from inadequate subfloor preparation, insufficient spacing for expansion and contraction, or incorrect locking mechanisms during installation. Subfloors must be level, clean, and dry. Any debris, moisture, or unevenness can compromise the integrity of the interlocking system. Ignoring expansion gaps along the perimeter of the room can lead to buckling and seam separation as the flooring expands and contracts with temperature and humidity fluctuations.
Subfloor Issues: An unstable subfloor can cause the vinyl planks to shift and separate. This is particularly relevant for older homes or areas with high moisture levels. Subfloor problems might include rot, warping, or general instability, which can directly impact the stability of the vinyl plank flooring above. Repairing or reinforcing the subfloor may be necessary before addressing the seam issues.
Moisture Exposure: While vinyl plank flooring is water-resistant, prolonged exposure to moisture can weaken the adhesive in some types of planks or cause the core material to swell, leading to seam separation. This is more common in areas with high humidity or where spills are not cleaned up promptly. Standing water can seep into the seams, causing warping or loosening of the adhesive.
Temperature Fluctuations: Significant temperature changes can cause the vinyl planks to expand and contract, placing stress on the seams. This is especially true in rooms with large windows or direct sunlight. Constant expansion and contraction cycles can fatigue the interlocking mechanisms, leading to eventual separation. Maintaining stable indoor temperatures can help mitigate this issue.
Heavy Traffic: Areas with high foot traffic are more susceptible to seam separation, especially if the flooring is not properly maintained or if heavy objects are dragged across the surface. The constant pressure and abrasion can weaken the seams over time. Using area rugs in high-traffic zones can help protect the flooring and reduce the risk of seam separation.
Repairing Minor Seam Separations: The "Tap and Bond" Method
For minor seam separations where the planks are still relatively aligned, a simple "tap and bond" method can often be effective. This approach involves gently realigning the planks and securing them with a suitable adhesive.
Materials Needed: Soft-faced mallet, seam roller, clean cloths, appropriate adhesive for vinyl plank flooring (check manufacturer recommendations), painter's tape, utility knife (optional).
Procedure:
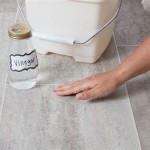
Cleaning: Thoroughly clean the area around the separated seam with a mild detergent and water. Remove any dirt, debris, or old adhesive residue. Allow the area to dry completely before proceeding. A clean surface ensures proper adhesion.
Realignment: Carefully align the planks by gently tapping them back into place with a soft-faced mallet. Use a tapping block to protect the edges of the planks from damage. Ensure the planks are flush and level with each other. Avoid excessive force, as this could damage the locking mechanisms.
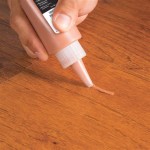
Adhesive Application: Apply a small amount of adhesive into the gap between the planks. Use a clean cloth to wipe away any excess adhesive immediately. Select an adhesive specifically designed for vinyl plank flooring to ensure compatibility and a strong bond. Follow the manufacturer's instructions for application and drying time.
Seam Rolling: Use a seam roller to apply pressure along the repaired seam, ensuring a tight bond between the planks. Roll the seam several times, applying even pressure. This helps to distribute the adhesive and create a secure connection.
Taping: Secure the repaired area with painter's tape to hold the planks in place while the adhesive dries. This prevents the planks from shifting during the curing process. Leave the tape in place for the time recommended by the adhesive manufacturer, typically 24-48 hours.
Final Cleaning: Once the adhesive is fully cured, remove the painter's tape and clean any remaining adhesive residue from the surface of the flooring. Inspect the repaired seam to ensure it is flush and secure.
Addressing Major Seam Gaps: The Plank Replacement Method
For larger gaps or damaged planks, a more extensive repair involving plank replacement may be necessary. This involves removing the damaged plank and replacing it with a new one.
Materials Needed: Replacement vinyl plank (matching the existing flooring), utility knife, measuring tape, straight edge, tapping block, soft-faced mallet, pull bar (for removing planks), adhesive (if required, depending on the type of plank), safety glasses, gloves.
Procedure:
Preparation: Obtain a replacement vinyl plank that matches the existing flooring in color, pattern, and dimensions. Ensure the replacement plank is free of defects. Gather all necessary tools and materials.
Removing the Damaged Plank: Carefully score the damaged plank along its perimeter with a utility knife. This helps to weaken the adhesive and prevent damage to surrounding planks. If the planks are interlocking, use a pull bar to carefully disengage the damaged plank from the surrounding planks. Start at one corner and work your way around the plank, gently prying it up. For glued-down planks, use a putty knife or scraper to gently lift the plank, working slowly to avoid damaging the subfloor. If the adhesive is particularly stubborn, a heat gun (used with caution) can help soften it.
Subfloor Preparation: Once the damaged plank is removed, thoroughly clean the subfloor. Remove any old adhesive residue, dirt, or debris. Ensure the subfloor is level and smooth. If necessary, use a leveling compound to fill any imperfections. Allow the leveling compound to dry completely before proceeding.
Installing the Replacement Plank: If the replacement plank is a click-lock type, align it carefully with the surrounding planks and use a tapping block and soft-faced mallet to gently lock it into place. Ensure the plank is flush and level with the surrounding flooring. If the planks require adhesive, apply a thin, even layer of adhesive to the back of the plank or to the subfloor, following the manufacturer's instructions. Position the plank carefully and press it firmly into place. Use a seam roller to apply pressure along the edges of the plank, ensuring a secure bond.
Securing the Plank: If adhesive was used, weigh down the replacement plank with a heavy object to prevent it from shifting while the adhesive cures. Allow the adhesive to dry completely before walking on the repaired area. If the plank is interlocking, ensure the seams are tightly locked together.
Final Inspection: Once the adhesive is fully cured or the interlocking mechanism is secure, inspect the repaired area to ensure the replacement plank is level, flush, and properly aligned with the surrounding flooring. Clean any remaining adhesive residue or debris from the surface.
Preventative Measures to Minimize Seam Separation
Preventing seam separation is often easier and more cost-effective than repairing it. Implementing preventative measures during and after installation can significantly reduce the risk of future problems.
Proper Installation Techniques: Adhering to the manufacturer's installation guidelines is crucial. This includes proper subfloor preparation, using the correct tools, and ensuring adequate expansion gaps. Pay close attention to the locking mechanisms and ensure they are fully engaged during installation. Using a tapping block and soft-faced mallet can help to prevent damage to the plank edges.
Maintaining Consistent Temperature and Humidity: Controlling the temperature and humidity levels in the room can help minimize expansion and contraction, reducing stress on the seams. Use a dehumidifier in humid climates and avoid extreme temperature fluctuations. Consider using window coverings to protect the flooring from direct sunlight.
Regular Cleaning and Maintenance: Regularly cleaning the floor helps to remove dirt and debris that can accumulate in the seams and contribute to wear and tear. Use a mild detergent and avoid harsh chemicals or abrasive cleaners. Clean up spills promptly to prevent moisture from seeping into the seams. Consider using a floor mat or rug in high-traffic areas to protect the flooring from wear and tear.
Using Furniture Pads: Placing furniture pads under the legs of heavy furniture can help to distribute the weight and prevent indentations or damage to the flooring. Avoid dragging heavy objects across the floor, as this can scratch the surface and weaken the seams. Lifting and carrying heavy objects is always preferable.
Routine Inspections: Periodically inspect the flooring for any signs of seam separation or damage. Addressing minor issues promptly can prevent them from escalating into more significant problems. Early detection allows for simpler and more effective repairs.
By understanding the causes of seam separation and implementing appropriate repair techniques and preventative measures, the lifespan and aesthetic appeal of vinyl plank flooring can be significantly extended. Consistent maintenance and prompt attention to minor issues are key to preserving the integrity of the flooring and maintaining a beautiful and durable surface.

How To Repair Vinyl Flooring Seams

How To Seam Sheet Vinyl

How To Fix A Bent Or Raised Up Edge On Your Luxury Vinyl Plank Flooring

How To Repair Vinyl Flooring Fixing Sc Bubbles More

How Do You Repair Vinyl Flooring

Diy Lvp Laminate Floor Seam Fix Thediytraill Onthisday Tiktok

Step By Guide To Seam Sheet Vinyl Like A Pro

Pt 2 How To Easily Repair Vinyl Plank Flooring

Roberts Palette Quick Repair Putty 3 Oz Gray For Wood Laminate And Vinyl Flooring Pc7728 The Home Depot

Laminate Floor Repair Diy Family Handyman
Related Posts