How to Remove Scratches from Laminate Floor Tiles
Laminate flooring offers an affordable and aesthetically pleasing alternative to hardwood. Its durability makes it a popular choice for high-traffic areas. However, laminate, like any flooring material, is susceptible to scratches. These imperfections can diminish the floor's overall appearance. While deep gouges may necessitate tile replacement, many superficial scratches can be effectively removed with the right techniques and products. This article outlines methods for addressing scratches on laminate floor tiles, ranging from simple fixes to more involved restoration processes.
Before embarking on any scratch removal attempt, it is crucial to identify the type and severity of the scratch. Minor surface scratches often appear as faint lines that are only noticeable upon close inspection. More significant scratches will be deeper and may exhibit a different color due to the underlying material being exposed. This distinction will guide the appropriate course of action. Gathering necessary materials and preparing the work area will optimize the scratch removal process. This typically involves cleaning the affected area and ensuring adequate lighting.
Assessing the Scratch and Gathering Supplies
The initial step involves a thorough assessment of the scratch. Determining the depth and width of the scratch is essential for selecting the appropriate repair method. Surface scratches, which only affect the top layer of the laminate, can often be addressed with simple polishing techniques. Deeper scratches that penetrate the wear layer will require more aggressive methods to conceal or minimize their appearance. Consider the location of the scratch. Scratches in high-traffic areas may require more durable repair solutions than those in less frequently used areas.
Gathering the necessary supplies before starting the repair process is paramount. The specific materials required will depend on the chosen repair method. Common materials include laminate floor cleaner, microfiber cloths, a scratch repair kit designed for laminate floors, furniture polish, mineral spirits, wax filler sticks (matching the floor color), a putty knife, and color-matched markers or pencils specifically designed for laminate repair. Having these materials readily available will streamline the repair process and minimize interruptions.
Microfiber cloths are essential for cleaning and polishing the laminate surface. These cloths are gentle and non-abrasive, reducing the risk of further scratching. A scratch repair kit typically includes a filler compound and instructions specific to the product. Furniture polish can sometimes be used to buff out minor scratches and restore the shine of the laminate. Mineral spirits may be needed to clean the area before applying a filler or to remove excess filler. Wax filler sticks are used to fill deeper scratches, and a putty knife helps to apply and smooth the filler. Color-matched markers or pencils are used to conceal any remaining discoloration after the filler has been applied.
Simple Cleaning and Polishing Techniques
For very minor surface scratches, a simple cleaning and polishing routine can often suffice. Begin by thoroughly cleaning the affected area with a laminate floor cleaner. Ensure that the cleaner is specifically designed for laminate flooring to avoid damaging the surface. Follow the manufacturer's instructions for dilution and application. Use a microfiber cloth to gently clean the area, removing any dirt, dust, or debris that may be contributing to the scratch's visibility.
After cleaning, allow the area to dry completely. Once dry, apply a small amount of furniture polish to a clean microfiber cloth. Gently buff the scratched area in a circular motion. The polish will help to fill in minor imperfections and restore the shine to the laminate. Avoid applying excessive pressure, as this can potentially worsen the scratch. Continue buffing until the scratch is less noticeable or disappears altogether.
If furniture polish alone is not sufficient, consider using a scratch concealer specifically designed for laminate floors. These products are typically applied with a soft cloth and buffed into the scratch. They contain a pigment that helps to blend the scratch with the surrounding flooring. Follow the manufacturer's instructions carefully when using a scratch concealer. Some products may require multiple applications or a waiting period before buffing.
The effectiveness of cleaning and polishing techniques is limited to very minor surface scratches. Deeper or more pronounced scratches will require more intensive repair methods, such as using a laminate repair kit or wax filler sticks. However, for superficial imperfections, cleaning and polishing offer a simple and effective solution.
Using Laminate Repair Kits and Wax Filler Sticks
Laminate repair kits offer a more comprehensive solution for addressing scratches that are too deep for simple cleaning and polishing. These kits typically include a filler compound, application tools, and color-matching guides. The filler compound is designed to fill the scratch and create a smooth, even surface. The application tools help to ensure precise and controlled application of the filler.
The first step in using a laminate repair kit is to thoroughly clean the scratched area. Remove any dirt, dust, or debris that may be present. Apply a small amount of mineral spirits to a clean cloth and gently wipe the area to remove any residual wax or polish. Allow the area to dry completely before proceeding. Follow the instructions provided in the repair kit regarding mixing the filler compound. Some kits may require mixing two or more components to activate the filler.
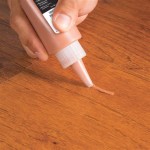
Using the provided applicator tool, carefully apply the filler compound to the scratch. Ensure that the scratch is completely filled, slightly overfilling it if necessary. Use a putty knife to remove any excess filler and smooth the surface. Wipe away any remaining residue with a clean, damp cloth. Allow the filler to dry completely according to the manufacturer's instructions. This may take several hours or even overnight.
Once the filler is dry, use a fine-grit sandpaper or a specialized polishing pad (often included in the kit) to gently smooth the surface and blend it with the surrounding flooring. Be careful not to apply too much pressure, as this can damage the laminate. If necessary, use a color-matched marker or pencil to conceal any remaining discoloration. Blend the color with a clean cloth until it matches the surrounding flooring.
Wax filler sticks offer an alternative method for filling deeper scratches. These sticks are made of a colored wax that is designed to melt and fill the scratch. Choose a wax filler stick that closely matches the color of the laminate flooring. Use a heat source, such as a soldering iron or a specialized wax melting tool, to melt the wax filler. Carefully drip the melted wax into the scratch, filling it completely. Allow the wax to cool and harden.
Once the wax has hardened, use a putty knife to carefully shave off any excess wax, creating a smooth, even surface. Wipe away any remaining residue with a clean cloth. Use a color-matched marker or pencil to conceal any remaining discoloration. Blend the color with a clean cloth until it matches the surrounding flooring. Wax filler sticks provide a durable and water-resistant repair, making them suitable for high-traffic areas.
Both laminate repair kits and wax filler sticks offer effective solutions for addressing deeper scratches in laminate flooring. The choice between the two depends on personal preference and the severity of the scratch. Laminate repair kits provide a more comprehensive solution, while wax filler sticks offer a simpler and more direct approach.
After any repair method, it’s recommended to protect the repaired area with a laminate floor protectant. This will help prevent future scratches and maintain the floor’s appearance. Regular cleaning and maintenance are crucial for preserving the beauty and longevity of laminate flooring. Avoiding harsh chemicals and abrasive cleaners will prevent damage to the laminate surface. Using felt pads under furniture legs will minimize the risk of scratches from moving furniture. Promptly cleaning up spills will prevent staining and water damage.
By carefully assessing the scratch, selecting the appropriate repair method, and following the instructions carefully, it is possible to effectively remove scratches from laminate floor tiles and restore the floor's original appearance. Regular maintenance and preventative measures will help to minimize the risk of future scratches and prolong the life of the flooring.

8 Ways To Fix Scratches On A Laminate Floor Mersey Flooring

How To Fix Scratches On Laminate Flooring Directflooring Direct

How To Remove Scratches Out Of Your Vinyl Tile Floor

3 Ways To Repair Laminate Floor Scratches Wikihow

How To Fix Scratches On Laminate Flooring

How To Fix Scratches In Vinyl Plank Hardwood And Laminate Floors

How To Fix Scratches On Luxury Vinyl Plank Flooring Steps

How To Remove Scuff Marks From Laminate Flooring Liquidators

I Tested 5 S For Removing Scratches From Furniture

How To Repair Laminate Flooring The Home Depot
Related Posts