How to Install Vinyl Flooring on a Bathroom Vanity Top
Resurfacing a bathroom vanity top is a common home improvement project. While various materials can be used, vinyl flooring offers a cost-effective, durable, and relatively straightforward solution. Vinyl flooring, especially sheet vinyl or luxury vinyl tile (LVT), is water-resistant, making it suitable for the moisture-prone environment of a bathroom. This article provides a comprehensive guide on how to install vinyl flooring on a bathroom vanity top, ensuring a professional and long-lasting result.
Before commencing any work, it's crucial to understand the required tools and materials, prepare the existing surface, and follow precise installation steps to avoid common pitfalls. A well-executed vinyl flooring installation can significantly enhance the aesthetic appeal and functionality of a bathroom vanity.
Key Point 1: Preparation and Assessment of the Vanity Top
Proper preparation is paramount for a successful vinyl flooring installation. Insufficient preparation can lead to adhesion problems, uneven surfaces, and ultimately, premature failure of the flooring. This phase involves assessing the existing vanity top, removing any existing coverings, and ensuring a clean, level, and structurally sound base for the new vinyl.
Initially, the existing vanity top needs a thorough assessment. Evaluate its condition. Are there any cracks, chips, or areas of water damage? Determine the material of the existing top, as this can influence the preparation methods. Common materials include laminate, wood, or tile. If the existing top is severely damaged or unstable, consider replacing the entire vanity top before installing vinyl flooring.
Remove any existing coverings, such as old laminate, tile, or vinyl. For laminate or vinyl, a heat gun or adhesive remover might be necessary to soften the adhesive and facilitate removal. Use a scraper to gently lift the material, being careful not to damage the underlying surface. For tile, use a chisel and hammer to carefully remove the tiles, working from the edges inward. Wear safety glasses and gloves during this process.
Once the existing covering is removed, thoroughly clean the surface. Remove any residual adhesive, dirt, or debris. Use a scraper, putty knife, or adhesive remover to eliminate any remaining adhesive residue. Vacuum the surface to remove loose particles. Clean the surface with a degreaser or mild detergent to remove any grease or oil. Rinse thoroughly with clean water and allow the surface to dry completely.
Inspect the surface for any imperfections, such as cracks, holes, or uneven areas. Fill any small cracks or holes with wood filler or epoxy filler, depending on the material of the vanity top. Allow the filler to dry completely according to the manufacturer's instructions. Sand the filled areas smooth, ensuring they are flush with the surrounding surface. Use a sanding block or orbital sander with fine-grit sandpaper (120-grit or higher) to achieve a smooth and even surface.
Finally, ensure the surface is level. Use a level to check for any uneven areas. If the surface is significantly uneven, consider using a self-leveling compound to create a perfectly level base for the vinyl flooring. Apply the self-leveling compound according to the manufacturer's instructions and allow it to dry completely. Sand the surface smooth after it has dried.
Key Point 2: Cutting and Fitting the Vinyl Flooring
Accurate cutting and fitting of the vinyl flooring are crucial for a seamless and professional-looking installation. Precise measurements and careful cutting techniques are essential to avoid gaps, overlaps, or unsightly seams. This phase involves measuring the vanity top, transferring those measurements to the vinyl flooring, and cutting it to size, accounting for any necessary overlaps or intricate shapes.
Begin by accurately measuring the vanity top. Use a measuring tape to determine the length, width, and any other dimensions of the surface. Pay close attention to any curves, corners, or cutouts for sinks or faucets. Create a template of the vanity top by using craft paper or cardboard. Lay the paper or cardboard over the vanity top and trace the outline, including any cutouts for sinks or faucets. Ensure the template accurately reflects the shape and dimensions of the vanity top.
Transfer the template to the vinyl flooring. Lay the vinyl flooring flat on a clean and stable surface. Place the template on top of the vinyl flooring, aligning it carefully. Use a pencil or marker to trace the outline of the template onto the vinyl flooring. Ensure the outline is clear and accurate. If using sheet vinyl, consider leaving a slight overlap of 1/4 to 1/2 inch around the edges to allow for minor adjustments during installation. For LVT, ensure the edges are precisely aligned with the template.
Cut the vinyl flooring along the traced outline. Use a sharp utility knife and a straight edge to cut the vinyl flooring. For straight cuts, use a straight edge as a guide to ensure a clean and accurate cut. For curved cuts, use a flexible cutting tool or carefully follow the traced outline with the utility knife. Make multiple shallow cuts rather than one deep cut to avoid tearing or damaging the vinyl. When cutting around sink or faucet cutouts, use a hole saw or jigsaw to create the necessary openings. Be careful to avoid overcutting or creating jagged edges.
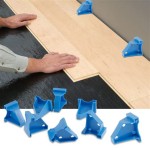
Dry-fit the vinyl flooring on the vanity top. Before applying any adhesive, place the cut vinyl flooring onto the vanity top to ensure it fits properly. Check for any gaps, overlaps, or areas where the vinyl flooring needs to be adjusted. Make any necessary adjustments to the cut vinyl flooring until it fits perfectly. Use a utility knife or sandpaper to trim or smooth any edges as needed.
For complex shapes or cutouts, consider using a seam roller to flatten the vinyl flooring and ensure it conforms to the contours of the vanity top. This will help to create a seamless and professional-looking installation.
Key Point 3: Adhering and Finishing the Vinyl Flooring
The final stage involves adhering the vinyl flooring to the vanity top and finishing the edges for a clean and professional appearance. Selecting the appropriate adhesive, applying it evenly, and properly sealing the edges are crucial for a long-lasting and water-resistant installation. This phase also involves adding trim or caulking to conceal any seams and protect the edges from moisture intrusion.
Select the appropriate adhesive for the vinyl flooring. Use a vinyl flooring adhesive specifically designed for the type of vinyl you are installing (sheet vinyl or LVT). Ensure the adhesive is compatible with the substrate of the vanity top. Read the manufacturer's instructions carefully and follow them precisely. Different adhesives have different application requirements and drying times.
Apply the adhesive evenly to the vanity top. Use a notched trowel to spread the adhesive evenly over the surface of the vanity top. The size of the notches on the trowel will depend on the type of adhesive and the manufacturer's recommendations. Ensure the adhesive is spread uniformly, covering the entire surface. Avoid applying too much adhesive, as this can cause bubbling or unevenness in the vinyl flooring. Also avoid applying too little adhesive, as this can result in poor adhesion.
Position and adhere the vinyl flooring. Carefully position the cut vinyl flooring onto the adhesive-covered vanity top. Align the edges and corners precisely. Gently press the vinyl flooring onto the adhesive, working from the center outwards. Use a roller or hand roller to firmly press the vinyl flooring onto the adhesive. This will help to ensure good adhesion and eliminate any air pockets. Work in small sections, rolling the flooring thoroughly before moving on to the next section.
Trim any excess vinyl flooring. After the adhesive has had sufficient time to set (according to the manufacturer's instructions), trim any excess vinyl flooring around the edges of the vanity top. Use a sharp utility knife and a straight edge to make clean and accurate cuts. Be careful not to damage the vanity top. Remove the excess vinyl flooring and discard it properly.
Seal the edges of the vinyl flooring. Apply a bead of silicone caulk along the edges of the vinyl flooring where it meets the walls, sink, or other surfaces. This will help to prevent water from seeping underneath the flooring and causing damage. Use a caulk gun to apply the caulk evenly and smoothly. Use a wet finger or a caulk smoothing tool to create a clean and professional-looking bead. Wipe away any excess caulk with a damp cloth.
Consider adding trim or molding. To further protect the edges of the vinyl flooring and enhance its appearance, consider adding trim or molding around the perimeter of the vanity top. Choose trim or molding that complements the style and color of the vinyl flooring and the bathroom. Attach the trim or molding using adhesive or small nails. Caulk the edges of the trim or molding to create a water-resistant seal.
Allow the adhesive and caulk to dry completely before using the vanity top. Follow the manufacturer's instructions for drying times. Avoid placing heavy objects on the vanity top until the adhesive and caulk are fully cured.

How To Lay Sheet Vinyl Flooring

How To Install Vinyl Plank Flooring Into A Bathroom

How To Install Vinyl Plank Flooring In A Bathroom Fixthisbuildthat

How To Install Vinyl Plank Tiles In A Bathroom

Dos And Don Ts For Installing Vinyl Plank Floors In The Bathroom Advice Homeowners

How To Install Vinyl Plank Tiles In A Bathroom

How To Install Vinyl Plank Flooring In A Bathroom Fixthisbuildthat

How To Install Vinyl Plank Flooring In A Bathroom As Beginner Home Renovation

How To Install Vinyl Plank Flooring In A Bathroom Fixthisbuildthat

Dos And Don Ts For Installing Vinyl Plank Floors In The Bathroom Advice Homeowners
Related Posts