How To Install Vinyl Flooring in a Bathroom
Vinyl flooring stands as a popular choice for bathroom renovations due to its water resistance, durability, and relatively low cost. Installing vinyl flooring in a bathroom, whether sheet vinyl, planks, or tiles, is a project that can be accomplished by homeowners with basic DIY skills. However, proper preparation and execution are crucial for a long-lasting and aesthetically pleasing result. This article provides a comprehensive guide to installing vinyl flooring in a bathroom, covering essential steps from preparation to finishing touches.
The type of vinyl flooring selected significantly impacts the installation process. Sheet vinyl typically requires fewer seams and therefore offers superior water resistance, making it an excellent choice for bathrooms prone to moisture. Vinyl plank and tile flooring offer more design flexibility and can be easier to handle in smaller bathrooms. Understanding the characteristics of each type of vinyl flooring will simplify the decision-making process.
Before embarking on the installation itself, gathering the necessary tools and materials is paramount. A comprehensive checklist ensures that the project proceeds smoothly without unnecessary delays. Required tools include a utility knife with sharp blades, a measuring tape, a straightedge or T-square, a pencil, a notched trowel (for glue-down installations), a seam roller (for sheet vinyl), a rubber mallet (for plank and tile installations), safety glasses, and knee pads. Additional materials include the chosen vinyl flooring, underlayment (if required), adhesive (for glue-down installations), seam sealer (for sheet vinyl), and transition strips.
Preparing the Subfloor
The subfloor's condition is a critical factor influencing the final appearance and longevity of the vinyl flooring. A clean, level, and dry subfloor is essential for a successful installation. Any imperfections in the subfloor will telegraph through the vinyl, resulting in an uneven surface. Therefore, thorough preparation is often more time-consuming than the actual flooring installation but is arguably more important.
The first step involves removing the existing flooring and thoroughly cleaning the subfloor. Existing flooring could include old vinyl, tile, or carpet. Use appropriate tools such as a scraper or pry bar to remove the old flooring materials, being mindful not to damage the subfloor. After removing the old flooring, vacuum the entire subfloor to eliminate any remaining debris. Next, use a damp cloth to clear any residual dirt. The substrate should be allowed to dry completely before preceding to the next stage.
Inspect the subfloor for any imperfections, such as cracks, holes, or uneven sections. Small cracks can be filled with a patching compound designed for subfloors. Larger holes or significantly uneven areas may require the use of a self-leveling compound. Apply the patching or self-leveling compound following the manufacturer's instructions, ensuring a smooth and level surface. Allow the compound to dry completely before proceeding further since insufficient drying time may lead to adhesion problems.
Leveling the subfloor is critical for preventing imperfections in the vinyl flooring. Use a level to identify any high or low spots. For minor unevenness, sanding down high spots may suffice. However, significant dips or slopes will require the application of a self-leveling compound. Pour the self-leveling compound according to the manufacturer's directions, ensuring complete coverage of the affected area. Once the compound has cured, the subfloor should be perfectly level to ensure proper installation and appearance of vinyl flooring.
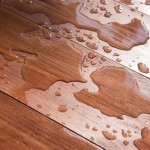
Moisture poses a substantial hazard to vinyl flooring, potentially causing adhesive failure or mold growth. Evaluate the subfloor's moisture content before installation, particularly for concrete subfloors. Use a moisture meter to determine the moisture level. If the moisture level exceeds the recommended limit specified by the vinyl flooring manufacturer, implementing moisture mitigation measures is essential. These measures may include applying a moisture barrier or allowing the subfloor to dry more thoroughly. Ignoring high moisture levels can lead to costly problems in the future.
Cutting and Fitting the Vinyl Flooring
Accurate measurement and cutting of the vinyl flooring ensure a professional and seamless installation. Precise measurements are crucial, especially when working with sheet vinyl, as mistakes can be difficult and costly to correct. Take careful measurements of the bathroom, accounting for any irregularities in the walls or fixtures.
When working with sheet vinyl, create a paper or cardboard template of the bathroom floor. This template provides a precise guide for cutting the vinyl, minimizing the risk of errors. Lay the template on the vinyl sheet and trace the outline with a pencil, leaving extra material along the edges for trimming. For vinyl planks or tiles, measure and cut each piece individually, allowing for expansion gaps along the walls.
Use a sharp utility knife to cut the vinyl flooring. For sheet vinyl, make smooth, continuous cuts along the template outline. For vinyl planks or tiles, score the surface of the vinyl with the utility knife and then snap the plank or tile along the score line. Ensure sharp blades are used. Dull blades can tear the vinyl.
Dry-fitting the vinyl flooring before applying adhesive is a crucial step in verifying the accuracy of the cuts and ensuring the flooring fits properly. Lay the vinyl sheet, planks, or tiles on the subfloor and check for any gaps or overlaps. Adjust the cuts as necessary to achieve a snug and seamless fit.
Dealing with obstacles, such as toilets, pipes, or door frames, requires careful cutting and fitting. For obstacles, mark the location and shape of the obstacle on the vinyl flooring. Use a utility knife to cut around the obstacle, leaving a small gap of approximately 1/4 inch for expansion. Cover the gap later with a pipe collar or trim.
Adhering the Vinyl Flooring and Finishing Touches
Adhering the vinyl flooring securely to the subfloor ensures stability and prevents shifting or lifting. The choice of adhesive depends on the type of vinyl flooring and the subfloor material. Read the manufacturer's instructions to select the appropriate adhesive.
For glue-down installations, apply the adhesive evenly to the subfloor using a notched trowel. Follow the manufacturer's recommendations for the correct trowel size and the recommended open time before laying the vinyl flooring. Work in small sections to prevent the adhesive from drying out before the vinyl is installed.
Carefully position the vinyl flooring onto the adhesive, working from one side of the room to the other. Use a seam roller or a rubber mallet to press the vinyl firmly into the adhesive, ensuring full contact and eliminating air pockets. Pay particular attention to the edges and seams.
Seaming sheet vinyl requires specific techniques to ensure a waterproof and aesthetically pleasing result. Overlap the edges of the adjacent sheets by approximately 1/8 inch. Use a straightedge and a sharp utility knife to cut through both layers of vinyl simultaneously, creating a perfect seam. Remove the excess vinyl strips and apply a seam sealer to the seam, following the manufacturer's instructions.
After adhering the vinyl flooring, use a roller to ensure full adhesion across the entire surface. Roll the entire floor thoroughly, paying extra attention to the seams and edges. This process helps to embed the vinyl into the adhesive and create a strong bond.
Install transition strips at doorways and where the vinyl flooring meets other types of flooring. Transition strips provide a smooth and safe transition between different floor coverings. Secure the transition strips with nails or screws, following the manufacturer's instructions.
Applying sealant around the perimeter of the room where the flooring meets the wall, especially near the toilet and shower areas, prevents water from seeping under the flooring. Use a high-quality sealant specifically designed for bathrooms. Apply the sealant carefully and smooth it with a wet finger or a sealant smoothing tool.
Allow the adhesive to cure completely before using the bathroom. Follow the manufacturer's recommendations for the curing time, which may vary depending on the adhesive type and environmental conditions.

How To Lay Sheet Vinyl Flooring

How To Install Vinyl Plank Tiles In A Bathroom

How To Install Vinyl Plank Flooring In A Bathroom As Beginner Home Renovation

How To Install Vinyl Plank Flooring In A Bathroom Fixthisbuildthat

How To Install Vinyl Plank Flooring Into A Bathroom

How To Install Vinyl Plank Flooring In A Bathroom Fixthisbuildthat

How To Install Sheet Vinyl Floor Decor Adventures

How To Install Vinyl Plank Tiles In A Bathroom

How To Lay Vinyl Floor In A Bathroom Dove Cottage

Dos And Don Ts For Installing Vinyl Plank Floors In The Bathroom Advice Homeowners
Related Posts