How To Put Down Vinyl Flooring: A Step-by-Step Guide
Vinyl flooring offers a durable, water-resistant, and aesthetically versatile option for a variety of spaces, from kitchens and bathrooms to living rooms and basements. Its relatively straightforward installation process makes it a popular choice for both professional installers and DIY enthusiasts. This article provides a comprehensive, step-by-step guide on how to properly install vinyl flooring, ensuring a long-lasting and visually appealing result. Successful installation hinges on meticulous preparation, precise execution, and adherence to best practices. Before commencing any work, thoroughly review the manufacturer's instructions specific to the chosen vinyl flooring product, as variations in material and design may necessitate adjustments to the outlined procedures.
Prior to initiating the installation process, ensure that all necessary tools and materials are readily available. This preparedness will streamline the workflow and minimize potential disruptions. Essential tools include a measuring tape, utility knife with sharp blades, straight edge or T-square, pencil, safety glasses, knee pads, a tapping block, and a rubber mallet. Depending on the type of vinyl flooring being installed (e.g., sheet vinyl, planks, or tiles), specific adhesives or locking mechanisms may require additional tools. Material requirements encompass the vinyl flooring itself, underlayment (if required or desired), adhesive (if applicable), seam sealant (for sheet vinyl), and transition strips for doorways or edges. Having these items organized and accessible will contribute significantly to an efficient and successful installation.
Preparing the Subfloor: The Foundation for Success
The subfloor’s condition is paramount to the longevity and aesthetic appeal of the vinyl flooring. A smooth, clean, and level subfloor provides the essential foundation for proper adhesion and prevents imperfections from telegraphing through the vinyl surface. The first step involves thoroughly inspecting the subfloor for any existing damage, such as cracks, holes, or uneven areas. Repair these deficiencies using appropriate patching compounds or leveling compounds specifically designed for flooring applications. Allow sufficient drying time as specified by the manufacturer of the repair materials.
Next, meticulously clean the subfloor to remove all traces of dirt, dust, debris, and existing adhesives. A thorough vacuuming followed by a damp mopping with a neutral cleaner is generally sufficient. In cases of stubborn adhesive residue, utilize a specialized adhesive remover, carefully following the product instructions and ensuring proper ventilation. Allow the subfloor to dry completely before proceeding. Ignoring this crucial cleaning step can severely compromise the adhesion of the vinyl flooring and lead to premature failure.
For concrete subfloors, particularly in basements, moisture testing is essential. Excessive moisture can damage the vinyl flooring and promote mold growth. Conduct a moisture test using a calcium chloride test kit or a relative humidity probe. Consult the vinyl flooring manufacturer’s specifications for acceptable moisture levels. If moisture levels exceed the allowable threshold, implement appropriate mitigation measures, such as applying a moisture barrier or installing a dehumidifier, before proceeding with the installation.
Determine whether an underlayment is necessary or recommended. While some vinyl flooring products have an integrated underlayment, others may benefit from the added cushioning, sound insulation, and moisture protection provided by a separate underlayment. Select an underlayment that is compatible with the chosen vinyl flooring and the subfloor material. Install the underlayment according to the manufacturer’s instructions, ensuring that seams are properly taped to prevent movement.
Laying Out the Vinyl Flooring: Planning for Optimal Aesthetics
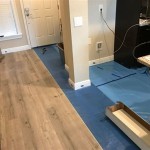
Before applying any adhesive or clicking any planks into place, conduct a dry layout to visualize the final appearance and identify any potential issues. This step is particularly crucial for patterned vinyl flooring or when dealing with irregularly shaped rooms. Begin by measuring the room’s dimensions and calculating the number of vinyl planks or tiles required to cover the entire area. Consider the direction of the flooring, paying attention to the alignment of seams and the overall visual flow.
Start by finding the center point of the room. Snap two chalk lines perpendicular to each other, dividing the room into four quadrants. This establishes a baseline for aligning the first row of vinyl flooring. Alternatively, for rooms with a strong focal point, such as a fireplace, you can use that as the starting point and align the flooring accordingly.
Lay out a row of vinyl flooring along one of the chalk lines, leaving a small expansion gap (typically ¼ inch to ⅜ inch) along the walls. Use spacers to maintain a consistent gap. This expansion gap allows the vinyl flooring to expand and contract with temperature and humidity changes, preventing buckling or warping. Continue laying out rows of vinyl flooring within each quadrant, ensuring that the patterns align properly and that the seams are tight and even. Observe how the flooring interacts with doorways, corners, and other architectural features.
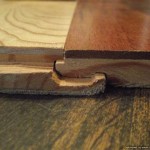
Trim the last row of vinyl flooring to fit snugly against the walls, again maintaining the expansion gap. Use a utility knife and a straight edge to make precise cuts. It is often necessary to scribe the vinyl flooring to accurately match irregular wall contours. This involves tracing the wall’s shape onto the vinyl flooring and then carefully cutting along the traced line. Remember to prioritize safety when using a utility knife, always cutting away from yourself and using a sharp blade.
During the dry layout, identify any areas where the vinyl flooring needs to be cut around obstacles, such as pipes or door frames. Use a combination square or compass to accurately transfer the shape of the obstacle onto the vinyl flooring. Cut out the shape using a utility knife or jigsaw. Test-fit the vinyl flooring around the obstacle to ensure a proper fit before permanently adhering it or installing it.
Installing the Vinyl Flooring: Adhesion and Securement Techniques
The installation process varies depending on the type of vinyl flooring. Sheet vinyl typically requires full adhesive bonding to the subfloor, while vinyl planks and tiles may utilize a peel-and-stick adhesive backing or a click-lock mechanism that mechanically interlocks the pieces. Always adhere to the manufacturer’s recommended installation procedures for the specific flooring product being used.
For sheet vinyl installation, carefully roll back half of the sheet, exposing the subfloor. Apply the recommended adhesive to the exposed subfloor using a notched trowel. The size and type of the notch should be consistent with the manufacturer’s specifications. Spread the adhesive evenly, ensuring complete coverage. Allow the adhesive to tack up according to the manufacturer's instructions before carefully rolling the vinyl sheet back into place. Use a flooring roller to firmly press the vinyl sheet onto the adhesive, working from the center outwards to remove any air pockets or wrinkles.
Repeat the process for the other half of the sheet, ensuring that the seams are aligned properly and that the entire sheet is securely bonded to the subfloor. Use a seam roller to firmly press the seam together, creating a watertight seal. Apply a seam sealant along the seam to further prevent water penetration. Clean up any excess adhesive immediately with a damp cloth.
For vinyl plank or tile installation with peel-and-stick adhesive, carefully peel off the protective backing and position the plank or tile in place. Press firmly onto the subfloor to ensure a strong bond. Use a tapping block and rubber mallet to tap the edges of the plank or tile, securing it to the adjacent pieces. Maintain the expansion gap along the walls.
For click-lock vinyl planks or tiles, angle the edge of one plank or tile into the groove of the adjacent piece. Press down firmly until the pieces click together, creating a secure and seamless connection. Use a tapping block and rubber mallet to tap the planks or tiles together, ensuring a tight fit. Stagger the seams between rows to create a more visually appealing and structurally sound floor.
After the vinyl flooring is installed, allow sufficient time for the adhesive to cure or the click-lock mechanism to fully engage before applying any weight or traffic to the floor. Consult the manufacturer’s specifications for recommended curing times.
Install transition strips at doorways and other edges to provide a smooth and safe transition between the vinyl flooring and adjacent flooring materials. These strips also protect the edges of the vinyl flooring from damage. Secure the transition strips to the subfloor using screws, nails, or adhesive. Apply caulk around the perimeter of the room and around any fixtures or pipes to create a watertight seal and prevent water from seeping under the flooring.
Finishing Touches and Maintenance: Ensuring Longevity
Once the floor is fully installed and the adhesive has cured, install baseboards or quarter-round molding to cover the expansion gap along the walls. This provides a finished and professional look while also protecting the edges of the flooring. Secure the baseboards or molding to the walls using nails or adhesive.
After installation, regularly sweep or vacuum the vinyl flooring to remove dirt and debris. Mop the floor with a damp mop and a neutral cleaner specifically designed for vinyl flooring. Avoid using abrasive cleaners or scouring pads, as these can damage the surface of the flooring. Protect the flooring from scratches and dents by using furniture pads under the legs of chairs and tables. Promptly clean up any spills to prevent staining.

How To Lay Sheet Vinyl Flooring

How To Install Vinyl Plank Flooring For Beginners Step By Guide

A Beginner S Guide To Installing Vinyl Plank Flooring Dumpsters Com

Post Nbl Express Eco Flooring

10 Beginner Mistakes Installing Vinyl Plank Flooring

Step By Guide On How To Install Hybrid Flooring Parrys

Your Step By Guide How To Install Luxury Vinyl Plank Wc Supply Whole Cabinet

How To Lay Lvt Flooring A Step By Guide Factory Direct

Laying Vinyl Planks The Right Way Expert Guide By Fantastic Handyman

How To Lay Vinyl Flooring Sheets Tiles And Planks Tarkett
Related Posts