How To Prep Wood Subfloor For Vinyl Plank Flooring
Installing vinyl plank flooring over a wood subfloor is a cost-effective and aesthetically pleasing way to upgrade a space. However, the longevity and appearance of the finished floor depend heavily on the quality of the subfloor preparation. Improperly prepared subfloors can lead to a variety of issues, including uneven surfaces, plank separation, squeaking, and premature wear. Therefore, a thorough and meticulous preparation process is essential to ensure a successful vinyl plank flooring installation.
This article provides a comprehensive guide on how to prepare a wood subfloor for vinyl plank flooring. The steps outlined cover inspection, cleaning, repair, and leveling, providing a framework for achieving a smooth, stable, and clean surface. Adhering to these recommendations will contribute to a professional-looking and long-lasting vinyl plank floor.
Inspection of the Wood Subfloor
The initial step in preparing a wood subfloor involves a detailed inspection to identify any existing problems. This inspection should encompass several key areas to ensure a comprehensive assessment of the subfloor's condition. The following aspects should be carefully examined:
Moisture Content: Moisture is a primary enemy of wood subfloors. Excess moisture can cause warping, swelling, and ultimately, rot. A moisture meter is an invaluable tool for determining the moisture content of the wood. Ideal moisture levels for installing vinyl plank flooring typically range from 6% to 12%, depending on the manufacturer's recommendations and the local climate. If the moisture content exceeds this range, it is imperative to address the source of the moisture and allow the subfloor to dry completely before proceeding. Potential sources of moisture include leaks from plumbing, condensation, or inadequate ventilation.
Structural Integrity: Examine the subfloor for any signs of structural damage. This includes sagging, bouncing, or soft spots. These issues could indicate underlying problems such as damaged joists, rot, or insect infestation. Walk across the entire subfloor, paying close attention to areas that feel unstable or exhibit excessive movement. If structural issues are identified, it's crucial to consult with a qualified contractor to assess the extent of the damage and implement appropriate repairs. Addressing structural problems before installing the vinyl plank flooring is essential for ensuring a stable and secure foundation.
Fastening Security: Over time, subfloor fasteners (nails or screws) can loosen, leading to squeaking and movement. Carefully inspect the subfloor for loose fasteners. A loose screw or nail allows for movement between the subfloor and the joists, creating the undesirable squeaking sound. If loose fasteners are found, tighten or replace them as needed. Adding additional fasteners can also enhance the stability of the subfloor. Counter-sinking any protruding nails or screw heads is also important to create a smooth surface.
Surface Irregularities: A smooth and level surface is critical for a successful vinyl plank flooring installation. Inspect the subfloor for any irregularities, such as raised nail heads, protruding staples, or uneven seams. Uneven surfaces can cause the vinyl planks to become stressed, potentially leading to cracking or separation over time. Minor irregularities can often be addressed by sanding or filling. However, more significant variations may require leveling compounds or patching materials.
Presence of Mold or Mildew: Look for any signs of mold or mildew growth on the subfloor. Mold and mildew thrive in damp environments and can pose health risks, as well as damage the wood. If mold or mildew is detected, it's important to identify and eliminate the source of the moisture. Affected areas should be thoroughly cleaned with a mold-killing solution. In severe cases, it may be necessary to replace the affected sections of the subfloor.
Following a thorough inspection, the next step involves addressing any issues identified to ensure a solid foundation for the vinyl plank flooring.
Repairing and Leveling the Wood Subfloor
Once the subfloor has been thoroughly inspected, the next step is to address any identified issues and prepare the surface for the vinyl plank flooring installation. This typically involves repairing damaged areas and leveling the subfloor to create a smooth, even surface. This phase is crucial for achieving a professional-looking and long-lasting installation.
Repairing Damaged Sections: If the inspection reveals damaged sections of the subfloor due to rot, water damage, or insect infestation, these areas must be repaired or replaced. The extent of the repair will depend on the severity of the damage. For minor damage, it may be sufficient to reinforce the affected area with wood hardener or epoxy filler. However, for more extensive damage, cutting out the affected section and replacing it with a new piece of subfloor material is required. Ensure that the replacement piece is the same thickness and type of wood as the original subfloor. Secure the replacement piece to the joists using screws or nails, ensuring that it is flush with the surrounding subfloor.
Addressing Squeaks: Squeaking subfloors are a common problem that can be addressed during the preparation process. Squeaks are typically caused by movement between the subfloor and the joists. To eliminate squeaks, locate the source of the noise and secure the subfloor to the joists using screws. Screws are generally preferred over nails, as they provide a stronger and more durable connection. Drive the screws at an angle into the joists to maximize their holding power. In some cases, it may be necessary to shim between the subfloor and the joists to eliminate any gaps that are contributing to the squeaking.
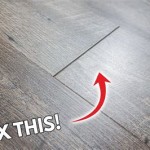
Leveling the Subfloor: A level subfloor is essential for a successful vinyl plank flooring installation. Even minor variations in height can cause the vinyl planks to become stressed, leading to cracking or separation over time. To level the subfloor, start by identifying any high or low spots. A long level or straightedge can be used to identify these areas. For minor variations, sanding down high spots and filling low spots with wood filler or patching compound may be sufficient. However, for more significant variations, self-leveling underlayment may be necessary.
Applying Self-Leveling Underlayment: Self-leveling underlayment is a pourable compound that spreads evenly across the subfloor, creating a smooth and level surface. Before applying self-leveling underlayment, it's important to prepare the subfloor properly. This includes cleaning the subfloor thoroughly to remove any dust, debris, or loose particles. Cracks and gaps should be sealed with caulk or patching compound to prevent the underlayment from leaking through. Follow the manufacturer's instructions for mixing and applying the self-leveling underlayment. Allow the underlayment to dry completely before proceeding with the vinyl plank flooring installation. Drying times can vary depending on the product and the ambient humidity.
Following these steps will ensure that the subfloor is properly repaired and leveled, providing a solid foundation for the vinyl plank flooring.
Cleaning and Preparing the Surface
The final stage in preparing a wood subfloor for vinyl plank flooring involves thoroughly cleaning the surface and applying any necessary primers or sealers. This step ensures that the vinyl plank flooring will adhere properly and that the subfloor is protected from moisture and other potential damage. A clean and properly prepared surface is crucial for a long-lasting and aesthetically pleasing flooring installation.
Removing Dust and Debris: After repairing and leveling the subfloor, it's essential to remove any dust, debris, or loose particles. This can be achieved by vacuuming the entire subfloor thoroughly. Use a vacuum cleaner with a brush attachment to reach into corners and along edges. Pay particular attention to areas where sanding or patching has been performed. After vacuuming, wipe down the subfloor with a damp cloth to remove any remaining dust. Ensure that the subfloor is completely dry before proceeding.
Addressing Stains and Residue: If the subfloor has any stains, paint splatters, or adhesive residue, it's important to remove them before installing the vinyl plank flooring. Stains can often be removed with a mild detergent and water. For stubborn stains, a specialized wood cleaner may be necessary. Paint splatters can be scraped off with a putty knife or razor blade. Adhesive residue can be removed with a solvent-based adhesive remover. Always follow the manufacturer's instructions when using cleaning products or solvents. Ensure that the subfloor is completely dry before proceeding.
Applying Primer or Sealer (If Required): Depending on the manufacturer's recommendations and the condition of the subfloor, it may be necessary to apply a primer or sealer. Primers can improve the adhesion of the vinyl plank flooring to the subfloor. Sealers can protect the subfloor from moisture damage. Choose a primer or sealer that is specifically designed for use with vinyl plank flooring. Follow the manufacturer's instructions for applying the primer or sealer. Allow the primer or sealer to dry completely before proceeding with the vinyl plank flooring installation.
Acclimation of Vinyl Plank Flooring: Before installation, it is crucial to acclimate the vinyl plank flooring to the environment in which it will be installed. This allows the planks to adjust to the temperature and humidity of the room, minimizing the risk of expansion or contraction after installation. Store the vinyl plank flooring in the room where it will be installed for at least 48 to 72 hours before installation. Follow the manufacturer's recommendations for acclimation.
By following these steps, the wood subfloor will be properly cleaned and prepared, ensuring a successful and long-lasting vinyl plank flooring installation. This attention to detail will contribute to the overall appearance and durability of the finished floor.

How To Prep Wood Subfloor For Luxury Vinyl Plank Flooring Beginners Fix High And Low Spots

How To Prep Wood Subfloors For Vinyl Plank Flooring

How To Prepare The Floor For Vinyl Plank Installation

Preparing Your Sub Floor For Luxury Vinyl Plank Flooring Floors Paws

How To Prep Your Subfloor For Vinyl Plank Flooring Jonny Diy

Floor Prep For Beginners Installing Vinyl Plank

How To Prep Your Sub Floor For Luxury Vinyl Flooring

How To Prep A Subfloor Lowe S

Simple Steps To Prepare Your Subfloor Before Installing Vinyl Flooring

How To Prep Floors For Luxury Vinyl Planks Nynr Refresh Challenge Casa Watkins Living
Related Posts