How To Lay Vinyl Plank Flooring On Concrete Basement
Installing vinyl plank flooring in a concrete basement is a popular and cost-effective way to transform a cold, utilitarian space into a comfortable and inviting living area. Vinyl plank flooring offers numerous advantages, including water resistance, durability, ease of maintenance, and a wide range of aesthetic options. However, successful installation requires careful planning, proper preparation, and adherence to established best practices.
Before commencing the installation, understanding the specific challenges and requirements of installing vinyl plank on concrete is crucial. Concrete, being a porous material, is susceptible to moisture infiltration. Addressing potential moisture issues is paramount to preventing future flooring problems, such as mold growth, adhesive failure, and warping of the vinyl planks. This article provides a comprehensive guide to laying vinyl plank flooring on concrete basement floors, covering essential steps from subfloor preparation to final finishing.
Checking for Moisture and Addressing Potential Problems
Moisture is the primary enemy of vinyl plank flooring installed on concrete. Before starting any work, a thorough moisture test is essential to determine the moisture vapor emission rate (MVER) of the concrete slab. High moisture levels can compromise the adhesive bond and lead to flooring failures. Several methods can be used to assess moisture levels, including:
Calcium Chloride Test (Anhydrous Calcium Chloride Test): This test involves placing a pre-weighed amount of calcium chloride on the concrete surface for a specified period (typically 72 hours) under a sealed dome. The calcium chloride absorbs moisture from the concrete, and the weight gain is then used to calculate the MVER. The manufacturer of the vinyl plank flooring will typically specify the acceptable MVER for their product. If the MVER exceeds the recommended limit, moisture mitigation strategies must be implemented.
Relative Humidity (RH) Probe Test: This method utilizes an in-situ probe inserted into a drilled hole in the concrete slab to measure the relative humidity within the concrete. The RH reading provides an indication of the overall moisture content of the concrete. Again, the vinyl plank manufacturer will specify the acceptable RH level.
Plastic Sheet Test: While less accurate than the calcium chloride or RH probe tests, the plastic sheet test can provide a basic indication of moisture presence. A square of plastic is taped to the concrete surface for 24-72 hours. If condensation forms underneath the plastic, it suggests that excess moisture is present.
If the moisture test indicates elevated levels, several mitigation options are available. These include:
Moisture Barriers: Applying a liquid-applied epoxy or urethane moisture barrier to the concrete surface can effectively block moisture from migrating upwards. These barriers are specifically designed to create a waterproof layer beneath the flooring. Follow the manufacturer's instructions carefully for application and curing times.
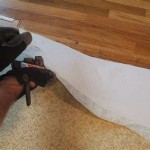
Underlayment with Vapor Barrier: Certain underlayments incorporate an integrated vapor barrier, providing an additional layer of protection against moisture. These underlayments can be used in conjunction with, or sometimes as an alternative to, liquid-applied moisture barriers. Ensure the underlayment is suitable for use on concrete subfloors and compatible with the chosen vinyl plank flooring.
Subfloor Ventilation Systems: In severe cases of moisture infiltration, a subfloor ventilation system may be required to actively remove moisture from beneath the flooring. These systems typically involve installing a network of perforated pipes and fans to circulate air and dry out the concrete slab.
Addressing moisture issues before installing vinyl plank flooring is crucial for a long-lasting and problem-free installation. Failure to do so can lead to costly repairs and replacements down the line.
Preparing the Concrete Subfloor
Once moisture issues have been addressed, the next step is to prepare the concrete subfloor to ensure a smooth, level, and clean surface for the vinyl plank flooring. Proper subfloor preparation is essential for achieving a professional-looking finish and preventing issues such as unevenness, gapping, and premature wear.
Cleaning the Concrete: Thoroughly clean the concrete surface to remove any dirt, dust, debris, oil, grease, or adhesive residue. Use a broom, vacuum, and scraper to remove loose particles. For stubborn stains or residues, use a concrete cleaner or degreaser specifically designed for the purpose. Allow the concrete to dry completely before proceeding to the next step.
Leveling the Concrete: Concrete floors are rarely perfectly level. Any significant dips or bumps in the surface can telegraph through the vinyl plank flooring, creating an uneven and unattractive appearance. Use a self-leveling compound to fill in low spots and create a smooth, even surface. Follow the manufacturer's instructions carefully for mixing and application. Allow the self-leveling compound to cure completely before proceeding. A long level or laser level can be used to identify areas that require leveling.
Patching Cracks and Holes: Fill any cracks or holes in the concrete surface with a concrete patching compound. These compounds are designed to bond strongly to concrete and provide a durable, seamless repair. Apply the patching compound according to the manufacturer's instructions and allow it to cure completely. Ensure the patching compound is flush with the surrounding concrete surface.
Grinding High Spots: If there are any high spots or protrusions on the concrete surface, use a concrete grinder to smooth them down. A diamond grinding wheel is typically used for this purpose. Wear appropriate safety gear, including eye protection, dust mask, and hearing protection when grinding concrete.
Priming the Concrete: In some cases, applying a primer to the concrete surface can improve the adhesion of the vinyl plank flooring adhesive or underlayment. Check the vinyl plank flooring manufacturer's recommendations to determine if a primer is necessary. Use a primer specifically designed for concrete subfloors and apply it according to the manufacturer's instructions.
A well-prepared concrete subfloor is the foundation for a successful vinyl plank flooring installation. Investing the time and effort to properly prepare the subfloor will pay off in the long run with a durable, attractive, and problem-free flooring installation.
Installing the Vinyl Plank Flooring
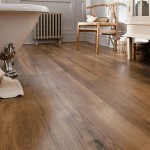
With the concrete subfloor properly prepared, the final step is to install the vinyl plank flooring. The installation process will vary depending on the type of vinyl plank flooring being used. The two main types are glue-down and click-lock (also known as floating) vinyl plank.
Acclimation: Regardless of the type of vinyl plank flooring, it is essential to acclimate the planks to the room's temperature and humidity for at least 48 hours before installation. This allows the planks to expand or contract slightly, preventing issues such as gapping or buckling after installation. Store the planks in the room where they will be installed, laying them flat and spaced apart to allow for adequate air circulation.
Glue-Down Vinyl Plank Installation: Glue-down vinyl plank flooring is adhered directly to the concrete subfloor using a specialized adhesive. The adhesive is typically applied with a notched trowel, ensuring even coverage. Follow the adhesive manufacturer's instructions carefully regarding application rate and open time. Lay the vinyl planks in the adhesive, pressing them firmly into place. Use a roller to ensure good contact between the planks and the adhesive. Work in small sections to prevent the adhesive from drying out before the planks are installed.
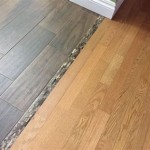
Click-Lock (Floating) Vinyl Plank Installation: Click-lock vinyl plank flooring features interlocking edges that allow the planks to be connected without the need for adhesive. This type of flooring is typically installed over an underlayment, which provides cushioning, sound insulation, and moisture protection. Start in one corner of the room and work your way across, connecting the planks by engaging the interlocking edges. Use a tapping block and hammer to gently tap the planks together for a tight, seamless fit. Maintain a consistent expansion gap around the perimeter of the room to allow for expansion and contraction.
Cutting Vinyl Planks: Vinyl planks can be easily cut using a utility knife and a straight edge. Score the plank several times along the cut line, then snap it along the score. For more complex cuts, such as around pipes or doorways, use a jigsaw or a miter saw.
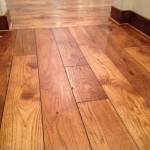
Layout and Design: Plan the layout of the vinyl planks before starting the installation. Consider the direction of the planks, the placement of seams, and any design elements you want to incorporate. Staggering the seams can create a more visually appealing and structurally sound floor. It's beneficial to dry-lay a few rows of planks to visualize the final layout before committing to adhesive or clicking the planks together.
Finishing Touches: Once the vinyl plank flooring is installed, install baseboards or quarter-round molding around the perimeter of the room to cover the expansion gap and provide a finished look. Clean the floor with a damp mop to remove any dust or debris.
Proper installation is crucial for achieving a durable and attractive vinyl plank floor. By following these steps carefully, a concrete basement can be transformed into a comfortable and aesthetically pleasing living space.

How To Install Vinyl Or Laminate Floors In A Basement Over Concrete Slab

Tips For Installing Vinyl Plank Over Concrete Floors Lemon Thistle

Best How To Install Vinyl Plank Flooring Four Generations One Roof

Laminate Flooring On Concrete Basement Floors Expert Installation Guide Csg Renovation

Best How To Install Vinyl Plank Flooring Four Generations One Roof

Concrete Subfloor Preparation For The Vinyl Floor Installation How To Diy Mryoucandoityourself

Best How To Install Vinyl Plank Flooring Four Generations One Roof

Tips For Installing Vinyl Plank Over Concrete Floors Lemon Thistle

Vinyl Plank Flooring Installation Basement Remodel Before And After

Ep5 Finishing A Basement How To Install Vinyl Plank Flooring Diy
Related Posts