How to Install Vinyl Plank Flooring on a Wood Subfloor
Vinyl plank flooring has become increasingly popular for its durability, affordability, and ease of installation. It's a great option for homeowners who want to upgrade their floors without undertaking a major renovation. Installing vinyl plank flooring on a wood subfloor is a relatively straightforward process that can be completed by most homeowners with basic DIY skills. This article provides a detailed guide to installing vinyl plank flooring on a wood subfloor, covering essential steps from preparation to finishing.
1. Prepare the Subfloor
Before installing vinyl plank flooring, ensure the subfloor is in good condition. This step is crucial for achieving a smooth, even surface that will prevent problems down the line. The following steps are involved in preparing the subfloor:
a. Inspect the Subfloor: Thoroughly inspect the subfloor for any unevenness, cracks, gaps, or loose boards. Repair any damaged areas using wood filler, wood putty, or replacement boards as needed.
b. Level the Subfloor: If the subfloor is uneven, consider using a self-leveling compound to create a smooth, even surface. Alternatively, you can use shims to level out individual boards.
c. Clean the Subfloor: Once the subfloor is level and repaired, thoroughly clean it to remove dirt, dust, or debris. This ensures proper adhesion for the underlayment and flooring.
2. Install the Underlayment
Underlayment serves as a moisture barrier and provides additional cushioning and sound insulation for the vinyl plank flooring. It's a crucial component in achieving a comfortable and durable floor installation.
a. Choose the Right Underlayment: Several types of underlayment are available, including foam, cork, and rubber underlayment. The best choice depends on your specific needs and budget.
b. Install the Underlayment: Follow the manufacturer's instructions for installing the chosen underlayment. Typically, it involves rolling out the underlayment and securing it using staples, tape, or adhesive.
c. Overlap Seams: When joining multiple pieces of underlayment, ensure they overlap by at least 6 inches to create a continuous moisture barrier.
3. Install the Vinyl Plank Flooring
Once the subfloor is prepared and the underlayment is installed, you can start laying the vinyl plank flooring. This involves several steps to ensure a seamless and professional installation:
a. Start in the Corner: Begin laying the planks in a corner of the room, working your way outward. Ensure the planks are aligned with the walls and are spaced evenly.
b. Use a Tap Block: Use a tap block to gently tap the planks together, ensuring a tight fit. Apply pressure evenly to avoid damaging the planks.
c. Stagger the Seams: When laying multiple rows, stagger the seams of the planks to create a stronger and more aesthetically pleasing floor. Do not align the seams of adjacent rows.
d. Cut Planks to Fit: Use a utility knife or a miter saw to cut the planks to fit around obstacles, such as doors, pipes, or walls. Ensure the cuts are precise and clean.
4. Installing Vinyl Plank Flooring Around Obstacles
When installing vinyl plank flooring, you'll likely encounter obstacles in the room, such as doorways, pipes, or walls. Dealing with these obstacles accurately is essential for a seamless and professional-looking installation. Here's how to install vinyl plank flooring around obstacles:
a. Measure and Cut: Carefully measure the space around the obstacle before cutting the planks. Cut the planks using a utility knife or a miter saw, ensuring the cuts are accurate and clean.
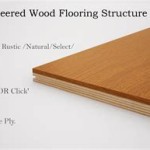
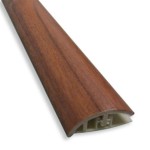
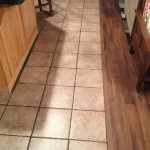
b. Use Transition Strips: Use transition strips to create a smooth transition between different floor coverings, such as between vinyl plank flooring and carpet.
c. Apply Adhesive: If necessary, apply adhesive to the back of the planks or the subfloor to secure the planks around obstacles.
5. Finishing Touches
After completing the installation, it's time to finish the flooring by adding the finishing touches to ensure a clean and professional look. These steps help create a seamless and stunning final product:
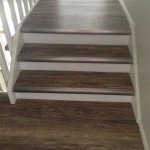
a. Install Baseboards and Trim: Install baseboards and trim around the perimeter of the room to cover the gaps between the flooring and the walls. Choose baseboards that complement the style and color of the vinyl plank flooring.
b. Clean the Floor: Once the installation is complete, clean the floor thoroughly using a soft-bristled broom or a damp mop to remove any debris or dust.
c. Allow Curing Time: Depending on the type of vinyl plank flooring, allow the flooring to cure for a few days before placing heavy furniture or appliances. This helps ensure the adhesive sets properly and the flooring bonds securely to the subfloor.

How To Install Vinyl Plank Flooring As A Beginner Home Renovation

How To Prep Wood Subfloor For Luxury Vinyl Plank Flooring Beginners Fix High And Low Spots

How To Install Vinyl Plank Flooring On Plywood Floor

How To Prep Your Sub Floor For Luxury Vinyl Flooring

A Beginner S Guide To Installing Vinyl Plank Flooring Dumpsters Com

Installing Vinyl Floors A Do It Yourself Guide The Honeycomb Home

How To Install Vinyl Plank Flooring As A Beginner Home Renovation

How To Install Glue Down Luxury Vinyl Plank Flooring On Osb Sub Floor

How To Prep Your Sub Floor For Luxury Vinyl Flooring

Preparing To Install Luxury Vinyl Flooring
Related Posts