How To Install Vinyl Plank Flooring On Concrete Basement
Installing vinyl plank flooring in a concrete basement is a popular and cost-effective way to transform a cold, utilitarian space into a warm and inviting living area. Vinyl plank flooring offers several advantages over other flooring options, including its water resistance, durability, ease of installation, and aesthetic versatility. However, proper preparation and installation are crucial for achieving a long-lasting and visually appealing result. This article provides a comprehensive guide to installing vinyl plank flooring on a concrete basement floor.
Before beginning the installation process, it's essential to understand the specific characteristics of concrete basements. Concrete is porous and can absorb moisture from the ground, potentially leading to mold growth or adhesive failure if adequate precautions are not taken. Proper moisture testing and remediation are absolute necessities. Additionally, concrete floors are rarely perfectly level, and any significant irregularities must be addressed to ensure a smooth and even surface for the vinyl planks.
Preparing the Concrete Subfloor
The success of any flooring installation hinges on the quality of the subfloor. Preparing the concrete subfloor is arguably the most important step in the vinyl plank installation process. This involves a series of steps designed to ensure that the surface is clean, level, dry, and free from any contaminants that could compromise the adhesion or stability of the flooring.
1. Cleaning the Concrete: The first step is to thoroughly clean the concrete floor. Use a broom or shop vacuum to remove any loose debris, dust, dirt, and cobwebs. Pay particular attention to corners and edges, where debris tends to accumulate. After removing the loose debris, scrub the floor with a mixture of warm water and a mild detergent. A stiff-bristled brush or floor scrubber can be used to loosen stubborn dirt and stains. Rinse the floor thoroughly with clean water to remove any soap residue. Allow the floor to dry completely before proceeding to the next step.
2. Moisture Testing: Concrete is porous and can absorb moisture from the ground, even if there are no visible signs of dampness. Excess moisture can lead to mold growth, adhesive failure, and warping of the vinyl planks. Therefore, it is critical to conduct a moisture test to determine the moisture content of the concrete. Several methods can be used for moisture testing, including:
*Calcium Chloride Test: This test involves placing a small dish containing calcium chloride on the concrete floor and sealing it with a vapor-impermeable cover. After a specified period (typically 72 hours), the dish is weighed to determine the amount of moisture absorbed by the calcium chloride. The results are used to calculate the moisture vapor emission rate (MVER). Consult the vinyl plank manufacturer's specifications for the acceptable MVER range. Exceeding the recommended moisture levels requires remediation before installation.
*Relative Humidity (RH) Test: This test uses a probe inserted into the concrete to measure the relative humidity within the slab. This method provides a more accurate and direct measurement of the concrete's moisture content and is less susceptible to external factors than the calcium chloride test. Again, refer to the vinyl plank manufacturer's specifications for acceptable RH levels.
*Polyethylene Film Test: This is a simpler, less precise test. Tape a 2'x2' piece of clear polyethylene film to the concrete floor and seal all edges with tape. After 24-72 hours, check the film for condensation. If condensation is present, it indicates high moisture levels and the need for further testing and remediation.
If the moisture test reveals excessive moisture levels, it is crucial to address the issue before installing the vinyl plank flooring. Common moisture remediation methods include:
*Applying a Moisture Barrier: A moisture barrier is a liquid-applied or sheet-based membrane that is applied to the concrete floor to prevent moisture from rising and affecting the flooring. Choose a moisture barrier that is compatible with the vinyl plank flooring and follow the manufacturer's instructions for application.
*Installing a Subfloor with a Vapor Barrier: Another option is to install a subfloor with an integrated vapor barrier. This creates a physical barrier between the concrete and the vinyl plank flooring, preventing moisture from reaching the flooring.
*Improving Ventilation: Increasing ventilation in the basement can help to reduce moisture levels. This can be achieved by installing a dehumidifier or by improving the airflow in the basement.
3. Leveling the Concrete: Concrete floors are rarely perfectly level. Even small irregularities can cause the vinyl planks to flex, leading to premature wear and tear, and unsightly gaps. It is important to level the concrete floor before installing the vinyl plank flooring. Several methods can be used to level the concrete, including:
*Self-Leveling Concrete: Self-leveling concrete is a cement-based compound that is poured onto the concrete floor and allowed to flow and level itself. This is the most effective way to level a large area of concrete. Follow the manufacturer's instructions for mixing and applying the self-leveling concrete.
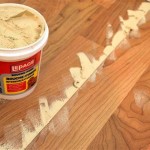
*Patching Compound: Patching compound is a cement-based or acrylic-based compound that is used to fill small cracks, holes, and imperfections in the concrete floor. Apply the patching compound with a trowel and allow it to dry completely before sanding smooth.
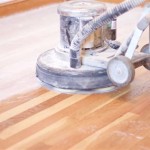
*Grinding: Grinding the concrete floor can remove high spots and create a more level surface. This method is best suited for smaller areas or for removing minor imperfections. A concrete grinder with a diamond grinding wheel is required for this task.
After leveling the concrete, use a long straightedge or level to check for any remaining irregularities. Repeat the leveling process as needed to create a smooth and level surface.
4. Removing Adhesives and Coatings: If the concrete floor has previously been covered with flooring, any adhesives or coatings must be removed before installing the vinyl plank flooring. Adhesives and coatings can interfere with the adhesion of the vinyl plank flooring and prevent it from bonding properly to the concrete. Several methods can be used to remove adhesives and coatings, including:
*Mechanical Removal: This involves using a scraper, chisel, or floor scraper to remove the adhesive or coating. This method is best suited for removing thick or stubborn adhesives.
*Chemical Removal: Chemical strippers can be used to soften and remove adhesives and coatings. Choose a chemical stripper that is compatible with the adhesive or coating being removed and follow the manufacturer's instructions for application and removal.
*Grinding: Grinding the concrete floor can also remove adhesives and coatings. This method is best suited for removing thin or brittle coatings.
After removing the adhesive or coating, clean the concrete floor thoroughly to remove any residue.
Acclimation and Layout
Before the actual installation, two crucial steps are acclimation of the vinyl planks and planning the layout. Skipping these steps can result in unsatisfactory results.
1. Acclimation: Vinyl plank flooring is sensitive to temperature and humidity changes. Allowing the planks to acclimate to the environment in which they will be installed is essential for preventing expansion and contraction issues after installation. Store the vinyl plank flooring in the basement for at least 48-72 hours before installation. This allows the planks to adjust to the temperature and humidity levels in the room. The ideal temperature range for acclimation is typically between 65°F and 85°F. Keep the planks in their original packaging and spread them out in the room to allow for proper air circulation.
2. Planning the Layout: Planning the layout of the vinyl plank flooring is important for achieving a visually appealing and structurally sound installation. Start by measuring the room and determining the direction in which the planks will be laid. Consider the shape of the room, the location of doorways and windows, and any existing architectural features. Generally, running the planks parallel to the longest wall of the room creates a more visually appealing and spacious look. Avoid installing the planks in a way that creates narrow strips along the edges of the room. If necessary, adjust the layout to ensure that the edge planks are at least half the width of a full plank.
Calculate how many rows of planks will be needed to cover the floor. If the last row will be less than half a plank wide, adjust the starting row by trimming planks to avoid a narrow strip. This ensures a more balanced and aesthetically pleasing finish. Using graph paper can be helpful for visualizing the layout and calculating the amount of flooring needed. Account for waste by adding 5-10% to the total square footage.
Installing the Vinyl Plank Flooring
With the subfloor properly prepared, the planks acclimated, and the layout planned, the installation process can begin. The specific installation method will depend on the type of vinyl plank flooring being used (e.g., click-lock, glue-down). Always refer to the manufacturer's instructions for specific installation guidelines.
1. Installing Click-Lock Vinyl Plank Flooring: Click-lock vinyl plank flooring is designed to be installed without glue or nails. The planks have interlocking edges that snap together to create a floating floor. This type of flooring is relatively easy to install and is a popular choice for DIYers.
*Starting the Installation: Begin by installing the first row of planks along the longest wall of the room. Use spacers along the wall to maintain a consistent expansion gap (typically 1/4" to 3/8") between the planks and the wall. This allows for expansion and contraction of the flooring without causing buckling or warping. Align the first plank with the corner of the room and click the adjoining plank into place. Continue adding planks to the first row, ensuring that each plank is securely locked into place.
*Cutting Planks: When you reach the end of the row, you will likely need to cut a plank to fit the remaining space. Use a utility knife, scoring tool, or vinyl plank cutter to make a clean cut. Measure the distance between the last full plank and the wall, accounting for the expansion gap. Transfer the measurement to the plank to be cut and score the plank along the cut line. Snap the plank along the score line or use a utility knife to cut through the plank completely.
*Installing Subsequent Rows: Begin the second row by staggering the joints between the planks. This creates a more visually appealing and structurally sound floor. Use the cutoff piece from the end of the first row to start the second row, if it is at least 6 inches long. This helps to minimize waste. Angle the plank into the groove of the previous row and then click it into place. Use a tapping block and hammer to gently tap the planks together for a tight fit.
*Working Around Obstacles: When you encounter obstacles such as pipes or door frames, you will need to cut the planks to fit around them. Use a measuring tape and pencil to mark the shape of the obstacle on the plank. Use a jigsaw or utility knife to cut out the shape, ensuring that the cut is precise and clean. Leave a small expansion gap around the obstacle.
*Finishing the Installation: Once all of the planks have been installed, remove the spacers from along the walls. Install baseboards or quarter-round molding to cover the expansion gap and provide a finished look. Use a rubber mallet to gently tap the molding into place.
2. Installing Glue-Down Vinyl Plank Flooring: Glue-down vinyl plank flooring requires the use of adhesive to attach the planks to the concrete subfloor. This type of flooring is more stable and durable than click-lock flooring, but it is also more difficult to install.
*Applying Adhesive: Apply the adhesive to the concrete subfloor using a trowel with the recommended notch size. Follow the adhesive manufacturer's instructions for application rate and open time. Work in small sections to prevent the adhesive from drying out before the planks are installed.
*Placing the Planks: Carefully place the vinyl planks onto the adhesive, ensuring that they are properly aligned and butted tightly together. Use a roller to press the planks firmly into the adhesive, ensuring that they are fully bonded to the subfloor. Wipe away any excess adhesive with a damp cloth.
*Cutting Planks: Cut the planks as needed to fit around walls, doorways, and other obstacles. Use a utility knife or vinyl plank cutter to make clean and precise cuts.
*Allowing Adhesive to Cure: Allow the adhesive to cure completely before walking on the floor. Refer to the adhesive manufacturer's instructions for the recommended curing time.
Regardless of the installation method, it is imperative to carefully follow the manufacturer's instructions for the specific type of vinyl plank flooring being used. These instructions will provide detailed guidance on subfloor preparation, adhesive selection (if applicable), plank alignment, cutting techniques, and other important considerations.

How To Install Vinyl Or Laminate Floors In A Basement Over Concrete Slab

Best How To Install Vinyl Plank Flooring Four Generations One Roof

How To Install Vinyl Plank Flooring On Concrete Step By Guide

Tips For Installing Vinyl Plank Over Concrete Floors Lemon Thistle

Vinyl Plank Flooring On Concrete Basement Pros Cons

Laminate Flooring On Concrete Basement Floors Expert Installation Guide Csg Renovation

Best How To Install Vinyl Plank Flooring Four Generations One Roof

Best How To Install Vinyl Plank Flooring Four Generations One Roof

Vinyl Plank Flooring On Concrete Basement Pros Cons

Ep5 Finishing A Basement How To Install Vinyl Plank Flooring Diy
Related Posts