How to Install Luxury Vinyl Plank Flooring on Concrete
Luxury vinyl plank (LVP) flooring has become increasingly popular due to its durability, water resistance, and aesthetic appeal. Its ease of installation, particularly on concrete subfloors, makes it a compelling option for homeowners and DIY enthusiasts alike. This article provides a comprehensive guide to installing LVP flooring on concrete, covering essential steps and considerations for a successful project.
Preparing the Concrete Subfloor
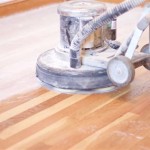
A solid and level concrete subfloor is crucial for a successful LVP installation. Begin by thoroughly cleaning the surface, removing any debris, dust, or residue. Use a dust mop, vacuum cleaner, or a damp cloth to ensure the floor is free of contaminants. Next, assess the levelness of the concrete using a long level or a straight edge. Minor unevenness can be addressed with a self-leveling compound, applied according to the manufacturer's instructions. For significant unevenness, consider professional leveling services.
Once the concrete is clean and level, it's essential to address any existing moisture problems. Concrete subfloors can release moisture, which can damage LVP flooring. To prevent this, a moisture barrier is recommended. This can be achieved using a moisture-resistant underlayment, a vapor barrier, or a combination of both. The chosen method should be compatible with the LVP flooring and meet the manufacturer's requirements for moisture control.
Installing the Underlayment
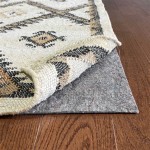
Underlayment serves as a cushioning layer between the concrete and the LVP flooring, providing insulation, sound absorption, and moisture protection. Choose an underlayment specifically designed for LVP flooring, ensuring compatibility with the chosen installation method. The underlayment should be rolled out across the entire surface, ensuring it is smooth and free of wrinkles or creases. Use a utility knife to trim any excess underlayment around the edges and in corners.
The underlayment must be securely attached to the concrete subfloor. For some underlayments, adhesive tape may be required. Consult the manufacturer's instructions for specific guidelines on securing the underlayment. A properly installed underlayment provides a stable and cushioned base for the LVP planks, contributing to a successful and durable installation.
Laying the LVP Planks
With the subfloor and underlayment prepared, it's time to install the LVP planks. Start by choosing the direction for laying the planks, considering the room's layout and the direction of natural light. Most LVP planks have a click-lock system, allowing them to be easily interlocked without the need for adhesives. Begin in a corner of the room, ensuring the first plank is aligned with the desired layout. Carefully click the planks together, ensuring they are tightly fitted.
As you proceed across the room, maintain a consistent spacing between planks, using a tapping block to securely fit them together. Use a utility knife to trim any excess planks near walls or obstacles. For areas with irregular shapes, consider using a jigsaw or a specialized LVP cutting tool for precise cuts. When reaching doors or other openings, trim the planks to achieve a seamless transition.
Securing the LVP Flooring
Although LVP planks are typically installed using a click-lock system, additional securing methods may be employed for areas with high traffic, such as near doorways or entryways. These methods include:
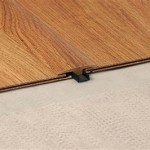
- T-molding: This decorative trim covers the seam between the LVP and the adjacent flooring, providing a secure and aesthetically pleasing finish.
- Transition strips: Designed to smooth the transition between LVP flooring and other flooring types, transition strips also provide additional security.
- Adhesive: Some LVP products may require adhesive to secure the planks to the underlayment, especially in areas subject to heavy foot traffic or movement.
Important Considerations
When installing LVP flooring on concrete, consider the following factors:
- Acclimation: Allow LVP planks to acclimate to the room's temperature and humidity for at least 24 hours before installation. This helps prevent warping or expansion.
- Expansion gaps: Leave expansion gaps of approximately 1/4 inch around the perimeter of the room to allow for movement as the flooring expands and contracts.
- Professional assistance: For large or complex installations, consider hiring a professional flooring installer for expert guidance and installation.
By following these steps and considering these important factors, you can successfully install LVP flooring on concrete, creating a durable, stylish, and functional floor for your home.

How To Prepare A Concrete Floor For Vinyl Flooring Parrys

Tips For Installing Vinyl Plank Over Concrete Floors Lemon Thistle

How To Install Vinyl Plank Flooring On Concrete Step By Tutorial

10 Beginner Mistakes Installing Vinyl Plank Flooring

Tips For Installing Vinyl Plank Over Concrete Floors Lemon Thistle

Installing Luxury Vinyl Plank Over Concrete Your Next Summer Diy Project

Lvp Flooring Installation How To Install Luxury Vinyl Plank In A Basement Diy

Installing Vinyl Plank Flooring For Beginners Anika S Diy Life

Laying Vinyl Planks The Right Way Expert Guide By Fantastic Handyman

How To Install Luxury Vinyl Flooring On Concrete Honey Built Home
Related Posts