How To Install Hardwood Floors for Beginners
Installing hardwood floors can significantly enhance the aesthetic appeal and value of a home. While professional installation is an option, a motivated beginner can successfully tackle this project with careful planning, patience, and adherence to proper techniques. This article provides a comprehensive guide for beginners looking to install hardwood floors, covering essential steps from preparation to finishing.
Before embarking on the installation process, acquiring a thorough understanding of the necessary tools, materials, and techniques is paramount. This includes recognizing different types of hardwood flooring, selecting appropriate subfloors, and mastering the installation process itself.
Key Point 1: Preparation and Subfloor Assessment
Proper preparation is arguably the most crucial stage of hardwood floor installation. This stage includes assessing the existing subfloor, acclimating the hardwood flooring, and gathering the required tools and materials.
Assessing the Subfloor: The subfloor provides the foundation for the hardwood flooring. It must be clean, level, and structurally sound. Common subfloor materials include plywood and concrete. For plywood subfloors, ensure that the plywood is at least 3/4 inch thick and securely fastened to the joists. Check for any loose boards, squeaks, or signs of water damage. Repair or replace any damaged sections before proceeding. For concrete subfloors, check for cracks, moisture, and unevenness. Use a self-leveling compound to correct any significant dips or rises. A moisture meter should be used to test the moisture content of both wood and concrete subfloors. Excessive moisture can lead to warping and other problems with the hardwood flooring.
Acclimating the Hardwood Flooring: Hardwood flooring is a natural product that expands and contracts with changes in humidity. Acclimation is the process of allowing the hardwood flooring to adjust to the moisture content of the room in which it will be installed. This typically involves storing the unopened boxes of hardwood flooring in the room for several days (usually 3-5 days is sufficient) before installation. Follow the manufacturer's recommendations for acclimation time, as it can vary depending on the type of wood and the local climate. Maintaining consistent temperature and humidity levels during acclimation is crucial for optimal results.
Gathering Tools and Materials: Having the right tools and materials on hand is essential for a smooth installation process. Essential tools include a measuring tape, hammer, tapping block, pull bar, pry bar, moisture meter, circular saw or miter saw, safety glasses, knee pads, pencil, and a chalk line. Additional materials include hardwood flooring, underlayment (if required), nails or staples (depending on the type of flooring), wood glue, shims, and baseboards or quarter-round molding for finishing.
Key Point 2: The Installation Process
The actual installation process involves laying the hardwood flooring according to the manufacturer’s instructions, ensuring proper alignment, and securing each plank or strip to the subfloor.
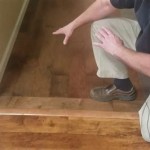
Laying the First Row: Begin by establishing a straight and accurate starting line. This is typically done along the longest straight wall in the room. Use a chalk line to mark the starting line, ensuring it is parallel to the wall and accounts for any necessary expansion gaps. Expansion gaps are small spaces (typically 1/4 to 3/8 inch) left around the perimeter of the room to allow for the natural expansion and contraction of the wood. Lay the first row of hardwood flooring along the chalk line, ensuring that the tongue side of the first row faces the starting wall. Use shims to maintain the expansion gap and keep the first row straight and aligned.
Securing the Hardwood Flooring: There are primarily two methods for securing hardwood flooring to the subfloor: nailing/stapling and gluing. The choice of method depends on the type of hardwood flooring and the subfloor material. Nailing or stapling is typically used for solid hardwood flooring installed over a wood subfloor. A specialized flooring nailer or stapler is used to drive fasteners at an angle through the tongue of the boards and into the subfloor. Ensure that the fasteners are properly set and do not damage the flooring. Gluing is often used for engineered hardwood flooring or when installing over a concrete subfloor. Apply a thin, even layer of wood glue to the back of each plank or strip and press it firmly into place. Excess glue should be wiped away immediately with a damp cloth.
Continuing the Installation: Continue laying the hardwood flooring row by row, working from the starting line towards the opposite wall. Stagger the end joints of the boards to create a visually appealing and structurally sound floor. Use a tapping block and hammer to gently tap each board into place, ensuring a tight fit. A pull bar can be used to pull the last row of boards into place along the wall. Remember to maintain the expansion gap around the perimeter of the room.
Key Point 3: Finishing and Detailing
The final stage of hardwood floor installation involves cutting and installing trim, removing shims, and cleaning the floor. This stage is crucial for achieving a professional and polished look.
Installing Trim: After the hardwood flooring is installed, the expansion gaps around the perimeter of the room need to be covered with trim. Common types of trim include baseboards, quarter-round molding, and shoe molding. Baseboards are installed along the base of the walls, while quarter-round and shoe molding are used to cover the gap between the baseboard and the floor. Measure and cut the trim to fit each section of the wall, using a miter saw to create accurate angles for corners. Attach the trim to the wall using nails or screws, ensuring that it is securely fastened and covers the expansion gap without pressing tightly against the flooring.
Removing Shims: Once the trim is installed, carefully remove the shims that were used to maintain the expansion gap. Ensure that no shims remain hidden under the trim, as they can prevent the flooring from expanding and contracting properly.
Cleaning the Floor: After the trim is installed and the shims are removed, thoroughly clean the hardwood floor to remove any dust, debris, or adhesive residue. Sweep or vacuum the floor to remove loose particles, and then use a damp mop to clean the surface. Avoid using excessive water, as it can damage the wood. Follow the manufacturer's recommendations for cleaning and maintaining the hardwood floor. Applying a protective finish, such as a polyurethane coating, can help to protect the floor from scratches and wear.
Addressing Potential Issues: During the installation process, several potential issues can arise. Gaps between boards, squeaking floors, and uneven surfaces are common problems that may require troubleshooting. Gaps can often be addressed by carefully tapping the boards together using a tapping block and hammer. Squeaking floors may indicate loose subfloor boards or inadequate fastening. Securing the subfloor with screws or adding shims beneath the flooring can often resolve this issue. Uneven surfaces may require sanding or leveling before installation. Addressing these issues promptly can prevent them from becoming more significant problems in the future.
Proper ventilation throughout the flooring process is important, especially when using adhesives or finishes. Ensure adequate airflow to dissipate fumes and promote drying. This can be achieved by opening windows and doors or using fans.
When cutting hardwood flooring or trim, safety should be prioritized. Wear safety glasses to protect your eyes from flying debris and use hearing protection when operating power tools. Secure the material being cut with clamps to prevent movement and ensure accurate cuts. Follow the manufacturer's instructions for the safe operation of all power tools.
Maintaining a tidy work area is essential for both safety and efficiency. Regularly sweep or vacuum up sawdust and debris to prevent tripping hazards and keep tools organized. A clean workspace promotes a more efficient and less stressful installation process.
The choice of hardwood flooring can also impact the installation process. Solid hardwood is typically thicker and more durable, but it is also more susceptible to moisture damage. Engineered hardwood is more dimensionally stable and less prone to warping, making it a better choice for areas with high humidity. Consider the specific characteristics of each type of flooring when making a selection.
Selecting the right type of underlayment can also improve the performance of the hardwood floor. Underlayment can provide cushioning, reduce noise transmission, and act as a moisture barrier. Choose an underlayment that is compatible with the type of flooring and the subfloor material.
When installing hardwood flooring in areas with radiant heat, it is essential to follow specific guidelines to prevent damage to the floor. Select a hardwood flooring that is specifically designed for use with radiant heat systems and follow the manufacturer's recommendations for installation and temperature control. Excessive heat can cause the wood to dry out and crack.
Before starting the installation, it is advisable to create a detailed layout plan. This plan should include the direction of the flooring, the placement of boards, and the location of any seams or transitions. A well-planned layout can help to minimize waste and ensure a visually appealing finished product.
It is also crucial to check local building codes and regulations before starting the installation. Some areas may have specific requirements for flooring materials, installation methods, or permits. Complying with these regulations can prevent costly fines and delays.

How To Install Hardwood Flooring For Beginners
:strip_icc()/101206833-2e499ef612434b6b8ab6e5b62422a78f.jpg?strip=all "How To Install Hardwood Floors")
How To Install Hardwood Floors

How To Install Laminate Flooring For Beginners

How To Install Hardwood Flooring For Beginners

Installing Hardwood Flooring For The First Time How To Install Wood Floors

How To Install A Hardwood Floor Build This Weekend

How To Install Hardwood Flooring The Home Depot

How To Install Hardwood Flooring The Home Depot
:strip_icc()/101206836-29035ec5a7c34a12a4c00cd5101818d4.jpg?strip=all "How To Install Hardwood Floors")
How To Install Hardwood Floors

How To Install Diy Hardwood Flooring With Tips For Beginners Crafted Work
Related Posts