How To Install Glue Down Vinyl Plank Flooring On Wood Subfloor
Installing glue-down vinyl plank flooring over a wood subfloor is a popular choice for homeowners looking for a durable, aesthetically pleasing, and relatively easy-to-maintain flooring option. However, the success of the installation hinges on proper preparation and execution. This article provides a comprehensive guide on how to install glue-down vinyl plank flooring on a wood subfloor, covering essential steps from subfloor preparation to the final adhesive application.
Before embarking on the installation, it is crucial to understand the advantages and disadvantages of glue-down vinyl plank flooring. The primary benefit is its stability and resistance to movement, particularly in areas with temperature fluctuations or high moisture levels (although excessive moisture should still be avoided). The adhesive bonds the planks directly to the subfloor, creating a solid, unified surface. This also results in a quieter floor, as there is less space for sound to resonate. On the other hand, glue-down installation can be more labor-intensive than other vinyl plank flooring methods, such as click-lock systems. Furthermore, removing glue-down vinyl plank flooring can be significantly more challenging and may require specialized tools and techniques.
Proper planning is paramount for a successful flooring installation. Start by accurately measuring the room to determine the total square footage. Add an extra 5-10% to account for cuts, waste, and potential errors. Visit a reputable flooring supplier to select the desired vinyl plank flooring, ensuring that it is suitable for glue-down installation. Purchase the recommended adhesive, as using the wrong type can lead to bonding issues. Gather all necessary tools and materials, including a utility knife, measuring tape, straight edge, chalk line, notched trowel (specified by the adhesive manufacturer), roller, broom or vacuum, moisture meter, self-leveling compound (if required), and safety gear (eye protection, gloves, and knee pads).
Subfloor Preparation: The Foundation for Success
The most critical aspect of installing glue-down vinyl plank flooring is the preparation of the wood subfloor. A clean, level, and dry subfloor is essential for proper adhesion and long-term performance. Any imperfections or irregularities in the subfloor will telegraph through the vinyl planks, creating an uneven and unsightly surface.
The first step is to thoroughly inspect the wood subfloor. Look for signs of moisture damage, rot, mold, or insect infestation. Address any issues before proceeding with the installation. Moisture is the enemy of vinyl flooring, as it can weaken the adhesive bond and lead to warping or buckling. Use a moisture meter to check the moisture content of the subfloor. Most manufacturers recommend a moisture content of no more than 12-13% for wood subfloors before installing vinyl flooring. If the moisture level is too high, rectify the problem by improving ventilation, repairing leaks, or using vapor barriers.
Next, ensure the subfloor is structurally sound. Check for loose or squeaky boards and secure them with screws. Replace any damaged or deteriorated sections of the subfloor. Nail down any protruding nails to prevent them from interfering with the vinyl plank installation. Fill large gaps or cracks in the subfloor with wood filler or patching compound. Allow the filler to dry completely before proceeding.
Leveling the subfloor is crucial for achieving a smooth, even surface. Use a long level to identify any high or low spots. For minor imperfections (less than 1/4 inch), use patching compound to fill the low spots and feather them out to blend with the surrounding surface. Allow the patching compound to dry and sand it smooth. For larger irregularities (greater than 1/4 inch), consider using a self-leveling compound. Follow the manufacturer's instructions carefully when applying self-leveling compound. Ensure adequate ventilation and wear appropriate safety gear.
Once the subfloor is level and structurally sound, clean it thoroughly. Sweep or vacuum the entire surface to remove any dust, debris, or residue. Use a damp mop with a mild detergent to clean the subfloor, removing any grease or oil. Allow the subfloor to dry completely before proceeding with the adhesive application. The subfloor should be as free as possible from any contaminants that could interfere with the bond between the adhesive and the subfloor.
Adhesive Application: Achieving a Strong Bond
Selecting the correct adhesive is just as important as preparing the subfloor. Consult the vinyl plank flooring manufacturer's recommendations for the appropriate adhesive type. Using the wrong adhesive can result in inadequate bonding, leading to loose planks or complete failure of the installation. Most manufacturers recommend a pressure-sensitive adhesive specifically formulated for vinyl plank flooring.
Before applying the adhesive, ensure that the room temperature is within the manufacturer's recommended range. Most adhesives require a temperature between 65°F and 85°F for proper application and curing. Allow the vinyl planks to acclimate to the room temperature for at least 48 hours before installation. This will prevent expansion or contraction after installation, which could cause gaps or buckling.
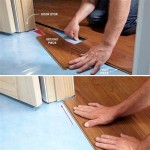
Start by establishing a straight reference line. Use a chalk line to snap a line parallel to the longest wall in the room. This line will serve as a guide for laying the first row of vinyl planks. Begin applying the adhesive to a small section of the subfloor, typically an area that can be covered in 15-30 minutes. Use a notched trowel to spread the adhesive evenly across the subfloor, following the manufacturer's instructions for the recommended notch size and angle. The notch size determines the amount of adhesive applied, which is critical for proper bonding.
Once the adhesive has been applied, allow it to tack up for the recommended time specified by the manufacturer. This is typically a few minutes, but it can vary depending on the adhesive type and the ambient temperature. The adhesive should be sticky to the touch but not wet. Carefully position the first row of vinyl planks along the reference line, ensuring that they are straight and aligned. Press each plank firmly into the adhesive, working from the center outwards to eliminate any air pockets.
Continue laying the vinyl planks row by row, maintaining a consistent pattern and ensuring that the planks are tightly butted together. Use a utility knife and straight edge to cut planks around walls, doorways, and other obstacles. Remember to leave a small expansion gap (typically 1/4 inch) around the perimeter of the room to allow for expansion and contraction due to temperature and humidity changes. This gap will be covered by baseboards or trim.
After each section of vinyl planks has been installed, use a roller to firmly press the planks into the adhesive. This will ensure maximum contact and create a strong bond. Pay particular attention to the edges and corners of the planks. Wipe away any excess adhesive with a damp cloth. Allow the adhesive to cure completely according to the manufacturer's instructions before walking on the floor or placing furniture on it.
Finishing Touches: Completing the Installation
Once the adhesive has cured, remove any spacers used to maintain the expansion gap. Install baseboards or trim around the perimeter of the room to cover the expansion gap and provide a finished look. Choose baseboards or trim that complement the vinyl plank flooring and the overall style of the room. Use a nail gun or screws to attach the baseboards or trim to the wall, ensuring that they are securely fastened.
Inspect the floor for any gaps, loose planks, or other imperfections. Address any issues promptly to prevent further damage. Use a color-matched caulk or sealant to fill any small gaps between the vinyl planks and the baseboards or trim. Clean the floor thoroughly with a mild detergent and water. Avoid using harsh chemicals or abrasive cleaners, as they can damage the vinyl plank flooring. Follow the manufacturer's recommendations for cleaning and maintenance to ensure the long-term durability and beauty of the floor.
Protect the floor with furniture pads under the legs of chairs, tables, and other heavy objects. Avoid dragging heavy objects across the floor, as this can scratch or damage the surface. Use entrance mats at doorways to prevent dirt and debris from being tracked onto the floor. With proper care and maintenance, glue-down vinyl plank flooring can provide years of durable and attractive service.

Post Nbl Express Eco Flooring

How To Install Gluedown Flooring

How To Install Glue Down Vinyl Plank

Deal Floors Step By Glue Down Vinyl Plank Installation Guide Flooring Blog Ideal In Dallas Fort Worth

How To Install Plank Vinyl Glue Down

Install Glue Down Vinyl Plank Flooring On A Wood Sub Floor Doityourself Com

A Beginner S Guide To Installing Vinyl Plank Flooring Dumpsters Com

How To Install Vinyl Plank Flooring The Home Depot

Floating Vinyl Plank Flooring Vs Glue Down 99cent Floor

How To Install Glue Down Luxury Vinyl Plank Flooring On Osb Sub Floor
Related Posts