Installing click lock vinyl flooring is a relatively easy and straightforward process. With a few simple steps, you can have a beautiful and durable floor that will last for years to come. Whether you’re looking for a low-maintenance flooring option or just want to freshen up the look of your home, click lock vinyl flooring is a great choice. Read on to learn how to install click lock vinyl flooring in your home.
Step 1: Prepare the Subfloor
The first step to installing click lock vinyl flooring is to ensure that the subfloor is properly prepared. If there is any existing flooring, it should be removed and the subfloor should be thoroughly cleaned. Make sure to remove any nails, screws, staples, or other objects that may obstruct the installation of the new flooring. Once the subfloor is clean and clear, it’s time to move on to the next step.
Step 2: Lay the Underlayment
The next step is to lay the underlayment. This serves as a cushion between the subfloor and the click lock vinyl flooring. The underlayment should be laid with the vapor barrier side facing up. This will help to protect the floor from any moisture that may be present. Make sure to lay the underlayment in the same direction as the flooring planks.
Step 3: Lay the Planks
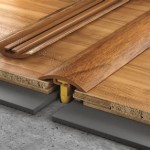
Now it’s time to start laying the click lock vinyl planks. Begin in the corner of the room and work your way out. Make sure to stagger the planks by at least 6 inches to ensure a uniform and sturdy installation. When laying the planks, be sure to click them together firmly to ensure that they are properly connected. To finish the installation, use a rubber mallet to tap the planks into place.
Step 4: Trim the Edges
Once all of the planks have been laid, it’s time to trim the edges of the floor. Use a utility knife to cut away any excess material from the edges and corners of the room. If necessary, use a jigsaw to make any intricate cuts. Make sure to wear protective eye-wear while cutting the vinyl to protect your eyes from any debris.
Step 5: Apply the Sealant
The last step is to apply a sealant to the click lock vinyl flooring. This will help to protect the floor from any water damage and dirt accumulation. Make sure to apply the sealant evenly and allow it to dry completely before walking on the floor. Follow the instructions on the sealant to ensure that it is applied correctly.
Conclusion
Installing click lock vinyl flooring is a relatively easy process, and can be completed in just a few simple steps. With the right preparation and materials, you can have a beautiful and durable floor that will last for years to come. Be sure to follow all of the steps outlined above and you’ll be enjoying your new click lock vinyl floor in no time.


Related Posts