How To Fix Cupping Wood Floors
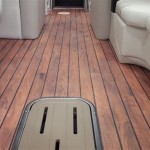
Cupping in wood floors is a common problem characterized by the edges of the wood planks being higher than their centers, creating a concave or "cupped" appearance. This condition arises primarily due to moisture imbalances within the flooring material, typically when the top surface of the wood is drier than the bottom surface. Addressing cupping requires a methodical approach to identify the source of the moisture issue and implement appropriate corrective measures.
Understanding the underlying causes of cupping is crucial for effective remediation. Without accurately diagnosing the moisture source, any repairs will likely be temporary, and the cupping will recur. This article details the steps involved in diagnosing, treating, and preventing cupping in wood floors, offering a comprehensive guide for homeowners and professionals alike.
Identifying the Source of Moisture
The first and most critical step in fixing cupped wood floors is to pinpoint the source of excess moisture. Wood is hygroscopic, meaning it readily absorbs and releases moisture depending on the surrounding environment. When the underside of the planks absorbs more moisture than the top, it causes the wood to expand, leading to the cupped shape.
Several factors can contribute to this moisture imbalance. Subfloor moisture is a common culprit. Concrete slabs, especially in basements or ground-level installations, can retain or transmit moisture from the ground. Leaks, whether from plumbing, appliances, or even condensation, can also introduce moisture beneath the flooring. Inspecting these areas is essential.
To accurately assess moisture levels, a moisture meter is indispensable. This tool measures the moisture content of both the wood flooring itself and the subfloor. Readings should be taken at multiple locations across the affected area to identify patterns of moisture concentration. Comparison readings from unaffected areas can serve as a baseline.
A relative humidity (RH) test is also beneficial in determining the overall environmental moisture conditions. High humidity levels in the room can contribute to moisture absorption in the flooring. Aim for an indoor RH between 30% and 50% to maintain optimal conditions for wood floors.
Look for visible signs of moisture damage, such as discoloration, staining, or mold growth. These indicators can help narrow down the potential source of the problem. Check for leaks around pipes, appliances, and windows. Investigate the drainage system around the foundation of the house to ensure proper water runoff away from the building.
Correcting the Moisture Imbalance
Once the source of moisture has been identified, the next step is to correct the underlying problem. This may involve a combination of strategies depending on the specific situation.
If the subfloor is the source of moisture, measures must be taken to reduce its moisture content. This may involve installing a vapor barrier beneath the flooring to prevent moisture migration from the concrete slab. Vapor barriers are typically polyethylene sheets or specialized membranes designed to block moisture transmission.
In cases of plumbing leaks, the leak must be repaired immediately. Allow the affected area to dry thoroughly before proceeding with any flooring repairs. A dehumidifier can be used to expedite the drying process.
If high humidity is the issue, a dehumidifier can be used to lower the humidity levels in the room. Ensure that the dehumidifier is properly sized for the space and that it is emptied regularly. Air conditioning can also help reduce humidity levels, particularly during warmer months.
Proper ventilation is crucial for maintaining a healthy indoor environment and preventing moisture buildup. Ensure that bathrooms and kitchens have adequate exhaust fans to remove moisture generated during showering, cooking, and other activities. Open windows periodically to allow for air circulation, weather permitting.
In some cases, it may be necessary to remove sections of the cupped flooring to allow for proper drying. This is particularly important if the moisture damage is extensive or if mold growth is present. Consult with a professional flooring contractor to determine the best course of action.
Repairing and Refinishing the Flooring
After the moisture issue has been addressed and the flooring has had sufficient time to dry, the next step is to repair and refinish the affected areas. The extent of the repair will depend on the severity of the cupping and the type of flooring.
For minor cupping, allowing the wood to acclimate to a drier environment may be sufficient. As the wood dries, it will naturally contract and return to its original shape. This process can take several weeks or even months, depending on the severity of the cupping and the ambient humidity levels.
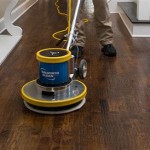
In more severe cases, sanding the floor may be necessary to level the surface. This process involves using a floor sander to remove the high edges of the planks, creating a smooth and even surface. Sanding should be performed by a professional flooring contractor to avoid damaging the flooring.
Before sanding, ensure that all nails or screws are set below the surface of the wood to prevent damage to the sanding equipment. Start with a coarse grit sandpaper to remove the bulk of the cupping, then gradually move to finer grits to smooth the surface.
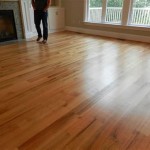
After sanding, the floor will need to be refinished to protect the wood and restore its appearance. The refinishing process typically involves applying several coats of a sealant, stain, and topcoat. Choose a finish that is appropriate for the type of wood and the intended use of the floor.
Ensure that the floor is thoroughly cleaned before applying any finish. Use a tack cloth to remove any remaining dust or debris. Apply the finish in thin, even coats, following the manufacturer's instructions. Allow each coat to dry completely before applying the next.
When refinishing, consider the existing finish on the rest of the floor. If possible, match the new finish to the existing finish to create a seamless appearance. This may involve consulting with a professional to determine the best type of stain and topcoat to use.
For engineered wood floors, sanding may be limited due to the thin veneer layer. In some cases, replacing the affected planks may be a more practical solution. This involves carefully removing the damaged planks and replacing them with new planks that match the existing flooring.
When replacing planks, ensure that the new planks are properly acclimated to the environment before installation. This will help prevent future cupping or other moisture-related problems. Use a high-quality adhesive to secure the new planks to the subfloor.
Maintaining consistent humidity levels is key to preventing future cupping. Installing a whole-house humidifier or dehumidifier can help regulate humidity levels throughout the year. Regularly monitor the humidity levels in your home and adjust the settings as needed.
Promptly address any leaks or moisture issues to prevent future water damage. Regularly inspect plumbing fixtures, appliances, and windows for leaks. Ensure that the drainage system around the foundation of the house is functioning properly to prevent water from seeping into the subfloor.
Consider the use of area rugs in high-traffic areas to protect the flooring from wear and tear. Avoid using excessive amounts of water when cleaning the floor. Use a damp mop and a pH-neutral cleaner specifically designed for wood floors.

What Causes Wood Floor Cupping To Do

5 Steps To Fix Wood Floor Cupping Sanding Floors

How To Fix Hardwood Floor Cupping

Will My Wood Floor Cupping Go Away

5 Tips To Prevent Hardwood Floor Cupping This Summer

What You Need To Know About Wood Floor Cupping Signature

How To Fix Floor Cupping Common Causes Solutions

5 Steps To Fix Wood Floor Cupping Sanding Floors

How To Reverse Wood Floor Cupping Hardwood Expert Advice

Wood Floor Mystery 16 It S Cupping But There No Water Here Business
Related Posts