Everything You Need To Know About Uniclic Vinyl Flooring Installation
Uniclic vinyl flooring has become a popular choice for homeowners and contractors alike, owing to its ease of installation, durability, and aesthetic versatility. This article provides a comprehensive guide to understanding and installing Uniclic vinyl flooring, covering everything from preparation to the final touches. By understanding the nuances of this type of flooring, individuals can achieve professional-looking results and enhance the value of their property.
Understanding Uniclic Technology
Uniclic refers to a patented click-lock system used in the construction of many types of flooring, including luxury vinyl tile (LVT) and planks (LVP). This system allows individual pieces to be interlocked together without the need for adhesives or nails. The design typically involves a tongue-and-groove mechanism on the edges of each plank or tile, which securely clicks into place when properly aligned and pressured. The key advantages of Uniclic technology include faster installation, reduced labor costs, and the ability to easily replace damaged sections without disturbing the entire floor.
The precise design of the Uniclic system can vary depending on the manufacturer, but the underlying principle remains consistent: to create a strong and seamless connection between flooring pieces. Some systems involve angling the planks together and then rotating them down to lock them in place, while others require a simple horizontal click motion. Familiarizing oneself with the specific Uniclic system used by the chosen flooring brand is crucial for a successful installation.
Furthermore, Uniclic systems are engineered to withstand the stresses of everyday foot traffic and temperature fluctuations. The interlocking mechanism distributes weight evenly across the floor, minimizing the risk of gapping or shifting. The tight seal created by the Uniclic system also helps prevent moisture from penetrating the subfloor, which can be particularly beneficial in kitchens, bathrooms, and basements.
Preparation is Key: Subfloor Assessment and Preparation
The success of any flooring installation, including Uniclic vinyl, heavily relies on proper subfloor preparation. A level, clean, and dry subfloor is essential for achieving a smooth and durable finished surface. Neglecting this crucial step can lead to a variety of problems, such as unevenness, squeaking, and premature wear.
The first step in subfloor preparation is to assess its condition. This involves inspecting the subfloor for any signs of damage, such as cracks, holes, or warping. These imperfections must be addressed before proceeding with the installation. Small cracks can be filled with a concrete patching compound, while larger holes may require more extensive repairs. Warped or uneven areas can be leveled using a self-leveling compound or by sanding down high spots.
Next, the subfloor must be thoroughly cleaned. This involves removing any debris, such as dust, dirt, paint, or adhesive residue. A vacuum cleaner or broom can be used for initial cleaning, followed by a damp mop to remove any remaining residue. It is important to allow the subfloor to dry completely before proceeding. The moisture content of the subfloor should be checked using a moisture meter to ensure it is within the recommended range specified by the vinyl flooring manufacturer.
For concrete subfloors, a vapor barrier may be required to prevent moisture from seeping up through the concrete and damaging the vinyl flooring. This is particularly important in basements or other areas with high moisture levels. The vapor barrier typically consists of a polyethylene film that is laid over the subfloor before the vinyl flooring is installed. Seams should be overlapped and taped to create a continuous barrier.
For wood subfloors, it is important to ensure that they are structurally sound and securely fastened to the joists. Any loose or damaged boards should be replaced before proceeding. It may also be necessary to install an underlayment to provide a smooth and stable surface for the vinyl flooring. Underlayment can also help to reduce noise and provide additional insulation.
Step-by-Step Installation Guide
Once the subfloor has been properly prepared, the installation of Uniclic vinyl flooring can begin. It is recommended to follow the manufacturer's instructions closely for best results. The following steps provide a general guideline for installing Uniclic vinyl flooring:
Acclimation: Allow the vinyl flooring to acclimate to the room's temperature and humidity for at least 48 hours before installation. This helps to prevent expansion or contraction after installation.
Layout: Plan the layout of the flooring to minimize waste and ensure a visually appealing pattern. Start by measuring the room and determining the direction in which the planks or tiles will be laid. Consider the placement of doorways, cabinets, and other obstacles.
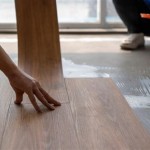
First Row: Begin by installing the first row of planks or tiles along a straight edge or wall. Use spacers to maintain a consistent expansion gap between the flooring and the wall. The expansion gap allows the flooring to expand and contract without putting pressure on the walls. Position the first plank with the tongue side facing the wall.
Connecting Planks: To connect subsequent planks, angle the tongue of the new plank into the groove of the existing plank and then rotate it down until it clicks into place. Apply gentle pressure to ensure a secure connection. Use a tapping block and mallet to gently tap the planks together if necessary.
Cutting Planks: Use a utility knife or a vinyl flooring cutter to cut planks or tiles to fit around obstacles or along walls. Score the surface of the plank several times and then snap it along the score line. For more complex cuts, a jigsaw may be necessary.
Subsequent Rows: Continue installing rows of planks or tiles, staggering the end joints to create a more visually appealing and structurally sound floor. Maintain the expansion gap along the walls as you proceed.
Final Row: The final row of planks or tiles may need to be cut to fit the remaining space. Use a measuring tape and a straight edge to determine the correct size and shape. Ensure that the final row also maintains the expansion gap.
Finishing Touches: Once the flooring has been installed, remove the spacers and install baseboards or quarter round molding to cover the expansion gap along the walls. This will give the floor a finished look and prevent dirt and debris from accumulating in the gap.
Tools and Materials Required
Successful Uniclic vinyl flooring installation requires a variety of tools and materials. Gathering these items before starting the project ensures a smooth and efficient process. The following is a list of essential tools and materials:
Vinyl Flooring: The selected Uniclic vinyl flooring, ensuring sufficient quantity to cover the entire area, accounting for waste due to cuts.
Measuring Tape: For accurate measurements of the room and flooring pieces.
Utility Knife: For scoring and cutting vinyl planks or tiles.
Straight Edge: For guiding the utility knife when cutting.
Tapping Block: A solid block used to gently tap planks together without damaging the edges.
Mallet: For tapping the tapping block to ensure a tight connection between planks.
Spacers: To maintain a consistent expansion gap along the walls.
Jigsaw: For making intricate cuts around obstacles.
Underlayment (Optional): For providing additional cushioning, noise reduction, and moisture resistance.
Vapor Barrier (If Required): A polyethylene film to prevent moisture from seeping up through the subfloor.
Baseboards or Quarter Round Molding: To cover the expansion gap along the walls.
Construction Adhesive (Optional): For added security in areas with high traffic or moisture.
Broom or Vacuum Cleaner: For cleaning the subfloor before and after installation.
Moisture Meter: To check the moisture content of the subfloor.
Self-Leveling Compound (If Required): To level uneven subfloors.
Safety Glasses: To protect eyes from debris.
Knee Pads: To protect knees during installation.
Troubleshooting Common Issues
Even with careful planning and execution, some common issues can arise during Uniclic vinyl flooring installation. Understanding these potential problems and their solutions can help to minimize frustration and ensure a successful outcome.
Gaps Between Planks: This can occur if the planks are not properly locked together or if the subfloor is uneven. Ensure that the planks are fully engaged by applying firm pressure and using a tapping block and mallet. If the subfloor is uneven, leveling it with self-leveling compound before installation is crucial.
Squeaking: Squeaking can be caused by movement between the vinyl flooring and the subfloor or by loose planks. Ensure that the subfloor is clean and free of debris. Apply construction adhesive to the back of the squeaking planks to secure them to the subfloor. If the squeaking persists, the planks may need to be removed and reinstalled.
Buckling or Warping: This can be caused by excessive moisture or temperature fluctuations. Ensure that the subfloor is dry and that the room's temperature and humidity are within the recommended range for the vinyl flooring. Provide adequate expansion gaps along the walls to allow the flooring to expand and contract without putting pressure on the walls.
Difficulty Locking Planks: Difficulty in locking planks together can be caused by debris in the locking mechanism or by damaged tongues or grooves. Clean the locking mechanism with a brush or vacuum cleaner. Inspect the tongues and grooves for any damage and replace any damaged planks.
Cutting Difficulties: Inaccurate cuts can lead to gaps or ill-fitting pieces. Use a sharp utility knife and a straight edge for precise cuts. Score the surface of the plank several times before snapping it along the score line. For more complex cuts, use a jigsaw and follow the cutting line carefully.
Maintenance and Care
Proper maintenance and care are essential for prolonging the life and appearance of Uniclic vinyl flooring. Regular cleaning and preventative measures can help to protect the flooring from damage and maintain its aesthetic appeal.
Regular Cleaning: Sweep or vacuum the floor regularly to remove dirt, dust, and debris. This prevents scratching and dulling of the surface. Use a soft-bristled broom or a vacuum cleaner with a soft brush attachment.
Damp Mopping: Mop the floor with a damp mop and a mild detergent specifically designed for vinyl flooring. Avoid using excessive water, as this can seep into the seams and damage the subfloor. Wring out the mop thoroughly before mopping the floor.
Avoid Harsh Chemicals: Do not use abrasive cleaners, bleach, or ammonia-based cleaners, as these can damage the finish of the vinyl flooring. Use a pH-neutral cleaner specifically formulated for vinyl flooring.
Protect from Scratches: Place mats or rugs at entrances to trap dirt and debris. Use furniture pads under the legs of furniture to prevent scratches. Avoid dragging heavy objects across the floor.
Prevent Stains: Clean up spills immediately to prevent staining. Use a soft cloth or sponge to blot the spill and then clean the area with a damp mop and a mild detergent.
Avoid Direct Sunlight: Prolonged exposure to direct sunlight can cause the vinyl flooring to fade or discolor. Use curtains or blinds to protect the flooring from direct sunlight.
By following these maintenance and care tips, individuals can ensure that their Uniclic vinyl flooring remains beautiful and durable for years to come.

Uniclic Flooring Animation Onflooring

Flooring 101 The Uniclic Joint Features Benefits Carlisle Wide Plank Floors

Floating Floor Installation Instructions Onflooring

Uniclic Vinyl Flooring Explained Wood And Beyond Blog

Uniclic Flooring Canadian Home Style

Uniclic Flooring Installation Process Expert Guide 2025

Easily Installation With Uniclic And Multifit

Uniclic Installation Torlys

Installation Lvt Rigid Uniclic Install And Clean

5gi I4f And Uniclic Vinyl Flooring Systems Compared Wood Beyond Blog
Related Posts