DIY Guide to Hardwood Floor Refinishing in Singapore
Hardwood floors add warmth and elegance to any home. However, over time, they can become dull, scratched, and worn, diminishing their aesthetic appeal. Refinishing hardwood floors restores their original beauty and extends their lifespan. In Singapore, where humidity and wear can take a toll, refinishing is a cost-effective alternative to complete floor replacement. This article provides a comprehensive DIY guide for refinishing hardwood floors in Singapore, outlining the necessary steps, tools, and precautions to achieve a professional-looking result.
Before embarking on a DIY hardwood floor refinishing project, consider the type of hardwood floor installed. Solid hardwood floors can typically be sanded and refinished multiple times, while engineered hardwood floors have a thinner veneer layer, limiting the number of possible refinishes. Understanding the floor's construction is crucial in determining the appropriate sanding depth and overall approach.
Assessing the Floor's Condition and Planning
The first step involves a thorough assessment of the floor's condition. Identify areas with deep scratches, gouges, stains, or other damage. This assessment will inform the sanding strategy and the need for wood filler or other repair materials. Determining the existing finish type is also critical, as different finishes require specific primers and topcoats for compatibility and adhesion.
Planning is essential for a successful refinishing project. This includes calculating the square footage of the area to be refinished to determine the quantity of materials needed, selecting the appropriate grit sequences for sanding, and choosing the desired stain color and finish type. Creating a detailed plan minimizes errors and ensures a smooth workflow.
Consider the cost of renting or purchasing the necessary equipment. Drum sanders, edgers, and buffers are essential tools for refinishing, and renting them can be a significant expense. Budgeting for these costs upfront prevents unexpected financial strain.
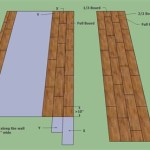
Furthermore, planning involves preparing the room or area to be refinished. Clear all furniture and belongings from the space. Cover doorways and vents to prevent dust from spreading to other parts of the home. Remove any baseboards or molding carefully, labeling them for easy reinstallation later. Preparing the room thoroughly saves time and effort during the sanding process.
Sanding the Hardwood Floor
Sanding is the most crucial and labor-intensive part of the refinishing process. The goal is to remove the existing finish and any imperfections from the wood surface, creating a smooth and even base for the new finish. Safety is paramount during sanding; always wear a dust mask, eye protection, and hearing protection to prevent inhaling dust and protect against noise.
Start with a coarse-grit sandpaper (e.g., 36-grit or 40-grit) to remove the old finish and level the floor. Operate the drum sander in overlapping passes, moving in the direction of the wood grain. Avoid stopping the sander while it's in contact with the floor, as this can create dips or gouges. Maintain a consistent speed and pressure to ensure even sanding.
After the initial sanding pass, switch to a medium-grit sandpaper (e.g., 60-grit or 80-grit) to remove the scratches left by the coarse-grit paper. Again, make overlapping passes in the direction of the wood grain. This step refines the surface and prepares it for the final sanding pass.
Use an edger to sand along the edges of the room, where the drum sander cannot reach. The edger requires careful handling to prevent damaging the walls or baseboards. Use the same grit sequence as with the drum sander, starting with a coarse grit and progressing to a finer grit.
The final sanding pass involves using a fine-grit sandpaper (e.g., 100-grit or 120-grit) to create a smooth, polished surface. This step is critical for ensuring the new finish adheres properly and provides a flawless appearance. After the final sanding, thoroughly vacuum the floor to remove all sanding dust.
Inspect the floor for any remaining imperfections, such as nail holes or gaps between boards. Fill these imperfections with wood filler that matches the wood species. Allow the wood filler to dry completely before sanding it smooth with fine-grit sandpaper.
Applying Stain and Finish
Once the floor is sanded and free of dust, the next step is to apply the stain, if desired. Staining enhances the wood's natural grain and adds color to the floor. Before applying the stain, test it in an inconspicuous area to ensure the desired color is achieved. Apply the stain evenly with a brush, rag, or applicator pad, following the manufacturer's instructions. Allow the stain to penetrate the wood for the recommended time, then wipe off any excess stain with a clean cloth.
Allow the stain to dry completely before applying the finish. The drying time will vary depending on the type of stain and the environmental conditions. Ensure proper ventilation in the room to facilitate drying. Once the stain is dry, apply the first coat of finish. Use a high-quality brush, roller, or applicator pad to apply the finish evenly, following the manufacturer's instructions. Avoid applying the finish too thickly, as this can cause it to sag or bubble.
Allow the first coat of finish to dry completely before sanding it lightly with fine-grit sandpaper (e.g., 220-grit or 320-grit). This step removes any imperfections and creates a smooth surface for the subsequent coat of finish. Vacuum the floor thoroughly to remove all sanding dust.
Apply the second and subsequent coats of finish, following the same procedure as with the first coat. The number of coats of finish will depend on the desired level of durability and sheen. Allow each coat of finish to dry completely before sanding and applying the next coat. After the final coat of finish has dried, allow the floor to cure for the recommended time before placing furniture or heavy objects on it.
Choosing the correct finish is crucial for the longevity of the refinished floor. Polyurethane finishes are durable and resistant to scratches and chemicals, making them a popular choice for high-traffic areas. Water-based finishes are low in VOCs (volatile organic compounds) and dry quickly, but they may not be as durable as polyurethane finishes. Oil-based finishes provide a warm, rich color and excellent durability, but they require longer drying times and emit stronger odors. Consider the pros and cons of each type of finish before making a decision.
Proper ventilation is essential throughout the finishing process. Open windows and doors to allow fresh air to circulate and prevent the buildup of fumes. Wear a respirator mask to protect against inhaling harmful vapors. Avoid smoking or using open flames near the finishing area.
In Singapore's humid climate, ensuring the correct drying times between coats is essential. High humidity can slow down the drying process, leading to a soft or tacky finish. Use a dehumidifier to control the humidity levels in the room and ensure the finish dries properly. Following the manufacturer's instructions regarding drying times is critical for achieving a durable and long-lasting finish.
Dispose of used stain and finish rags properly to prevent fire hazards. Soak the rags in water and place them in a sealed metal container before disposing of them. Never leave oily rags lying around, as they can spontaneously combust.
Post-Refinishing Care and Maintenance
After the floor has been refinished, proper care and maintenance are essential for preserving its beauty and extending its lifespan. Avoid walking on the floor in shoes for the first few days after finishing. Place felt pads under furniture legs to prevent scratches. Use rugs or mats in high-traffic areas to protect the floor from wear and tear.
Clean the floor regularly with a damp mop and a mild detergent designed for hardwood floors. Avoid using excessive amounts of water, as this can damage the wood. Never use abrasive cleaners, scouring pads, or steel wool, as these can scratch the finish.
Periodically inspect the floor for signs of wear or damage. Touch up any scratches or worn areas with a compatible finish. Reapply a coat of finish every few years to maintain the floor's protection and appearance.
Controlling humidity levels in the home is crucial for preserving hardwood floors in Singapore's climate. Use a dehumidifier during humid months to prevent the wood from expanding and contracting, which can lead to cracks or warping. Maintain a consistent temperature and humidity level in the home to minimize stress on the floor.
By following these guidelines, homeowners in Singapore can successfully refinish their hardwood floors and enjoy their beauty for years to come. Careful planning, proper execution, and diligent maintenance are key to achieving professional-looking results on a DIY basis.

Diy Parquet Varnishing Guide Dw Floor Polishing Singapore Marble Services

A Step By Guide To Diy Wood Floor Polishing Dw Singapore Parquet Marble Services

Professional Parquet Floor Repairs Singapore

Parquet Flooring Repair Dw Floor Polishing Singapore Marble Services

Parquet Floor Polishing Mr Wood Varnish

A Guide To Diy Water Damaged Parquet Flooring Repair Dw Floor Polishing Singapore Marble Services

A Guide To Diy Water Damaged Parquet Flooring Repair Dw Floor Polishing Singapore Marble Services

How Can I Prepare For A Hardwood Floor Recoating Woodfloor Masters Inc

A Guide To Diy Water Damaged Parquet Flooring Repair Dw Floor Polishing Singapore Marble Services

How To Repair Laminate Flooring Handyman Tips Singapore
Related Posts