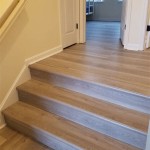
Laminate wood flooring is an affordable and stylish way to update the look of your home. Laminate wood flooring has the look of real hardwood floors without the hassle and added expense of buying and installing real hardwood. Installing laminate flooring is not a difficult process, but it does require some special tools and a few extra steps. Read on to learn how to install laminate wood flooring in your home.
What You’ll Need for Installation
Before beginning your installation, you will need a few essential tools and supplies. You will need a saw, a measuring tape, a mallet, a rubber mallet, a level, a jigsaw, a miter saw, a utility knife, a straight edge, and a vacuum cleaner. You will also need the appropriate underlayment, adhesive, and transition strips for your particular installation.
Preparing the Subfloor
Before you begin laying the laminate wood flooring, it is important to prepare the subfloor. This includes making sure that the subfloor is clean, flat, and level. If the subfloor is not clean and level, the laminate flooring will not lay properly and could cause damage to the flooring. If the subfloor is uneven, use self-leveling compound to fill in any dips or low spots. Once the subfloor is ready, you can begin laying the laminate wood flooring.
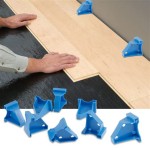
Laying the Laminate Planks
Once you have all the necessary tools and supplies, you can begin laying the laminate planks. Begin in the corner of the room and place the first plank with the grooved side facing the wall. Make sure the plank is level and use a rubber mallet to tap it into place. Continue to lay planks until you reach the opposite wall. Make sure to leave an expansion gap of about 1/8-inch between the wall and the planks for expansion and contraction of the floor.
Cutting the Planks to Fit
Once you reach the opposite wall, you may need to cut the planks to fit. Measure the remaining space and use a miter saw to cut the plank to size. Place the cut plank in the remaining space and tap it into place. If you need to, you can use a jigsaw for more intricate cuts.
Installing Transition Strips
Once the planks are all in place, you will need to install transition strips. Transition strips are used to transition from one flooring type to another, such as from laminate wood flooring to carpet. Secure the transition strip to the floor using adhesive, then tap it into place with a rubber mallet.
Finishing Up
Once the transition strips are in place, you can finish up the installation. Vacuum up any dust and debris, then use a damp cloth to clean the floor. Allow the floor to dry completely before walking on it or replacing furniture. With proper care and maintenance, your laminate wood flooring can last for many years.

:max_bytes(150000):strip_icc()/how-to-lay-laminate-flooring-1822250-01-0b84ff37785a4f8b94ab8bd30c300bfb.jpg)


/Installing-Laminate-Stagger-Joints-56a49e453df78cf772834b1f.JPG)


Related Posts