If you have a hardwood floor, you probably already know that it requires regular maintenance to keep it looking its best. Sanding a hardwood floor is an essential part of this maintenance. Here is a step-by-step guide to help you sand your hardwood floor and get it looking like new again.
Step 1: Preparing the Room for Sanding
The first step in sanding a hardwood floor is to prepare the room. Remove all furniture and other items from the room, and cover any remaining items with a drop cloth. Vacuum the floor and use a damp cloth to remove any dirt or dust that may be present.
Step 2: Choosing the Right Sander
The next step is to choose the right sander for the job. There are two types of sanders available—an orbital sander and a belt sander. An orbital sander is best for hardwood floors that have a few scratches or dents, whereas a belt sander is better for floors with a lot of scratches or gouges. Be sure to use the correct sander for the job to ensure the best results.
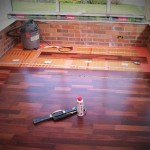
Step 3: Applying the Sandpaper
Once you have chosen the right sander, it is time to apply the sandpaper. Start by attaching the sandpaper to the sander, and then begin sanding the floor. Start in the furthest corner of the room and work your way out. Move the sander in a back-and-forth motion, taking care not to stay in one spot for too long. Be sure to sand the entire surface of the floor, including the corners and edges.
Step 4: Vacuuming the Floor
After sanding the floor, vacuum up all of the dust and debris. This is an important step in the sanding process, as it will ensure that the floor is free of any dust or debris before the next step.
Step 5: Applying the Stain or Finish
The next step is to apply the stain or finish to the floor. This can be done with a brush, roller, or sprayer. Be sure to read the directions on the product to ensure that you are applying the stain or finish correctly. Allow the stain or finish to dry completely before moving on to the next step.
Step 6: Applying the Polyurethane
The final step in the sanding process is to apply the polyurethane. This is important as it will help to protect the floor from future damage. Start in the corner of the room and work your way out, using a brush or roller to apply the polyurethane. Allow the polyurethane to dry completely before walking on the floor.
Conclusion
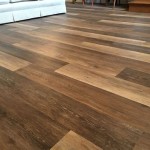
Sanding a hardwood floor is an important part of maintaining the floor’s appearance. Using the right tools and following the steps outlined in this guide will help you achieve the best results. With a little time and effort, you can have your hardwood floor looking like new again.


Related Posts