Refinishing Oak Wood Floors: A Comprehensive Guide
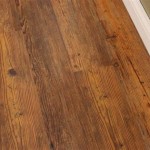
Oak wood floors are a popular choice for homeowners due to their durability, natural beauty, and versatility. They offer a timeless aesthetic that complements a wide range of interior design styles. However, over time, oak floors can become worn, scratched, or discolored due to daily wear and tear. Refinishing is an effective way to restore the original beauty of these floors, extending their lifespan and enhancing the overall value of the home.
The process of refinishing oak wood floors involves removing the existing finish, sanding the wood to create a smooth surface, and applying new coats of sealant and finish. This undertaking requires careful planning, the right tools, and a solid understanding of the necessary techniques. Mistakes can lead to uneven surfaces, unsightly scratches, or premature wear of the new finish, making it crucial to approach the project with diligence and precision.
Preparing for the Refinishing Process
Before starting any refinishing work, thorough preparation is essential. This includes removing all furniture, rugs, and other obstructions from the room. Any nails or staples protruding from the floor should be hammered down or removed. Protecting areas that are not being refinished, such as baseboards and door frames, is crucial using painter's tape and plastic sheeting. This will prevent dust and accidental damage during the sanding process.
A critical step is to thoroughly clean the floor. Sweep or vacuum the entire area to remove any loose dirt, debris, and pet hair. A more intensive cleaning may be necessary to remove embedded grime or wax buildup. Specific wood floor cleaners can be used to achieve a clean surface without damaging the wood.
Inspect the floor carefully for any signs of damage, such as loose boards, cracks, or water stains. Loose boards should be secured with wood screws or nails. Cracks can be filled with wood filler that is specifically designed for flooring. Severe water damage may require replacing the affected boards entirely. Addressing these issues before sanding will ensure a smooth and even finish.
Finally, it is important to consider the safety measures. Refinishing wood floors generates a considerable amount of dust, which can be harmful to breathe. Wearing a high-quality respirator mask is essential to protect the respiratory system. Eye protection, such as safety goggles, should also be worn to prevent dust and debris from entering the eyes. Proper ventilation is also critical. Opening windows and using fans can help to circulate air and reduce dust concentration.
Sanding the Oak Wood Floors
Sanding is the most labor-intensive and crucial step in refinishing oak wood floors. It involves removing the old finish and smoothing the surface to prepare it for the new finish. Different grits of sandpaper are used progressively to achieve the desired result. The initial sanding usually starts with a coarse grit, such as 36-grit or 40-grit, to remove the existing finish and any significant imperfections.
A drum sander is commonly used for large areas. This machine uses a rotating drum to sand the floor quickly and efficiently. However, it is essential to use the drum sander carefully and avoid staying in one spot for too long, as this can create dips or unevenness in the floor. The sander should be kept moving in a consistent pattern, overlapping each pass slightly to ensure complete coverage.
After the initial sanding, the floor should be vacuumed thoroughly to remove all the dust and debris. A medium-grit sandpaper, such as 60-grit or 80-grit, is then used to smooth out any remaining imperfections and prepare the floor for the final sanding. This step helps to remove the scratches left by the coarser grit sandpaper.
The final sanding is typically done with a fine-grit sandpaper, such as 100-grit or 120-grit. This step creates a very smooth surface that is ideal for applying the new finish. A floor edger is used to sand along the edges of the room and in corners where the drum sander cannot reach. The edger requires a steady hand and extra caution to avoid creating gouges or unevenness along the edges.
Between each sanding pass, the floor must be vacuumed meticulously. Any remaining dust can interfere with the sanding process and lead to an uneven finish. A tack cloth can also be used to wipe down the floor and remove any lingering dust particles.
Applying Sealant and Finish to Oak Floors
After sanding, the next step is to apply a sealant and finish to protect the wood and enhance its appearance. The choice of sealant and finish depends on the desired look and durability. Common options include polyurethane, varnish, and water-based finishes. Polyurethane is a popular choice due to its durability and resistance to scratches and stains. Water-based finishes are lower in VOCs (volatile organic compounds) and tend to dry faster than oil-based options.
Before applying the sealant or finish, the floor must be thoroughly cleaned one last time. Vacuuming and using a tack cloth will remove any remaining dust particles. Applying the sealant or finish to a clean surface is essential for ensuring proper adhesion and a smooth, even finish.
The sealant is typically applied first and acts as a primer, helping the finish adhere to the wood and preventing it from being absorbed too quickly. The sealant also enhances the natural color of the wood and provides a uniform base for the finish. Apply the sealant according to the manufacturer's instructions, using a brush, roller, or applicator pad.
After the sealant has dried completely, the finish can be applied. Multiple coats of finish are usually required to achieve the desired level of protection and durability. Allow each coat to dry completely before applying the next. Lightly sanding between coats with a very fine-grit sandpaper (e.g., 220-grit or 320-grit) can help to create an even smoother finish. This process is called "de-glossing" and helps the subsequent coat of finish adhere better.
The application technique depends on the type of finish and the desired appearance. Brushes are suitable for detailed work and for applying finish to edges and corners. Rollers are often used for larger areas, providing a smooth and even coverage. Applicator pads are another option and can be particularly useful for achieving a thin and uniform layer of finish.
During the application process, maintain a wet edge to prevent lap marks. Work in manageable sections and avoid allowing the finish to dry partially before applying the next section. Maintaining a consistent application technique will help to ensure a uniform and professional-looking finish.
After the final coat of finish has been applied, allow the floor to dry completely according to the manufacturer's instructions. This may take several days, depending on the type of finish and the environmental conditions. Avoid walking on the floor during the drying period to prevent scratches and other damage.
Once the finish has fully cured, the furniture and rugs can be returned to the room. Apply felt pads to the legs of furniture to prevent scratches and protect the new finish. Regular cleaning and maintenance will help to keep the refinished oak wood floors looking their best for years to come.

Refinish Red Oak Flooring How To Make It Like White Arched Manor

How To Refinish Hardwood Floors

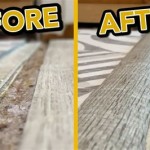
Refinishing Dated Hardwood Floors Transformation From Start To Finish

Chicago Hardwood Install

How We Refinished Our 100 Year Old White Oak Flooring Cassie Jean

Refinish Red Oak Flooring How To Make It Like White Arched Manor

How Long Does It Take To Refinish Hardwood Floors Refinishing Guide Reallyfloors America S Est Flooring

What Is The Cost To Refinish Hardwood Flooring

Hardwood Floor Refinishing Ub Hardwoods Plymouth Mn

Refinishing Old Wood Flooring Your Step By Guide To A New Look
Related Posts