Understanding Threshold Laminate Flooring Installation
Laminate flooring is a popular choice for homeowners due to its durability, affordability, and aesthetic appeal. However, a crucial aspect of a successful laminate flooring installation often overlooked is the installation of thresholds. Thresholds, also known as transition strips, are essential for creating a seamless and professional finish where laminate flooring meets other flooring types or doorways.
This article will delve into the intricacies of threshold laminate flooring installation, covering the different types of thresholds, the necessary tools and materials, the step-by-step installation process, and troubleshooting common issues. Understanding these elements is paramount for achieving a clean, safe, and aesthetically pleasing transition between different flooring surfaces.
Types of Thresholds for Laminate Flooring
Selecting the appropriate threshold is the first step in ensuring a smooth transition. Different situations require different types of thresholds, each designed to address specific height differences and aesthetic considerations. Understanding these types will help in choosing the best option for any given installation.
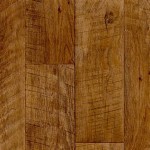
T-Molding: This type is used when two sections of laminate flooring meet at the same height. It creates a smooth, even transition between the two surfaces, concealing the expansion gap and preventing tripping hazards. T-moldings are typically made of wood or laminate and come in various colors and finishes to match the flooring.
Reducer Strips: Reducer strips are designed to bridge the gap between laminate flooring and a lower flooring surface, such as vinyl, tile, or carpet. They have a sloped profile that gradually transitions from the higher laminate floor to the lower surface, minimizing the height difference and creating a safer walkway. Reducer strips are also available in different materials and finishes.
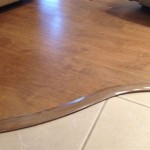
End Caps: End caps are used to finish the edges of laminate flooring against vertical surfaces, such as sliding glass doors, fireplaces, or walls where a baseboard is not present. They provide a clean, finished look and prevent the edges of the laminate from chipping or becoming damaged. End caps are typically narrow and have a simple, unobtrusive design.
Overlap Reducer Strips: These are similar to reducer strips but have a wider profile that overlaps the lower flooring surface. This type is particularly useful when the height difference between the two floors is significant or when the lower flooring surface is uneven. The overlap design provides extra stability and helps to conceal any imperfections.
Stair Nose: Stair nose moldings are specifically designed for finishing the edges of laminate flooring on staircases. They provide a rounded or beveled edge that is safe and comfortable to step on, while also protecting the laminate from wear and tear. Stair nose moldings are usually made of durable materials that can withstand heavy foot traffic.
The choice of threshold depends on the specific circumstances of the installation. Consider the height difference between the two flooring surfaces, the type of flooring on either side of the threshold, and the overall aesthetic you want to achieve. Measuring the gap accurately is crucial to selecting the right threshold profile.
Tools and Materials Required for Threshold Installation
Before beginning the installation process, it is essential to gather all the necessary tools and materials. Having everything on hand will streamline the process and prevent delays. Proper preparation contributes significantly to a successful and professional-looking installation.
Threshold Molding: Choose the appropriate type based on the considerations outlined previously. Purchase enough length to cover the entire transition area, accounting for any cuts or adjustments that may be necessary. Extra length is always recommended to avoid potential shortages.
Measuring Tape: Accurate measurements are crucial for ensuring a proper fit. A reliable measuring tape will help to determine the length of the threshold needed and to mark cutting lines accurately.
Pencil: Use a pencil to mark the cutting lines on the threshold. A sharp pencil will provide clear and precise lines for accurate cutting.
Saw: A saw is needed to cut the threshold to the correct length. A miter saw is recommended for making precise and angled cuts, but a hand saw can also be used. Choose a saw blade that is appropriate for the material of the threshold.
Drill and Screws: Most threshold moldings require screws for installation. Use a drill to create pilot holes for the screws, which will prevent the wood from splitting and make it easier to drive the screws in. Select screws that are the appropriate length and type for the threshold and the subfloor.
Construction Adhesive: Some installations may require construction adhesive to provide additional support and stability. Apply the adhesive sparingly to the subfloor before installing the threshold.
Hammer and Tapping Block: A hammer and tapping block may be needed to gently tap the threshold into place, especially when installing T-moldings or reducer strips. The tapping block will protect the surface of the threshold from damage.
Safety Glasses and Gloves: Always wear safety glasses and gloves to protect your eyes and hands during the installation process. Sawing and drilling can create dust and debris that can be harmful.
Having all these tools and materials readily available will ensure a smooth and efficient threshold installation.
Step-by-Step Guide to Installing Laminate Flooring Thresholds
The installation process for laminate flooring thresholds involves several key steps, each requiring careful attention to detail. Following these steps will ensure a secure, aesthetically pleasing, and safe transition between flooring surfaces.
Step 1: Measure and Cut the Threshold: Begin by measuring the width of the doorway or the length of the transition area. Use a measuring tape to determine the required length of the threshold molding. Transfer this measurement to the threshold and mark the cutting line with a pencil. Use a saw to cut the threshold to the correct length, ensuring a clean and precise cut. For angled cuts, use a miter saw.
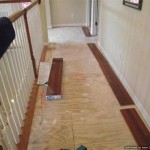
Step 2: Prepare the Subfloor: Ensure that the subfloor is clean, level, and free of debris. Remove any nails, screws, or staples that may be protruding from the subfloor. Fill any holes or cracks with wood filler and allow it to dry completely. If the subfloor is uneven, use a self-leveling compound to create a smooth and even surface.
Step 3: Position the Threshold: Place the threshold molding in the desired position, aligning it with the edges of the laminate flooring and the adjacent flooring surface. Ensure that the threshold is centered over the transition area and that it is flush with both flooring surfaces. If necessary, use shims to adjust the height of the threshold to achieve a level transition.
Step 4: Drill Pilot Holes: Using a drill and a drill bit that is slightly smaller than the diameter of the screws, create pilot holes through the threshold and into the subfloor. The pilot holes will prevent the wood from splitting and make it easier to drive the screws in. Space the pilot holes evenly along the length of the threshold, typically every 6 to 8 inches.
Step 5: Secure the Threshold: Insert screws into the pilot holes and tighten them until the threshold is securely fastened to the subfloor. Do not overtighten the screws, as this can damage the threshold or the subfloor. If using construction adhesive, apply a thin bead of adhesive to the underside of the threshold before screwing it into place.
Step 6: Finishing Touches: Once the threshold is securely installed, inspect it for any gaps or imperfections. Fill any gaps with wood filler or caulk and smooth it out with a putty knife. Clean any excess adhesive or caulk with a damp cloth. If necessary, touch up the finish of the threshold with paint or stain to match the flooring.
Step 7: Test the Transition: Walk across the threshold to ensure that it is level and secure. Check for any tripping hazards or unevenness. If any adjustments are needed, loosen the screws and reposition the threshold. Retighten the screws and retest the transition. Repeat this process until the threshold is perfectly level and secure.
By following these steps carefully, one can achieve a professional-looking and functional threshold installation.
Troubleshooting Common Issues
Even with careful planning and execution, certain issues may arise during the threshold installation process. Being prepared to address these problems can prevent frustration and ensure a successful outcome.
Threshold is Too Long or Too Short: If the threshold is too long, simply recut it to the correct length using a saw. If the threshold is too short, it will need to be replaced with a longer piece. Always double-check measurements before cutting to avoid this issue.
Threshold is Not Level: If the threshold is not level, use shims to adjust the height. Place shims under the threshold until it is flush with both flooring surfaces. Secure the shims with construction adhesive or screws.
Screws Are Stripping: If the screws are stripping, try using a larger screw or a screw with a coarser thread. You can also try inserting a wood toothpick into the pilot hole to provide a tighter grip for the screw.
Threshold is Loose: If the threshold is loose, try adding more screws or using construction adhesive. Ensure that the screws are properly tightened and that the adhesive is fully cured before walking on the threshold.
Threshold is Cracking or Splitting: If the threshold is cracking or splitting, it may be due to overtightening the screws or using a drill bit that is too small. Use a drill bit that is slightly smaller than the diameter of the screws and avoid overtightening them. If the threshold is already cracked or split, it may need to be replaced.
Addressing these common issues promptly and effectively will contribute to a successful and long-lasting threshold installation.

How To Install A Threshold With Large Change In Height

How To Install A Threshold Between Rooms On Laminate

Laminate Floor With Existing Threshold Contractor Talk Professional Construction And Remodeling Forum

How To Transition Diffe Tile Wood Floor Heights

Home Diy How To Install Transition Strips On New Floor Partselect Com

Installing Door Threshold On Laminate Flooring

Transition Threshold For Wood Flooring Andybozeman Com

How To Create A Exterior Door Threshold For Vinyl Flooring

Your Ultimate Guide To Installing Wooden Thresholds At Home Timber2udirect

What Is A Threshold Transition Strip Knowledge
Related Posts