Vinyl Flooring Installation: A Comprehensive Guide for Homesteads
Vinyl flooring stands as a practical and aesthetically versatile option for homesteads, offering durability, water resistance, and ease of maintenance. This flooring type suits various spaces, from kitchens and bathrooms to living areas and even workshops. A successful installation hinges on meticulous preparation, precise execution, and adherence to manufacturer guidelines. This article provides a comprehensive guide to installing vinyl flooring in a homestead setting, covering essential steps and considerations.
Preparing the Subfloor
Subfloor preparation represents the cornerstone of any successful vinyl flooring installation. The subfloor must be clean, level, dry, and structurally sound. Any imperfections will telegraph through the vinyl, leading to uneven wear, potential damage, and an unprofessional appearance. In a homestead, where subfloors might be exposed to harsher conditions or older construction techniques, thorough inspection and remediation are particularly critical.
Inspection: Begin with a comprehensive inspection of the existing subfloor. Look for signs of water damage, rot, mold, or insect infestation. Address these issues before proceeding with any further work. Check for loose boards, protruding nails or screws, and uneven surfaces. Use a straightedge and level to identify any high or low spots exceeding the manufacturer's recommended tolerance, typically around 3/16 inch over a 10-foot span. Note the subfloor material – plywood, OSB (oriented strand board), or concrete – as this will influence the choice of preparation methods and materials.
Cleaning: Thoroughly clean the subfloor to remove all traces of dirt, dust, debris, grease, paint splatters, and adhesive residue. Vacuum the surface repeatedly, paying attention to corners and edges. Scrape away any loose debris with a putty knife or scraper. For stubborn stains or adhesive residue, use appropriate cleaning solutions formulated for the subfloor material. Ensure the subfloor is completely dry before proceeding.
Leveling: Leveling the subfloor is crucial for a professional-looking and long-lasting vinyl floor. Low spots can be filled with self-leveling compound or patching compound, depending on the size and depth of the imperfection. Follow the manufacturer's instructions carefully when mixing and applying these compounds. Allow sufficient drying time, typically 24-48 hours, before sanding the surface smooth. High spots can be sanded down using a floor sander or belt sander. Exercise caution to avoid damaging the subfloor during sanding. In cases of significant unevenness, consider installing a new layer of underlayment to create a flat and stable surface.
Underlayment (Optional): Installing an underlayment provides a smooth and stable surface for the vinyl flooring, improves sound insulation, adds thermal insulation, and can help bridge minor imperfections in the subfloor. Underlayment is particularly beneficial when installing vinyl plank or tile flooring over concrete subfloors. Choose an underlayment specifically designed for vinyl flooring, considering its thickness, density, and compatibility with the chosen vinyl product. Install the underlayment according to the manufacturer's instructions, ensuring it is securely fastened to the subfloor.
Moisture Testing: Moisture content in the subfloor can significantly impact the adhesion and longevity of vinyl flooring. Conduct a moisture test to ensure the subfloor is within the acceptable moisture range specified by the vinyl flooring manufacturer. For concrete subfloors, use a calcium chloride test or a moisture meter designed for concrete. For wood subfloors, use a pin-type moisture meter. If the moisture content exceeds the acceptable limit, address the source of the moisture and allow the subfloor to dry completely before proceeding with the installation.
Installing Vinyl Flooring: Plank, Tile, or Sheet
The installation process varies depending on the type of vinyl flooring chosen: plank, tile, or sheet. Each type offers distinct advantages and requires specific techniques. Understanding the nuances of each installation method is crucial for achieving optimal results.
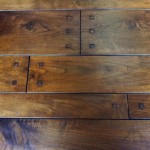
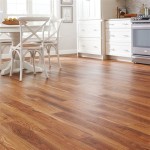
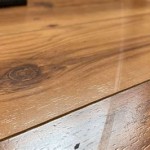
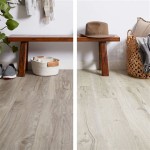
Vinyl Plank Flooring: Vinyl plank flooring offers a realistic wood-look and is relatively easy to install, making it a popular choice for homesteads. Most vinyl plank flooring features a click-lock system, allowing the planks to interlock without the need for adhesive. Begin by acclimating the vinyl planks to the room temperature for at least 48 hours before installation. This allows the planks to expand or contract, minimizing gapping after installation. Plan the layout of the planks to minimize waste and ensure a visually appealing pattern. Start in a corner of the room and work your way across, interlocking the planks as you go. Use a tapping block and rubber mallet to gently tap the planks together, ensuring a tight and secure fit. Cut planks to fit around obstacles, such as pipes or doorways, using a utility knife or jigsaw. Maintain expansion gaps around the perimeter of the room, as specified by the manufacturer. These gaps allow for natural expansion and contraction of the flooring.
Vinyl Tile Flooring: Vinyl tile flooring provides a versatile and durable option for kitchens, bathrooms, and other areas prone to moisture. Vinyl tiles are available in various sizes, shapes, and patterns, offering a wide range of design possibilities. Some vinyl tiles feature a peel-and-stick backing, while others require adhesive for installation. For peel-and-stick tiles, ensure the subfloor is perfectly clean and smooth before applying the tiles. Carefully align the tiles and press them firmly onto the subfloor, working from the center outward to avoid air bubbles. For tiles that require adhesive, apply the adhesive evenly to the subfloor using a notched trowel, following the adhesive manufacturer's instructions. Allow the adhesive to tack up slightly before placing the tiles. Position the tiles carefully and press them firmly onto the adhesive, ensuring proper alignment. Use a roller to press the tiles firmly into the adhesive and remove any air pockets. Cut tiles to fit around obstacles using a utility knife or tile cutter.
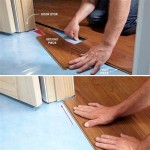
Sheet Vinyl Flooring: Sheet vinyl flooring offers a seamless and waterproof solution for large areas, such as kitchens and bathrooms. Installation of sheet vinyl is more complex than plank or tile flooring and often requires professional assistance. Begin by creating a template of the room using paper or cardboard. Transfer the template to the sheet vinyl and cut the vinyl to size, leaving a small overlap around the perimeter. Dry-fit the vinyl sheet in the room, ensuring it fits snugly and aligns with the walls. Fold back half of the vinyl sheet and apply adhesive to the subfloor using a notched trowel, following the adhesive manufacturer's instructions. Roll the vinyl sheet back into place, pressing it firmly into the adhesive. Repeat the process for the other half of the sheet. Use a roller to press the vinyl sheet firmly into the adhesive and remove any air pockets. Trim the excess vinyl around the perimeter of the room using a utility knife. Seal the edges of the vinyl sheet with caulk to prevent water from seeping underneath.
Finishing Touches and Maintenance
Once the vinyl flooring has been installed, several finishing touches will enhance the appearance and longevity of the floor. These include installing baseboards, shoe molding, and transitions, as well as implementing a regular maintenance routine.
Baseboards and Shoe Molding: Baseboards and shoe molding provide a finished look to the room, concealing expansion gaps and protecting the walls from damage. Install baseboards along the perimeter of the room, using nails or screws to secure them to the wall studs. Install shoe molding along the bottom edge of the baseboards, covering the expansion gap between the flooring and the wall. Miter the corners of the baseboards and shoe molding for a clean and professional look. Caulk any gaps between the baseboards and the wall or floor.
Transitions: Transitions are used to connect vinyl flooring to other types of flooring, such as carpet or tile. They also provide a smooth transition between rooms with different floor heights. Choose transitions that match the color and style of the vinyl flooring. Install the transitions according to the manufacturer's instructions, ensuring they are securely fastened to the subfloor.
Cleaning and Maintenance: Regular cleaning and maintenance will help to maintain the appearance and longevity of vinyl flooring. Sweep or vacuum the floor regularly to remove dirt and debris. Mop the floor with a mild detergent and water. Avoid using abrasive cleaners or harsh chemicals, as these can damage the surface of the vinyl. Protect the floor from scratches and dents by using furniture pads under heavy furniture. Clean up spills immediately to prevent staining. Consider using a vinyl floor polish to restore the shine and protect the surface from wear.
By following these guidelines, homesteaders can successfully install vinyl flooring, creating a durable, attractive, and easy-to-maintain surface that enhances the functionality and aesthetics of their living spaces.

How To Install Vinyl Plank Flooring In Your Shed Thrift Diving

The Surprisingly Simple Process Of Installing Lvp Flooring In My Shed

How To Install Vinyl Flooring Lvp

How To Install Glue Down Vinyl Plank Flooring Bathroom Concrete Floor

How To Install Vinyl Plank Flooring Best Laminate

Luxury Vinyl Plank Flooring Installation Waterproof Lvp Floors

How To Install Sheet Vinyl Floor Decor Adventures

Flooring Homestead Timbers

How To Install Vinyl Plank Flooring Quick And Simple

How To Install Vinyl Plank Flooring Quick And Simple
Related Posts