Preparing Wood Subfloor For Vinyl Plank Flooring
Installing vinyl plank flooring over a wood subfloor is a popular choice for homeowners seeking a durable, aesthetically pleasing, and relatively easy-to-maintain flooring option. However, the success of the installation hinges significantly on the preparation of the wood subfloor. A properly prepared subfloor ensures that the vinyl plank flooring lays flat, adheres correctly, and provides a stable and long-lasting surface. Neglecting this crucial step can lead to issues such as unevenness, squeaking, premature wear, and even complete flooring failure. This article elucidates the necessary steps involved in preparing a wood subfloor for vinyl plank flooring, providing a comprehensive guide for achieving optimal results.
Assessing the Subfloor's Condition
Before initiating any preparatory work, a thorough assessment of the existing wood subfloor is paramount. This assessment involves a detailed inspection to identify any existing problems that could compromise the integrity and performance of the new vinyl plank flooring. The following aspects should be carefully examined:
Moisture Content: Excessive moisture is a primary enemy of both wood subfloors and vinyl plank flooring. High moisture levels can lead to warping, cupping, and mold growth in the wood, as well as adhesive failure and dimensional instability in the vinyl planks. A moisture meter should be used to measure the moisture content of the subfloor in multiple locations. The ideal moisture content should be within the range recommended by the vinyl plank flooring manufacturer, typically between 6% and 12%. If the moisture content exceeds this range, the source of the moisture must be identified and rectified before proceeding. Potential sources include leaks from plumbing, inadequate ventilation, or ground moisture penetrating through the foundation.
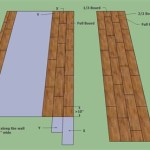
Levelness: The subfloor must be reasonably level to ensure that the vinyl plank flooring lays flat and does not develop dips or humps. Minor imperfections can be addressed with patching compounds, but significant unevenness requires more extensive corrective measures. A long level or straightedge should be used to check for levelness across the subfloor. Any dips or humps greater than 3/16 inch over a 10-foot span should be addressed. These areas can be marked for later repair.
Structural Integrity: The subfloor must be structurally sound to provide a stable base for the vinyl plank flooring. Check for signs of rot, decay, or insect damage. Any damaged sections must be replaced with new lumber of the same thickness and grade. Loose or squeaking subfloor boards should be securely fastened to the joists below using screws. Additionally, ensure that the subfloor is adequately supported by the floor joists. If the joists are spaced too far apart, or if they are sagging, additional support may be required.
Surface Condition: The surface of the subfloor should be clean, smooth, and free of any debris, such as nails, staples, screws, paint splatters, or adhesive residue. Any protrusions should be removed or hammered flat. The surface should also be free of any contaminants that could interfere with the adhesion of the vinyl plank flooring. These contaminants may include oil, grease, wax, or dust. A thorough cleaning is essential to ensure proper adhesion.
Preparing the Subfloor Surface
Once the subfloor's condition has been assessed and any necessary repairs have been made, the next step is to prepare the surface to ensure optimal adhesion and a smooth, even substrate for the vinyl plank flooring. This involves cleaning, leveling, and smoothing the subfloor.
Cleaning: A thorough cleaning of the subfloor is essential to remove any dirt, dust, debris, or contaminants that could interfere with the adhesion of the vinyl plank flooring. Begin by sweeping or vacuuming the entire subfloor to remove loose debris. Then, scrub the subfloor with a solution of mild detergent and water, using a stiff brush or mop. Rinse the subfloor thoroughly with clean water to remove any soap residue. Allow the subfloor to dry completely before proceeding to the next step. For stubborn stains or contaminants, a specialized cleaner may be required. Follow the manufacturer's instructions carefully when using any cleaning product.
Leveling: As previously mentioned, the subfloor must be reasonably level to ensure that the vinyl plank flooring lays flat and does not develop dips or humps. Minor imperfections can be addressed with a self-leveling underlayment or patching compound. For larger areas, a self-leveling underlayment may be the best option. This product is poured onto the subfloor and spreads out to create a smooth, level surface. Follow the manufacturer's instructions carefully when applying a self-leveling underlayment. For smaller dips or humps, a patching compound can be used. Apply the patching compound to the affected areas using a trowel, feathering the edges to blend with the surrounding surface. Allow the patching compound to dry completely before sanding.
Smoothing: After leveling the subfloor, it is important to smooth the surface to remove any imperfections, such as ridges, bumps, or rough patches. This can be accomplished by sanding the subfloor with a floor sander or a hand sander. Start with a coarse grit sandpaper to remove any major imperfections, and then gradually switch to finer grits to achieve a smooth finish. Be sure to wear a dust mask to protect yourself from airborne particles. After sanding, vacuum the subfloor thoroughly to remove any sanding dust. A smooth surface ensures that the vinyl plank flooring will lay flat and adhere properly.
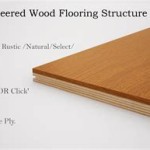
Installing Underlayment (Optional): While not always necessary, installing an underlayment can provide additional benefits, such as increased sound insulation, added cushioning, and improved moisture resistance. If an underlayment is desired, select one that is specifically designed for use with vinyl plank flooring. Follow the manufacturer's instructions carefully when installing the underlayment.
Addressing Specific Subfloor Issues
In addition to the general preparation steps outlined above, certain specific subfloor issues may require additional attention. These issues can range from gaps between subfloor boards to the presence of asbestos-containing materials.
Gaps Between Subfloor Boards: Gaps between subfloor boards can allow air and moisture to pass through, which can lead to drafts, heat loss, and potential moisture damage. These gaps can be filled with a wood filler or patching compound. Apply the filler to the gaps using a putty knife, and smooth it out flush with the surface of the subfloor. Allow the filler to dry completely before sanding. For larger gaps, it may be necessary to install shims or additional lumber to provide support.
Loose or Squeaking Subfloor Boards: Loose or squeaking subfloor boards can be annoying and can also compromise the stability of the vinyl plank flooring. These boards should be securely fastened to the joists below using screws. Use screws that are long enough to penetrate the joists by at least 1 inch. If the screws are not holding properly, it may be necessary to use larger screws or to add shims between the subfloor boards and the joists.
Presence of Asbestos-Containing Materials: In older homes, the subfloor or the adhesive used to install previous flooring may contain asbestos. Asbestos is a hazardous material that can cause serious health problems if inhaled. If you suspect that your subfloor may contain asbestos, it is important to have it tested by a qualified professional. If asbestos is present, it should be removed by a licensed asbestos abatement contractor. Do not attempt to remove asbestos yourself.
Dealing with Paint or Adhesive Residue: Existing paint or adhesive residue on the subfloor can interfere with the adhesion of the vinyl plank flooring. Paint can be removed with a paint scraper or a chemical paint stripper. Adhesive residue can be removed with a solvent-based adhesive remover. Follow the manufacturer's instructions carefully when using any chemical product. Be sure to wear appropriate personal protective equipment, such as gloves and a respirator.
By carefully assessing the subfloor's condition, preparing the surface properly, and addressing any specific issues, homeowners can ensure that their vinyl plank flooring is installed on a stable, level, and clean foundation. This will contribute to the longevity, appearance, and overall performance of the finished flooring. The detailed examination and meticulous preparation are investments that yield significant returns in the form of a beautiful and durable flooring solution.

How To Prep Wood Subfloor For Luxury Vinyl Plank Flooring Beginners Fix High And Low Spots

How To Prep Wood Subfloors For Vinyl Plank Flooring

Preparing Your Sub Floor For Luxury Vinyl Plank Flooring Floors Paws

How To Prepare The Floor For Vinyl Plank Installation

Floor Prep For Beginners Installing Vinyl Plank

How To Prep Your Sub Floor For Luxury Vinyl Flooring

How To Prep A Subfloor Lowe S

Preparing To Install Luxury Vinyl Flooring Floors For Paws

Installing Vinyl Floors A Do It Yourself Guide The Honeycomb Home

Complete Guide Underlayment For Vinyl Sheet Flooring
Related Posts