How to Level Vinyl Flooring: A Comprehensive Guide
Uneven subfloors can significantly compromise the appearance, durability, and longevity of vinyl flooring. Addressing this issue is crucial before installation to ensure a professional and aesthetically pleasing outcome. Leveling vinyl flooring involves a systematic approach, starting with a thorough assessment of the subfloor and proceeding with appropriate leveling techniques based on the specific discrepancies identified. This article provides a detailed guide on how to effectively level a subfloor prior to installing vinyl flooring, covering various methods, materials, and essential considerations.
The importance of a level subfloor cannot be overstated. Vinyl flooring, while relatively flexible, will conform to the contours of the surface beneath it. This means that any dips, humps, or inconsistencies in the subfloor will be visible and potentially problematic over time. These imperfections can lead to premature wear and tear, uneven stress distribution, and even cracking or tearing of the vinyl material. Furthermore, an uneven surface can create tripping hazards and compromise the overall structural integrity of the flooring installation.
Before embarking on any leveling project, it is essential to understand the different types of subfloors commonly encountered. These primarily include concrete slabs and wood subfloors. Concrete subfloors, while generally durable, can develop cracks, spalling, or unevenness due to settling, moisture penetration, or previous damage. Wood subfloors, comprised of plywood or oriented strand board (OSB), are susceptible to warping, bowing, and rot due to moisture exposure, improper installation, or structural issues. The approach to leveling will vary depending on the subfloor material and the nature of the imperfections present.
Assessing the Subfloor and Identifying Imperfections
The first step in leveling vinyl flooring is a comprehensive assessment of the subfloor. This involves both visual inspection and the use of leveling tools to identify and quantify any unevenness. Begin by thoroughly cleaning the subfloor, removing any debris, dirt, dust, and existing adhesives. This allows for a clear view of the surface and ensures accurate readings during the leveling process. A vacuum cleaner with a hard floor attachment is ideal for this task. Scrape away any old adhesive residue using a floor scraper or putty knife.
Once the subfloor is clean, perform a visual inspection, noting any obvious cracks, dips, humps, or other irregularities. Pay particular attention to areas where the subfloor meets walls, doorways, and other fixed structures. These areas are often prone to unevenness. Mark any identified imperfections with a pencil or marker for future reference.
The next step involves using a long straightedge and a level to determine the extent of the unevenness. A straightedge of at least 6 feet in length is recommended for larger areas, while a shorter straightedge may be sufficient for smaller spaces. Place the straightedge on the subfloor and use a level to check for any gaps or deviations. Slide the straightedge across the entire subfloor, systematically checking for high and low spots. Note the depth of any depressions and the height of any protrusions. Alternatively, a laser level can be used for a more precise measurement of the overall flatness of the subfloor. Laser levels project a perfectly horizontal or vertical beam of light, allowing for easy identification of any uneven areas.
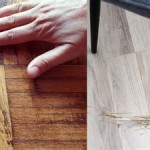
For concrete subfloors, also inspect for cracks. Hairline cracks are generally not a major concern, but wider cracks (greater than 1/8 inch) should be addressed to prevent further damage and ensure a stable base for the vinyl flooring. Check for any signs of moisture damage, such as discoloration, staining, or efflorescence (a white, powdery deposit). Moisture issues must be resolved before proceeding with any leveling or flooring installation.
For wood subfloors, check for signs of rot, warping, or delamination. Pay close attention to seams between plywood or OSB sheets, as these are common areas for unevenness. Ensure that the subfloor is securely fastened to the joists below. Loose or squeaky subflooring can indicate underlying structural problems that need to be addressed before leveling.
Leveling Techniques for Concrete Subfloors
Once the subfloor assessment is complete, the appropriate leveling technique can be selected based on the severity and type of imperfections present. For concrete subfloors, common leveling methods include using self-leveling concrete, patching compounds, and grinding high spots.
Self-leveling concrete is a pourable mixture that, as the name suggests, seeks its own level. It is ideal for correcting larger areas of unevenness or for creating a completely flat surface over an existing concrete slab. Before applying self-leveling concrete, thoroughly clean and prime the subfloor according to the manufacturer's instructions. Priming is essential to ensure proper adhesion and prevent air bubbles from forming in the self-leveling compound. Mix the self-leveling concrete according to the manufacturer's specifications, paying close attention to the water-to-powder ratio. Pour the mixture onto the subfloor, starting in the deepest areas. Use a gauge rake or notched trowel to distribute the self-leveling concrete evenly and to remove any air pockets. Allow the self-leveling concrete to cure completely according to the manufacturer's recommendations before proceeding with the vinyl flooring installation.
Patching compounds are suitable for filling smaller cracks, holes, and depressions in concrete subfloors. These compounds are typically pre-mixed or require the addition of water to form a smooth, workable paste. Apply the patching compound to the affected areas using a putty knife or trowel, feathering the edges to blend seamlessly with the surrounding surface. Allow the patching compound to dry completely before sanding smooth and removing any excess material. Several applications may be necessary to achieve a completely level surface. For larger cracks, consider using a concrete crack filler specifically designed for this purpose.
Grinding down high spots is an effective way to level concrete subfloors. This involves using a concrete grinder equipped with a diamond grinding wheel to remove material from the high areas. This method is best suited for minor imperfections and localized high spots. Wear appropriate safety gear, including a dust mask, eye protection, and hearing protection, when using a concrete grinder. Begin by marking the high spots with a pencil. Gradually grind down the high spots, using a sweeping motion to avoid creating uneven depressions. Regularly check the flatness of the surface with a straightedge and level to ensure that the grinding is progressing evenly. Vacuum up the dust created by the grinding process to maintain a clean and safe working environment.
Leveling Techniques for Wood Subfloors
Leveling wood subfloors requires a different approach than leveling concrete subfloors. Common techniques include using wood patching compounds, shimming low spots, and sanding high spots. Addressing moisture issues is paramount before any leveling work begins.
Wood patching compounds are designed to fill cracks, holes, and imperfections in wood subfloors. These compounds are typically made of wood flour and resin, creating a durable and paintable surface. Apply the wood patching compound to the affected areas using a putty knife or trowel, ensuring that the compound is packed tightly into the voids. Allow the compound to dry completely before sanding smooth and removing any excess material. For larger gaps or cracks, consider using wood filler or a wood epoxy specifically designed for structural repairs.
Shimming low spots involves inserting thin pieces of wood or other suitable material beneath the subfloor to raise it to the desired level. This method is particularly useful for correcting localized depressions or for leveling areas where the subfloor is sagging. Locate the low spots using a straightedge and level. Cut shims to the appropriate size and shape to fill the gap between the subfloor and the joists below. Secure the shims in place using construction adhesive or screws. Ensure that the shims are flush with the surrounding subfloor surface to prevent any bumps or unevenness. For larger areas of sagging, it may be necessary to reinforce the joists beneath the subfloor.
Sanding high spots is an effective way to level wood subfloors. This involves using a floor sander to remove material from the high areas. This method is best suited for minor imperfections and localized high spots. Rent a floor sander from a local hardware store or rental center. Wear appropriate safety gear, including a dust mask, eye protection, and hearing protection, when using a floor sander. Begin by using a coarse-grit sandpaper to remove the bulk of the high spots. Gradually switch to finer-grit sandpaper to smooth the surface and blend it seamlessly with the surrounding area. Regularly check the flatness of the surface with a straightedge and level to ensure that the sanding is progressing evenly. Vacuum up the dust created by the sanding process to maintain a clean and safe working environment.
Essential Considerations for Successful Leveling
Regardless of the subfloor material or the leveling technique used, there are several essential considerations that will contribute to a successful outcome. These include proper preparation, moisture control, and adherence to manufacturer's instructions.
Proper preparation is crucial for ensuring the adhesion and durability of the leveling materials. Thoroughly clean the subfloor, removing any debris, dirt, dust, and existing adhesives. Repair any structural damage or underlying issues before proceeding with the leveling process. Prime the subfloor according to the manufacturer's instructions to promote adhesion and prevent air bubbles. Ensure that the leveling materials are properly mixed and applied according to the manufacturer's specifications.
Moisture control is essential for preventing future problems with the vinyl flooring installation. Test the moisture content of the subfloor before proceeding with any leveling or flooring installation. The moisture content should be within the acceptable range specified by the vinyl flooring manufacturer. If the moisture content is too high, take steps to dry the subfloor before proceeding. This may involve using dehumidifiers, fans, or moisture barriers. Address any sources of moisture, such as leaks or groundwater intrusion, to prevent recurrence of the problem. Install a moisture barrier beneath the vinyl flooring to protect it from moisture vapor that may rise from the subfloor.
Adherence to manufacturer's instructions is paramount for ensuring the proper performance and warranty coverage of the leveling materials and the vinyl flooring. Carefully read and follow the manufacturer's instructions for each product used. Pay close attention to mixing ratios, application techniques, drying times, and other important specifications. Using the wrong materials or applying them incorrectly can compromise the integrity of the installation and void the warranty.

How To Prep Wood Subfloor For Luxury Vinyl Plank Flooring Beginners Fix High And Low Spots

Floor Prep For Beginners Installing Vinyl Plank

How To Level Your Floors

10 Beginner Mistakes Installing Vinyl Plank Flooring

10 Beginner Mistakes Installing Vinyl Plank Flooring Fixthisbuildthat

How To Prepare A Concrete Floor For Vinyl Flooring Parrys

20 Tips For A Great Vinyl Plank Flooring Installation

How To Level Your Floor For Perfect Vinyl Installation

A Beginner S Guide To Installing Vinyl Plank Flooring Dumpsters Com

Installing Luxury Vinyl Floors Over Engineered Hardwood Honey Built Home
Related Posts