How To Remove Laminate Flooring From Under Kitchen Units
Removing laminate flooring from underneath kitchen units presents a unique challenge compared to removing it from open areas. The process requires careful planning, specialized tools, and a methodical approach to avoid damaging the cabinetry or plumbing. Understanding the potential difficulties and employing the correct techniques ensures a successful and damage-free removal.
The primary obstacle when removing laminate flooring from under kitchen units is the limited space. Traditional methods, such as using a large pry bar, might be impossible. Furthermore, the flooring is often tightly fitted against the cabinets, making it difficult to separate the planks without force. This article outlines the necessary steps and considerations for safely and effectively removing laminate flooring from this confined area.
Assessing the Situation and Gathering Necessary Tools
Before commencing the removal process, a thorough assessment of the situation is crucial. This involves identifying the type of laminate flooring installed, the method of installation (e.g., click-lock, glued), and the presence of any obstructions such as plumbing or electrical wiring running beneath the cabinets. This assessment informs the selection of appropriate tools and techniques.
The type of laminate flooring significantly impacts the removal process. Click-lock flooring, which is designed to interlock without adhesive, is generally easier to remove than glued-down flooring. Glued-down flooring requires more effort and may necessitate the use of specialized tools to soften the adhesive.
The presence of plumbing or electrical wiring requires extreme caution. These utilities must be carefully identified and protected throughout the removal process. It is advisable to consult with a qualified professional if there is any uncertainty regarding the location or potential hazards associated with these utilities.
The following tools are typically required for removing laminate flooring from under kitchen units:
- Utility knife: For scoring the laminate planks.
- Pry bar (small): For gently lifting the planks. A smaller pry bar is preferred for tight spaces.
- Hammer: For tapping the pry bar or chisel.
- Chisel: For separating glued-down planks.
- Multi-tool with a flush-cut blade: For cutting the planks close to the cabinets.
- Oscillating tool: For making precise cuts around obstacles.
- Putty knife: For scraping away adhesive residue.
- Gloves: For hand protection.
- Safety glasses: For eye protection.
- Dust mask: For respiratory protection.
- Shop vacuum: For cleaning up debris.
- Moisture meter: To check the subfloor moisture levels after removal.
Having the correct tools readily available streamlines the removal process and minimizes the risk of damage.
Preparing the Area and Initiating the Removal Process
Preparation is paramount for a successful laminate flooring removal. This involves clearing the area, protecting the cabinets, and implementing safety precautions.
Begin by removing all movable items from the kitchen, including appliances if possible. Cover the exposed cabinets with protective sheeting or cardboard to prevent scratches or dents. Ensure adequate ventilation by opening windows or using fans to minimize dust exposure.
The removal process typically starts at the exposed edge of the laminate flooring. Use a utility knife to score the planks along the edge of the cabinets. This prevents chipping and splintering during the removal process. Score deeply enough to sever any sealant or adhesive that may be present.
For click-lock flooring, attempt to gently lift the planks by inserting a small pry bar between the plank and the subfloor. Apply steady, even pressure to avoid damaging the plank or the cabinet base. Once a small gap is created, use the pry bar to carefully detach the interlocking mechanism. Work systematically, plank by plank, until the flooring is removed from under the cabinets.
If the flooring is glued down, the removal process is more challenging. Use a heat gun or a specialized adhesive remover to soften the adhesive. Carefully apply heat or the remover to a small area and allow it to penetrate for the recommended time. Then, use a chisel and hammer to gently separate the plank from the subfloor. Work slowly and methodically, taking care not to damage the subfloor.
A multi-tool with a flush-cut blade is invaluable for cutting the planks flush against the cabinets. This allows for the removal of planks that are tightly fitted and difficult to pry up. The oscillating tool can be used to make precise cuts around pipes or other obstacles.
When encountering plumbing or electrical wiring, exercise extreme caution. If possible, disconnect the utilities before proceeding. If disconnection is not feasible, carefully work around the utilities, using hand tools to avoid damaging them. It may be necessary to cut the laminate flooring into smaller pieces to facilitate removal without disturbing the utilities.
Addressing Adhesive Residue and Preparing the Subfloor
After removing the laminate flooring, adhesive residue may remain on the subfloor. This residue must be removed to ensure a smooth and level surface for the new flooring.
Use a putty knife or scraper to remove any loose adhesive residue. For stubborn adhesive, consider using a specialized adhesive remover. Apply the remover according to the manufacturer's instructions and allow it to penetrate the adhesive for the recommended time. Then, use a scraper to remove the softened adhesive.
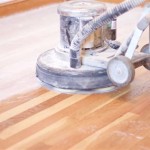
In some cases, sanding the subfloor may be necessary to remove remaining adhesive residue and create a smooth surface. Use a floor sander with a medium-grit sandpaper to lightly sand the subfloor. Be careful not to sand too aggressively, as this can damage the subfloor.
Once the adhesive residue has been removed, thoroughly clean the subfloor with a shop vacuum. This removes any remaining dust and debris. Inspect the subfloor for any damage, such as cracks or holes. Repair any damage before installing new flooring.
It is crucial to check the moisture level of the subfloor before installing new flooring. Use a moisture meter to measure the moisture content. The moisture level should be within the acceptable range specified by the flooring manufacturer. If the moisture level is too high, allow the subfloor to dry completely before proceeding.
After removing the laminate flooring and preparing the subfloor, consider priming the subfloor with a suitable primer. This helps to improve adhesion and prevent moisture from seeping into the subfloor. Allow the primer to dry completely before installing new flooring.
The removal of laminate flooring from under kitchen units requires patience, precision, and a thorough understanding of the materials and techniques involved. By following these steps and taking necessary precautions, damage to the cabinets and subfloor can be minimized.

Remove Hardwood Floors Under Cabinets Baseboards

How To Finish Wood Viny Flooring In Kitchens Bath Around Cabinets Tips Tricks For Beginners Diy

How To Remove Vinyl Flooring The Home Depot

How To Replace That Old Rotted Out Sink Base Floor Step By

What Comes First Flooring Or Cabinets

Draft Cold Air From Gap Underneath Kitchen Cabinets Home Improvement Stack Exchange

How To Remove Vinyl Flooring Mastic From Hardwood Floor Under Kitchen Cabinet Toe Kick Lumberjocks Woodworking Forum

How To Remove Laminate Flooring

Mobile Homes Removing Vinyl Flooring Floor Prep For

How To Remove Laminate Flooring The Home Depot
Related Posts