Hardwood Flooring Installation Tips and Tricks
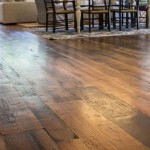
Hardwood flooring imparts a timeless elegance and warmth to any space. Installing it, however, is a project that demands meticulous planning, precise execution, and a thorough understanding of the nuances involved. This article provides a comprehensive overview of hardwood flooring installation, covering essential tips and tricks to ensure a successful and long-lasting result.
Before embarking on the installation process, careful preparation is paramount. This foundational stage sets the stage for a seamless and efficient project. Neglecting these preliminary steps can lead to avoidable complications and compromise the final outcome. Proper assessment of the subfloor, strategic acclimatization of the wood, and accurate measurement of the installation area form the bedrock of a successful hardwood flooring installation.
The type of hardwood selected significantly impacts the installation process. Solid hardwood, renowned for its durability and timeless appeal, typically requires nailing or gluing down, demanding a stable and even subfloor. Engineered hardwood, constructed with multiple layers of wood, offers greater dimensional stability and can be installed using various methods, including floating, gluing, or nailing. Understanding the specific requirements of the chosen hardwood flooring is crucial for selecting the appropriate installation technique and ensuring optimal performance.
Selecting the appropriate tools and materials is equally crucial. A high-quality moisture meter is essential for verifying the moisture content of both the subfloor and the hardwood flooring. This ensures compatibility and minimizes the risk of warping or buckling after installation. A reliable tapping block and pull bar are indispensable for achieving tight seams and preventing damage to the flooring during installation. Additionally, selecting the correct type of fasteners, adhesive, or underlayment based on the chosen installation method and subfloor material is critical for a secure and durable installation.
Preparing the Subfloor: The Foundation for Success
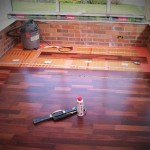
The subfloor's condition is arguably the most critical factor influencing the success of a hardwood flooring installation. A level, clean, and dry subfloor is essential for preventing unevenness, squeaking, and other issues that can compromise the integrity and appearance of the finished floor. Careful inspection of the subfloor is necessary to identify and address any deficiencies before proceeding with the installation.
Any existing flooring or debris should be removed completely to expose the bare subfloor. This allows for a thorough inspection and ensures proper adhesion of the new hardwood flooring. If the subfloor is concrete, it should be thoroughly cleaned and tested for moisture. Excessive moisture can lead to mold growth and damage the hardwood flooring. Using a concrete moisture meter is the most accurate way to assess the moisture content. If the moisture levels are too high, a moisture barrier should be installed before laying the hardwood floor.
For wood subfloors, check for any signs of rot, insect damage, or structural weakness. Damaged areas should be repaired or replaced to ensure a solid and stable foundation. The subfloor should also be thoroughly cleaned and sanded to remove any imperfections or residues. Leveling the subfloor is crucial for achieving a smooth and even surface. This can be accomplished using self-leveling compound for concrete subfloors or by adding shims to wood subfloors. The subfloor should be as level as possible to prevent unevenness in the finished floor.
Once the subfloor is prepared, it's essential to install an underlayment. The underlayment provides a moisture barrier and sound insulation and can help to smooth out minor imperfections in the subfloor. The type of underlayment selected should be compatible with the chosen hardwood flooring and the subfloor material. Follow the manufacturer's instructions for installing the underlayment to ensure proper performance.
Acclimatizing the Hardwood: Preventing Future Problems
Acclimatization is the process of allowing the hardwood flooring to adjust to the environmental conditions of the installation area. This process is crucial for preventing warping, cupping, and gapping after installation. Hardwood flooring is a natural product that expands and contracts in response to changes in humidity and temperature. Acclimatization allows the wood to reach equilibrium with its environment, minimizing these dimensional changes after installation.
The duration of acclimatization depends on several factors, including the type of hardwood, the humidity levels in the installation area, and the manufacturer's recommendations. Generally, it is recommended to acclimatize the hardwood flooring for at least three to five days before installation. In areas with high humidity, a longer acclimatization period may be necessary. The hardwood flooring should be stored in the installation area in its original packaging to protect it from moisture and damage. The temperature and humidity in the installation area should be similar to the conditions that will be maintained after installation.
During acclimatization, the hardwood flooring should be evenly spaced to allow for proper air circulation. Stacking the boxes too tightly can impede airflow and prevent the wood from acclimatizing properly. Monitor the humidity levels in the installation area using a hygrometer. If the humidity levels are outside the recommended range, it may be necessary to adjust the heating or cooling system to create a more stable environment. Once the hardwood flooring has acclimatized, it is ready for installation.
Skipping the acclimatization process can lead to significant problems after installation. If the hardwood flooring is installed before it has acclimatized, it may expand or contract excessively, causing the floor to buckle, warp, or develop gaps. These problems can be costly to repair and can significantly detract from the appearance of the floor. Taking the time to acclimatize the hardwood flooring is a worthwhile investment that can prevent these problems and ensure a successful installation.
Installation Techniques: Nailing, Gluing, and Floating
The choice of installation technique depends on factors such as the type of hardwood flooring, the subfloor material, and the desired level of durability. Three primary installation methods are commonly used: nailing, gluing, and floating. Each method has its advantages and disadvantages, and the selection of the appropriate method is crucial for ensuring a successful and long-lasting installation.
Nailing is the most common method for installing solid hardwood flooring. This method involves using a specialized nail gun to fasten the hardwood planks to the subfloor. Nailing provides a strong and secure connection between the hardwood flooring and the subfloor, resulting in a durable and stable floor. However, nailing requires a wood subfloor that is capable of holding the nails securely. It is not suitable for concrete subfloors or for engineered hardwood flooring that is not designed for nailing.
Gluing is another popular method for installing hardwood flooring, particularly engineered hardwood. This method involves applying adhesive to the subfloor and then pressing the hardwood planks into the adhesive. Gluing provides a strong and waterproof bond between the hardwood flooring and the subfloor. It is suitable for both wood and concrete subfloors and can be used with a variety of hardwood flooring types. However, gluing requires a clean and level subfloor to ensure proper adhesion. It can also be more time-consuming and messy than nailing.
Floating is a method that does not involve directly attaching the hardwood flooring to the subfloor. Instead, the planks are connected to each other using a tongue-and-groove system, creating a single, unified surface that floats above the subfloor. Floating installations are typically used with engineered hardwood flooring and require the use of an underlayment to provide cushioning and sound insulation. Floating installations are relatively easy and quick to install and offer good dimensional stability. However, they may not be as durable as nailed or glued installations and may be more prone to squeaking.
Regardless of the chosen installation method, it is essential to follow the manufacturer's instructions carefully. These instructions provide specific guidelines for preparing the subfloor, applying adhesive, and fastening the hardwood planks. Failing to follow the manufacturer's instructions can void the warranty and compromise the integrity of the installation. It is also crucial to use the correct tools and materials for the chosen installation method. Using incorrect tools or materials can damage the hardwood flooring or the subfloor and can result in a substandard installation.
During installation, leave an expansion gap around the perimeter of the room. This gap allows the hardwood flooring to expand and contract without putting pressure on the walls. The size of the expansion gap varies depending on the type of hardwood flooring and the humidity levels in the area. Consult the manufacturer's instructions for the recommended expansion gap. After installation, cover the expansion gap with baseboards or quarter-round molding to create a finished look.
Maintaining a clean and organized workspace is crucial for a successful hardwood flooring installation. Remove any debris or tools that could get in the way and keep the floor clean to prevent damage to the hardwood planks. Work in a systematic manner and take your time to ensure that each plank is properly installed. A little extra care and attention to detail can make a significant difference in the final outcome.
Proper cutting of the hardwood planks is essential for achieving a professional-looking installation. Use a sharp saw and take your time to make accurate cuts. When cutting planks to fit around obstacles, such as door frames or pipes, use a jigsaw or coping saw to create precise cuts. It is always better to cut a little too much than to cut too little. You can always trim off a small amount of wood if necessary, but you cannot add wood back if you cut too much.
After the installation is complete, thoroughly inspect the floor for any imperfections. Check for gaps between planks, uneven surfaces, and any signs of damage. Address any issues promptly to prevent them from worsening over time. Clean the floor with a recommended cleaner to remove any dust or debris. Avoid using harsh chemicals or abrasive cleaners, as these can damage the finish of the hardwood flooring.
:strip_icc()/101206836-29035ec5a7c34a12a4c00cd5101818d4.jpg?strip=all "How To Install Hardwood Floors")
How To Install Hardwood Floors

Flooring Installation Tips Tricks Door Jamb Last Row Cut Rip

How To Install Hardwood Flooring For Beginners

5 Common Hardwood Flooring Installation Mistakes And How To Avoid Them

How To Install Laminate Flooring For Beginners

Diy Engineered Hardwood Floor Installation Guide Four Generations One Roof Blog

Laminate Flooring Installation Tips And Tricks Bvg

How To Install Laminate Flooring Diy Tips And Tricks

Everything You Need To Know About Replacing Carpet With Hardwood Floors

Sub Flooring Installation Tips When Using Hardwood West Fraser Integrated Forestry Company
Related Posts