Here is an article about laying wood flooring patterns, formatted as requested:
How To Lay Wood Flooring Patterns
Wood flooring offers a timeless appeal and durability that can significantly enhance the aesthetic value and marketability of a property. Beyond the choice of wood species and finish, the pattern in which the flooring is laid dramatically impacts the overall look and feel of a room. Understanding various wood flooring patterns and the techniques involved in their installation is crucial for achieving a desired aesthetic and ensuring the longevity of the floor.
This article will discuss some popular wood flooring patterns, providing guidance on planning and executing their installation. Proper preparation and attention to detail are paramount for achieving a professional and visually appealing result.
Planning and Preparation
Prior to any installation, meticulous planning is essential. This involves accurate measurements of the room, careful consideration of the subfloor's condition, and selection of the appropriate flooring material. Thorough planning minimizes waste and potential errors during the installation process.
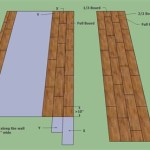
Measurement and Layout: Begin by precisely measuring the length and width of the room. Draw a scaled diagram of the room, noting any doorways, obstructions, or irregularities. This diagram will serve as a guide for planning the pattern layout, determining the starting point, and calculating the necessary amount of flooring material. Add an additional 5-10% to the calculated material to account for waste due to cuts and imperfections. For complex patterns, consider creating a full-scale mock-up of a section of the floor to visualize the final result and identify potential challenges.
Subfloor Preparation: A level, clean, and dry subfloor is critical for a successful wood flooring installation. Inspect the subfloor for any signs of damage, such as cracks, loose boards, or moisture. Repair any imperfections by filling cracks with patching compound, replacing damaged boards, and ensuring the subfloor is properly secured. Clean the subfloor thoroughly to remove dust, debris, and adhesive residue. If the subfloor is concrete, test its moisture content using a moisture meter. High moisture levels can cause the wood flooring to warp or buckle. Install a moisture barrier if necessary. For wood subfloors, ensure adequate ventilation beneath the floor to prevent moisture buildup.
Acclimation: Wood flooring must acclimate to the room's temperature and humidity levels before installation. This process allows the wood to expand or contract, minimizing the risk of gapping or buckling after installation. Store the flooring material in the room where it will be installed for at least 3-5 days, following the manufacturer's recommendations. Maintain a consistent temperature and humidity level during the acclimation period. Check the moisture content of the wood flooring with a moisture meter to ensure it falls within the acceptable range.
Tool and Material Acquisition: Gather all necessary tools and materials before starting the installation. Essential tools include a measuring tape, pencil, chalk line, circular saw or miter saw, table saw (for intricate cuts), tapping block, pull bar, rubber mallet, nail gun (if using a nail-down method), adhesive (if using a glue-down method), spacers, safety glasses, and knee pads. Ensure that the adhesive or fasteners are compatible with the type of wood flooring and subfloor. Having all tools readily available will streamline the installation process and improve efficiency.
Popular Wood Flooring Patterns
The choice of flooring pattern influences the overall aesthetic and perception of space within a room. Different patterns create distinct visual effects, such as making a room appear larger or more formal.
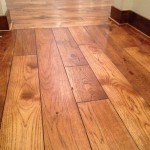
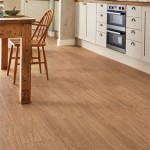
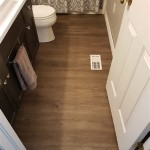
Straight Lay (Parallel): This is the simplest and most common wood flooring pattern. Planks are laid parallel to each other along the length or width of the room. It is efficient, minimizes waste, and suits various room sizes and styles. The direction of the planks can influence the perception of space, running the planks lengthwise can make a room appear longer, while running them widthwise can make it appear wider. Start by establishing a straight reference line along the longest wall and lay the first row of planks along this line, ensuring consistent spacing between the planks and the wall. Use spacers to maintain a consistent expansion gap. Stagger the end joints of subsequent rows to create a visually appealing and structurally sound floor.
Staggered (Running Bond): Similar to the straight lay, the staggered pattern involves laying planks parallel to each other, but with staggered end joints. This pattern adds visual interest and strengthens the floor by distributing stress across the joints. The stagger is typically one-third or one-half the length of the plank. This pattern requires more planning and cutting than the straight lay but produces a more dynamic and visually appealing result. As with the straight lay, start with a straight reference line and lay the first row of planks. Then, offset the end joints of subsequent rows by the desired amount. Minimize the occurrence of short pieces and maintain a consistent stagger throughout the floor.
Herringbone: The herringbone pattern features planks laid in a zigzag arrangement, creating a visually striking and elegant floor. This pattern is more complex than the straight or staggered patterns and requires precise cutting and installation. The herringbone pattern can make a room appear larger and more sophisticated. To install a herringbone pattern, start by establishing a center line along the length of the room. Then, lay the first rows of planks at a 45-degree angle to the center line, forming the "V" shape. Use a miter saw to accurately cut the planks at a 45-degree angle. Ensure that the planks are tightly fitted together and properly secured to the subfloor. The herringbone pattern requires more waste than simpler patterns, so plan accordingly.
Chevron: The chevron pattern is similar to the herringbone pattern, but the ends of the planks are cut at a 45-degree angle to create a continuous zigzag line. This pattern produces a more streamlined and modern look than the herringbone pattern. The chevron pattern requires even more precision cutting than the herringbone pattern. The planks must be cut accurately to ensure that the points meet perfectly. This pattern is often used in high-end residential and commercial spaces. The installation process is similar to that of the herringbone pattern, but requires even more attention to detail. Start by establishing a center line and laying the first rows of planks at a 45-degree angle. Carefully align the points of the planks to create a continuous zigzag line. Secure the planks to the subfloor using adhesive or fasteners.
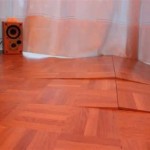
Parquet: The parquet pattern involves arranging small pieces of wood into geometric designs, such as squares, diamonds, or triangles. This pattern adds a touch of elegance and sophistication to a room. Parquet flooring is typically pre-assembled into tiles or blocks, making installation easier than individual pieces. However, it still requires careful planning and execution. Start by establishing a center point in the room and laying the first tile or block. Then, work outwards from the center, ensuring that the tiles are aligned correctly and tightly fitted together. Use adhesive to secure the tiles to the subfloor. Parquet flooring is available in various wood species and finishes, allowing for customization.
Installation Techniques and Best Practices
Selecting the appropriate installation technique is critical. Two primary methods exist: nail-down and glue-down. The choice depends on the type of flooring, the subfloor material, and personal preference.
Nail-Down Method: The nail-down method involves securing the wood flooring to the subfloor using nails or staples. This method is typically used with solid hardwood flooring and wood subfloors. Use a flooring nailer or stapler to drive the fasteners through the tongue of the planks at a 45-degree angle. Space the fasteners according to the manufacturer's recommendations. Ensure that the fasteners are properly set and do not damage the surface of the flooring. The nail-down method is relatively quick and easy, but it can be noisy and may not be suitable for concrete subfloors. When working near walls, a manual nailer or a finish nailer may be necessary to avoid damaging the wall.
Glue-Down Method: The glue-down method involves adhering the wood flooring directly to the subfloor using a specialized adhesive. This method is suitable for both solid hardwood and engineered wood flooring, and it can be used with wood or concrete subfloors. Apply the adhesive to the subfloor using a notched trowel, following the manufacturer's recommendations. Ensure that the adhesive is evenly distributed and that there are no gaps or voids. Lay the flooring planks onto the adhesive and press them firmly into place. Use a rolling pin or weighted roller to ensure that the planks are fully bonded to the subfloor. The glue-down method provides a strong and stable bond, reduces noise, and is suitable for various subfloor types. However, it can be more time-consuming and messy than the nail-down method. The adhesive must be compatible with the type of wood flooring and subfloor.
Expansion Gaps: Wood expands and contracts with changes in temperature and humidity. It is essential to leave an expansion gap of approximately ¼ to ½ inch around the perimeter of the room and around any fixed objects, such as pipes or thresholds. This gap allows the flooring to expand without buckling or warping. Cover the expansion gap with baseboards or trim to create a finished look. Failure to provide adequate expansion gaps can lead to serious problems, such as cupping, crowning, or cracking of the flooring.
Cutting Techniques: Accurate cutting is crucial for achieving a professional and visually appealing wood flooring installation. Use a circular saw or miter saw for straight cuts and a jigsaw for curved or intricate cuts. Always wear safety glasses and use a dust mask to protect yourself from wood dust. When cutting planks near walls or obstructions, use a tapping block and pull bar to ensure a tight fit. Avoid forcing the planks into place, as this can cause damage. For complex patterns, consider using a template or pattern guide to ensure accurate cuts. Practice cutting on scrap pieces of wood before cutting the actual flooring material.
Finishing Touches: Once the flooring is installed, complete the finishing touches to enhance the overall appearance. Install baseboards or trim to cover the expansion gaps and create a clean, finished edge. Use wood filler to fill any gaps or imperfections. Clean the floor thoroughly to remove dust, debris, and adhesive residue. Apply a wood floor cleaner and polish to protect the finish and enhance the shine. Inspect the floor for any loose or damaged planks and repair them as needed. Regular maintenance, such as sweeping, vacuuming, and occasional cleaning, will help to preserve the beauty and longevity of the wood flooring.

Golden Rules For Laying A Wooden Floor Discountflooringdepot Co Discount Flooring Depot Blog

A Guide To Parquet Floors Patterns And More Hadley Court Wood Floor Pattern Patterned Tiles

5 Top Hardwood Flooring Patterns Ash Wood Floors

Laying Patterns

Which Direction To Lay Your Hardwood Flooring Riterug

Hardwood Floor Installation Patterns Classic Floors

7 Quintessential Wood Floor Patterns For Your Place

6 Unique Hardwood Flooring Patterns Next Day Floors

Laying Patterns

Top Nine Ways To Lay Down Wood And Tile Flooring
Related Posts