How To Install Laminate Flooring in a Pattern
Laminate flooring offers a durable and aesthetically pleasing alternative to hardwood, stone, or tile. Its ease of installation is a significant advantage, making it a popular choice for DIY enthusiasts and professionals alike. However, beyond a simple straight-lay installation, laminate flooring can be arranged in various patterns to enhance the visual appeal of a room. This article provides a comprehensive guide on how to install laminate flooring in different patterns, covering preparation, techniques, and potential challenges.
Before embarking on any laminate flooring project, thorough preparation is crucial. This initial stage sets the foundation for a successful and long-lasting installation. Neglecting these initial steps can lead to problems such as uneven flooring, gaps, and premature wear.
Key Point 1: Pre-Installation Preparation
Acclimatization and Subfloor Assessment
Acclimatization is the process of allowing the laminate flooring to adjust to the environment in which it will be installed. This is vital because laminate expands and contracts with changes in temperature and humidity. To acclimatize the flooring, store the unopened boxes of laminate in the room where it will be installed for at least 48 to 72 hours. This allows the material to reach equilibrium with the ambient conditions, minimizing the risk of warping or buckling after installation.
The subfloor is the foundation upon which the laminate flooring will rest, and its condition directly impacts the final result. The subfloor must be clean, level, and dry. Sweep or vacuum the subfloor to remove any debris. Use a level to check for any significant dips or rises. Minor imperfections (up to 3/16 inch over 10 feet) can often be addressed with self-leveling compound. For larger discrepancies, professional subfloor leveling might be necessary.
Moisture testing is another critical step. Excess moisture in the subfloor can lead to mold growth and damage the laminate. Use a moisture meter to check the moisture content of the subfloor. Acceptable moisture levels depend on the subfloor material but generally should be below 12% for wood and within the manufacturer's recommendations for concrete.
Once the subfloor is prepared, install an underlayment. Underlayment provides cushioning, reduces noise transmission, and acts as a moisture barrier. Choose an underlayment specifically designed for laminate flooring, considering factors such as thickness and sound absorption properties. Roll out the underlayment and secure it according to the manufacturer's instructions, typically using tape at the seams.
With these crucial preparatory steps completed, the actual installation process can begin. Measuring and planning the layout are the next significant considerations.
Key Point 2: Planning and Pattern Selection
Layout Strategies and Pattern Options
Before laying the first plank, accurate measurements are essential. Measure the length and width of the room and calculate the square footage. Add an extra 5% to 10% to account for waste and cuts, especially when installing in a pattern. This buffer ensures sufficient material is available to complete the project without running short due to intricate cuts or potential mistakes.
Several patterns can be achieved with laminate flooring, each offering a distinct aesthetic. The most common patterns include:
- Straight Lay: The simplest pattern, where planks are installed parallel to each other. This is often the most efficient in terms of material usage.
- Staggered: Similar to straight lay, but with offset seams between rows. This creates a more visually interesting and structurally sound floor. Aim for a minimum of 6 inches between end joints on adjacent rows.
- Herringbone: Planks are laid in a V-shape, creating a classic and elegant pattern. This pattern requires more precise cuts and more material.
- Brick: Planks are offset by half their length in each row, resembling a brick wall. This pattern is visually appealing and relatively straightforward to install.
- Diagonal: Planks are installed at a 45-degree angle to the walls. This can create a larger sense of space in a room but also increases waste due to angled cuts.
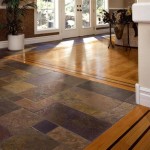
Select the pattern that best suits the room's style and your skill level. Consider the direction of the planks in relation to the room's light source. Laying planks parallel to the main light source can make the room appear longer and smoother. Decide on a starting point and direction for the installation. Often, starting along the longest straight wall is the most efficient approach.
Before committing to the final layout, conduct a dry run. Arrange several rows of planks without clicking them together to visualize the pattern and identify any potential problem areas, such as obstructions or areas where narrow planks would be needed.
With the pattern selected and the layout planned, the installation process begins. The tools and techniques used for cutting and securing the laminate flooring are vital to ensuring a professional result.
Key Point 3: Cutting and Installation Techniques
Tools and Laminate Securing Methods
Several essential tools are required for cutting and installing laminate flooring:
- Measuring Tape: For accurate measurements.
- Pencil: For marking cut lines.
- Square: For ensuring accurate right angles.
- Laminate Cutter or Saw: A laminate cutter provides clean, straight cuts with minimal dust. A circular saw or jigsaw can also be used, but a fine-tooth blade is recommended to prevent chipping.
- Tapping Block and Pull Bar: Used to securely connect planks without damaging them.
- Spacers: To maintain a consistent expansion gap around the perimeter of the room.
- Hammer: For gently tapping the tapping block.
- Safety Glasses: To protect your eyes from dust and debris.
Begin the installation by placing spacers along the wall to create the required expansion gap (typically ¼ to ⅜ inch). This gap allows for the natural expansion and contraction of the flooring without causing buckling or warping.
When cutting planks, always measure and mark the cut line accurately. Use a square to ensure that the cut is perpendicular. If using a laminate cutter, position the plank and apply firm pressure to make a clean cut. If using a saw, support the plank securely and cut slowly and steadily along the marked line.
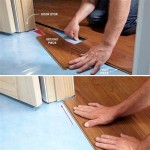
For the first row, ensure that the tongue side of the planks faces the wall. Connect the planks end-to-end, clicking them together securely. Use a tapping block and hammer to gently tap the planks into place if necessary. Ensure that the seams are tight and flush.
Continue installing subsequent rows, following the chosen pattern. Stagger the seams appropriately and use the tapping block and pull bar to secure the planks together. Periodically check the alignment of the rows to ensure that the pattern remains consistent.
When reaching obstacles such as door frames or pipes, use a template or combination square to accurately transfer the shape of the obstacle onto the plank. Carefully cut out the shape using a jigsaw, ensuring a precise fit. A slight undercut can allow the laminate to slip underneath door frames for a neater appearance.
The final row often requires ripping planks to width. Measure the remaining space, subtracting the expansion gap, and cut the planks accordingly. Use a pull bar to engage the final row of planks if space is limited.
Once the flooring is installed, remove the spacers. Install baseboards or quarter-round molding to cover the expansion gap and provide a finished look. Secure the molding to the wall, not the floor, to allow for movement of the laminate.
Cleaning and maintaining the laminate flooring are essential for preserving its appearance and longevity. Sweep or vacuum regularly to remove dirt and debris. Use a damp mop with a cleaner specifically designed for laminate flooring. Avoid excessive water, which can seep into the seams and damage the core of the planks. Address spills promptly to prevent staining. With proper care and maintenance, a professionally installed laminate floor can provide years of beauty and durability.
Several additional considerations can improve the overall outcome of the installation.
Additional Considerations: Mitigating Common Problems
Addressing Obstacles, Transitions, and Repair Techniques
Dealing with obstacles efficiently is crucial for a seamless installation. When encountering irregular shapes or complex angles, creating a template can significantly simplify the cutting process. Transfer the shape onto a piece of cardboard or paper, then use the template to mark the laminate.
Transition strips are used to bridge the gap between laminate flooring and other types of flooring or at doorways. These strips provide a smooth and safe transition while also concealing the expansion gap. Choose a transition strip that matches the color and style of the laminate flooring. Secure the transition strip to the subfloor, not the laminate, to allow for expansion and contraction.
Despite careful installation, damage to laminate flooring can occur over time. Minor scratches can often be concealed with a laminate repair kit, which typically includes putty or wax sticks that match the color of the flooring. For more significant damage, such as chipped edges or gouges, replacing the damaged plank may be necessary. If the original installation included extra planks, the replacement process is relatively straightforward. Carefully remove the damaged plank using a pry bar or specialized tool, and then install the new plank in its place.
Proper preparation, meticulous planning, and precise installation techniques are key to successfully installing laminate flooring in a chosen pattern. By following the guidelines outlined in this article, individuals can achieve a professional-looking floor that enhances the aesthetics and value of their home. The selection of high-quality materials and adherence to manufacturer's instructions are also crucial for ensuring a long-lasting and visually appealing result.

How To Stagger Laminate Flooring Case Study Floortheory

How To Stagger Laminate Flooring Case Study Floortheory

How To Stagger Laminate Flooring Case Study Floortheory

A Tip For The Best Presentation Of Your Wood Look Flooring Tile Floor Pattern Laminate Diy

How To Stagger Laminate Flooring Case Study Floortheory

Yahoo Image Search Diy Flooring Wood Floor Pattern Layout

How To Install Laminate Flooring Whidbey Island

How To Stagger Laminate Flooring Experts Com

How To Stagger Vinyl Plank Flooring Whole Cabinet Supply

Determining The Direction To Lay Install Hardwood Laminate Or Luxury Vinyl Plank Flooring
Related Posts