Can I Put Laminate Flooring On Tiles? A Comprehensive Guide
Laminate flooring, known for its affordability, durability, and ease of installation, is a popular choice for homeowners seeking to upgrade their spaces. One common question that arises during the planning phase is whether laminate flooring can be installed directly over existing tile. The answer, while generally yes, is nuanced and depends on several factors pertaining to the existing tile floor's condition and the specific installation guidelines of the laminate flooring product.
Installing laminate over tile can be a viable option for several reasons. It saves on demolition costs and labor associated with removing the old tile. It also minimizes disruption to the home and potentially speeds up the renovation process. However, it is crucial to approach this project with careful planning and preparation to ensure a successful and long-lasting result. Ignoring the necessary preliminary steps can lead to problems such as uneven floors, moisture issues, and ultimately, the failure of the laminate flooring.
Key Considerations Before Installation
Before embarking on the installation of laminate flooring over tile, several critical factors must be evaluated. These considerations determine the suitability of the existing tile as a subfloor and influence the longevity and performance of the new laminate floor.
1. Condition of the Existing Tile: The most important factor is the condition of the tile floor. The tile must be structurally sound, meaning it should not be cracked, loose, or significantly uneven. Any loose or broken tiles must be repaired or replaced before proceeding. Minor chips and imperfections can often be addressed with leveling compounds, but extensive damage indicates a more significant problem. A thorough inspection of the entire tile surface is necessary.
Walking across the tile floor and visually inspecting it for any cracks, loose grout, or signs of water damage is the primary inspection step. Listen for hollow sounds, which can indicate that tiles are not properly adhered to the subfloor. Any areas of concern should be closely examined and addressed. Ignoring these issues can lead to the laminate flooring conforming to the unevenness below, resulting in an unstable and potentially damaged floor.
2. Levelness of the Subfloor: Laminate flooring requires a relatively level subfloor to prevent flexing, squeaking, and potential damage to the locking mechanisms. The acceptable tolerance for levelness is typically around 3/16 inch over a 10-foot span. If the tile floor deviates significantly from this standard, leveling compounds may be necessary to create a smooth and even surface. Self-leveling underlayments are available for larger variations, while patching compounds can address smaller imperfections.
Using a long level or a straight edge to assess the floor's levelness is essential. Identify high and low spots and mark them for correction. For minor imperfections, a floor patching compound can be applied and feathered to blend with the surrounding tile. For larger variations in height, a self-leveling underlayment might be required. These products are designed to flow smoothly and create a level surface suitable for installing laminate flooring.
3. Moisture Mitigation: Moisture is a significant enemy of laminate flooring. Tile floors are typically non-porous and can act as a moisture barrier, but it’s still crucial to verify that the subfloor beneath the tile is dry and free from any potential moisture sources. Conduct a moisture test on the tile surface to determine the moisture vapor transmission rate. If the rate exceeds the manufacturer's recommendations for the laminate flooring, a moisture barrier underlayment must be installed.
There are several methods for testing the moisture level of a concrete subfloor, including using a calcium chloride test kit or an electronic moisture meter. These tests provide a quantitative measurement of the moisture vapor emission rate. Even if the tile appears dry, moisture can still migrate through the concrete slab below. A moisture barrier underlayment, typically a polyethylene film, is designed to prevent this moisture from reaching the laminate flooring.
Preparing the Tile Surface for Laminate Installation
Once the tile floor has been thoroughly assessed and any necessary repairs have been made, the next step is to prepare the surface for the laminate flooring. This preparation involves cleaning, leveling, and potentially applying an underlayment.
1. Thorough Cleaning: Begin by thoroughly cleaning the tile floor to remove any dirt, dust, grease, or debris. Use a neutral pH cleaner and a scrub brush to ensure a clean surface. Rinse the floor thoroughly with clean water and allow it to dry completely before proceeding. Any residue left on the tile can interfere with the adhesion of leveling compounds or underlayments.
It is advisable to avoid harsh chemicals or abrasive cleaners, as they can damage the grout or the tile surface. A simple solution of water and a mild detergent is typically sufficient. Pay particular attention to cleaning the grout lines, as they can often accumulate dirt and grime. Ensure that the floor is completely dry before moving on to the next step.
2. Leveling Imperfections: As mentioned earlier, addressing any unevenness in the tile floor is critical. Use a floor patching compound to fill in minor chips, cracks, or grout lines. Apply the compound according to the manufacturer's instructions and allow it to dry completely. For larger depressions or height variations, a self-leveling underlayment may be necessary. These products are designed to create a smooth and level surface over a larger area.
When using a floor patching compound, ensure that it is compatible with the type of tile and grout. Apply the compound in thin layers, allowing each layer to dry before applying the next. This helps to prevent shrinkage and cracking. When using a self-leveling underlayment, follow the manufacturer's instructions carefully, as the mixing and application process can be critical to the final result.
3. Underlayment Installation: An underlayment is a layer of padding that is installed between the tile floor and the laminate flooring. It serves several purposes, including providing cushioning, reducing noise transmission, and acting as a moisture barrier. The type of underlayment required depends on the specific laminate flooring product and the conditions of the subfloor. Some laminate flooring products come with an attached underlayment, while others require a separate underlayment to be installed.
When selecting an underlayment, consider its thickness, density, and moisture resistance. Thicker underlayments typically provide more cushioning and noise reduction, while higher-density underlayments offer better support for the laminate flooring. If moisture is a concern, choose an underlayment with a built-in moisture barrier. Install the underlayment according to the manufacturer's instructions, ensuring that it is properly aligned and taped at the seams.
Laminate Flooring Installation Over Tile
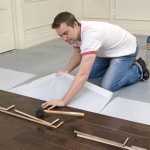
After the tile floor has been properly prepared, the actual installation of the laminate flooring can begin. This process typically involves laying out the flooring planks, cutting them to size, and interlocking them together. It is essential to follow the manufacturer's instructions carefully to ensure a successful installation.
1. Acclimation: Before installing the laminate flooring, it is crucial to allow it to acclimate to the room's temperature and humidity for at least 48 to 72 hours. This acclimation period allows the flooring planks to expand or contract as necessary, preventing problems such as buckling or gapping after installation. Store the boxes of laminate flooring in the room where they will be installed, ensuring that they are properly supported and not exposed to direct sunlight or excessive moisture.
The ideal temperature and humidity range for acclimation typically is specified by the manufacturer. It is advisable to maintain these conditions during the acclimation period and throughout the installation process. This helps to ensure that the laminate flooring performs as expected.
2. Laying Out the Flooring: Begin by laying out the first row of laminate flooring planks along the longest straight wall in the room. Use spacers to maintain a consistent expansion gap between the flooring and the wall. This expansion gap allows the flooring to expand and contract with changes in temperature and humidity without putting pressure on the walls.
When laying out the flooring, consider the direction of the planks. Typically, the planks are installed parallel to the longest wall in the room, but this can vary depending on the room's layout and the desired aesthetic. Stagger the end joints of the planks in each row to create a more visually appealing and structurally sound floor.
3. Cutting and Interlocking: Use a saw to cut the laminate flooring planks to the appropriate size. Ensure that the cuts are clean and precise to facilitate proper interlocking. Interlock the planks together according to the manufacturer's instructions, using a tapping block and a hammer to gently seat the joints. Avoid using excessive force, as this can damage the locking mechanisms.
Many laminate flooring products feature a click-lock system, which allows the planks to be easily interlocked without the need for glue or nails. Follow the manufacturer's instructions carefully to ensure that the planks are properly aligned and locked together. Use a pull bar to tighten the joints in tight spaces or along walls.
Potential Challenges and Solutions
While installing laminate flooring over tile is generally a straightforward process, certain challenges may arise. Being aware of these potential issues and having solutions in mind can help to ensure a smooth and successful installation.
1. Uneven Tile Surfaces: Even after applying leveling compounds, some minor imperfections in the tile surface may remain. These imperfections can cause the laminate flooring to flex or squeak. To address this issue, use a thicker underlayment to provide additional cushioning and support. Alternatively, apply a thin layer of self-leveling underlayment to further smooth out the surface.
Selecting a high-density underlayment can also help to minimize the impact of minor unevenness. These underlayments are designed to distribute weight evenly and prevent flexing. If squeaking persists, consider using a laminate flooring lubricant to reduce friction between the planks.
2. Moisture Problems: As mentioned earlier, moisture can be a significant problem for laminate flooring. If the subfloor is prone to moisture, even with a moisture barrier underlayment, moisture can still migrate through the tile and damage the flooring. In such cases, consider installing a vapor barrier directly over the concrete subfloor before installing the tile. This provides an extra layer of protection against moisture.
Ensure proper ventilation in the room to reduce humidity levels. Consider using a dehumidifier to control moisture in particularly humid environments. Regularly inspect the laminate flooring for signs of moisture damage, such as swelling or discoloration.
3. Height Differences: Installing laminate flooring over tile will raise the floor height, which can create transitions issues with adjacent rooms. To address this problem, use transition strips to seamlessly connect the laminate flooring to the existing flooring in the adjacent room. Transition strips are available in various styles and materials to match the laminate flooring and the existing flooring.
Carefully measure the height difference between the two floors and select a transition strip that is appropriate for the height difference. Install the transition strip according to the manufacturer's instructions, ensuring that it is securely attached to both floors.

Can You Put Laminate Flooring Over Ceramic Tiles Mellowpine

Can You Put Laminate Flooring Over Tile Alliance Directory

Can You Put Laminate Flooring Over Tile Twenty Oak

Can You Put Laminate Or Vinyl Plank Flooring Over Tile

Installing Laminate Tile Over Ceramic Diy Floors Wonderhowto

Should You Install Vinyl Floor Over Tile

Installing Laminate Tile Over Ceramic Diy Floors Wonderhowto

Can I Install Vinyl Tiles Over Laminate Flooring Comprehensive Guide

Can I Install Laminate Floors On Ceramic Tiles The Carpet Guys

Can Timber Flooring Be Laid Over Tiles Cb Floors
Related Posts