Can You Install Laminate Flooring on Tile? A Comprehensive Guide
Installing new flooring can significantly transform the aesthetic and feel of a living space. Laminate flooring, prized for its durability, affordability, and ease of installation, is a popular choice for many homeowners. However, when faced with existing tile flooring, a common question arises: is it possible to install laminate directly over tile? The answer is generally yes, but it is not always a straightforward process. Careful consideration must be given to various factors to ensure a successful and long-lasting result.
This article provides a comprehensive guide to installing laminate flooring over existing tile, outlining the necessary preparations, potential challenges, and essential considerations for achieving a professional-quality installation. It will explore the benefits and drawbacks of this approach compared to removing the existing tile, examining the key steps involved in proper subfloor preparation, and discussing the long-term implications for the overall performance and lifespan of the new laminate floor.
Key Point 1: Assessing the Suitability of Your Existing Tile Floor
Before even considering laying laminate over tile, a thorough assessment of the existing tile floor is paramount. This evaluation will determine whether the installation is feasible and, if so, what preparatory steps are required. A faulty tile floor can compromise the integrity of the new laminate and lead to premature failure.
The first step is to check for loose or cracked tiles. Any unstable tiles must be repaired or replaced before proceeding. Loose tiles create uneven surfaces that can cause the laminate to flex and eventually separate at the seams. Similarly, cracked tiles can lead to moisture penetration, which can damage both the laminate and the subfloor over time. The process of repair typically involves removing the damaged tile, cleaning the underlying surface, applying fresh adhesive, and setting a new tile. Ensure the replacement tile is of the same thickness as the surrounding tiles to maintain a level surface.
Next, assess the overall flatness of the tile floor. Laminate flooring requires a relatively even subfloor to prevent flexing and gapping. Minor imperfections can often be addressed with underlayment, but significant variations in height will necessitate additional leveling measures. Use a long straightedge tool, such as a level or a long ruler, placed across the tile floor in multiple directions. If gaps larger than 3/16 of an inch are observed, leveling will be required.
Finally, consider the type of tile present. Certain tile types, particularly those with highly textured surfaces, can pose challenges. While underlayment can often compensate for minor textures, extremely uneven or coarse tiles may require a self-leveling compound to create a smooth and even surface. Understanding the composition and characteristics of the existing tile will ultimately guide the decision-making process and ensure a successful laminate flooring installation.
Key Point 2: Preparing the Tile Subfloor for Laminate Installation
Proper subfloor preparation is crucial for a successful laminate flooring installation over tile. Even if the tile floor appears to be in good condition, failing to adequately prepare the surface can lead to problems down the line. This process involves cleaning, leveling, and potentially applying a moisture barrier.
Begin with a thorough cleaning of the tile floor. Remove any dirt, debris, wax, or grease. Use a suitable cleaning solution, depending on the type of tile, and scrub the surface vigorously. Rinse thoroughly with clean water and allow the floor to dry completely before proceeding. This step is necessary to ensure proper adhesion of any underlayment or leveling compounds used.
Addressing unevenness is a critical aspect of subfloor preparation. As mentioned earlier, significant variations in height can cause problems with the laminate floor. Small imperfections can be addressed with a thicker underlayment, but larger dips or humps require more substantial intervention. Self-leveling compounds are specifically designed for this purpose. These compounds are pourable mixtures that flow over the surface, filling in low spots and creating a level plane. Before applying a self-leveling compound, prime the tile surface according to the manufacturer's instructions. This will ensure proper bonding and prevent the compound from drying too quickly. Follow the manufacturer's instructions carefully regarding mixing ratios, application thickness, and curing time.
In addition to leveling, consider the need for a moisture barrier. While many laminate floors are water-resistant, they are not completely waterproof. Moisture seeping up from the subfloor can damage the laminate over time, causing swelling, warping, and mold growth. Installing a moisture barrier between the tile floor and the laminate can mitigate this risk. Typically, this consists of a polyethylene film laid over the entire surface of the tile floor. Overlap the edges of the film by several inches and tape them together to create a continuous barrier. Some underlayments also include an integrated moisture barrier, which can simplify the installation process.
After completing these preparation steps, thoroughly inspect the surface one last time to ensure that it is clean, level, and adequately protected from moisture. Only then should you proceed with the actual installation of the laminate flooring.
Key Point 3: Understanding Underlayment and Laminate Flooring Installation
Choosing the right underlayment and mastering the laminate flooring installation techniques are critical to achieve a successful and aesthetically pleasing outcome when installing over tile. The underlayment provides cushioning, sound absorption, and, in some cases, a moisture barrier, while the installation methods ensure proper alignment and secure locking of the laminate planks.
Selecting the appropriate underlayment is a crucial step. Various types of underlayment are available, each offering different levels of cushioning, sound insulation, and moisture protection. Foam underlayment is a common and affordable option, providing a basic level of cushioning and sound absorption. Cork underlayment offers superior sound insulation and is a more eco-friendly choice. Rubber underlayment is highly durable and provides excellent cushioning, making it suitable for high-traffic areas. When installing over tile, consider an underlayment with a built-in moisture barrier to provide added protection against moisture seepage. Also, consider the thickness of the underlayment; a thicker underlayment can help compensate for minor imperfections in the tile floor. Always consult the laminate flooring manufacturer's recommendations regarding the appropriate underlayment to use with their product.
Laminate flooring installation typically involves a "floating floor" system, where the planks are interlocked without being directly glued or nailed to the subfloor. This allows the floor to expand and contract freely with changes in temperature and humidity. Start by acclimating the laminate flooring to the room for at least 48 hours before installation. This allows the planks to adjust to the room's temperature and humidity, minimizing expansion and contraction after installation. Begin laying the planks along a straight wall, leaving a small expansion gap (typically 1/4 to 3/8 inch) around the perimeter of the room. Use spacers to maintain this gap. Interlock the planks according to the manufacturer's instructions, typically using a tongue-and-groove system. Use a tapping block and hammer to gently tap the planks together, ensuring a tight and secure fit. Cut planks as needed to fit around obstacles and corners, using a jigsaw or laminate cutter. Leave expansion gaps around pipes and other vertical obstructions.
During the installation process, regularly check the alignment and levelness of the planks. Use a level to ensure that the floor is flat and that there are no significant dips or humps. If any problems are detected, address them immediately before proceeding further. Clean any excess glue or debris from the surface of the floor as you go. Once the installation is complete, remove the spacers around the perimeter of the room and install baseboards or quarter-round molding to cover the expansion gaps and provide a finished look. These finishing touches are essential for concealing any irregularities and providing a professional appearance to the completed laminate floor installation.

Can You Put Laminate Flooring Over Tile Twenty Oak

How To Install Laminate Flooring Over A Tile Floor 2024 Today S Homeowner

Installing Laminate Tile Over Ceramic Diy Floors Wonderhowto

Installing Laminate Tile Over Ceramic Diy Floors Wonderhowto

Install Laminate Flooring Over Ceramic Tile

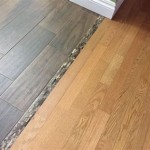
Transition From Tile To Laminate Howtospecialist How Build Step By Diy Plans

Should You Install Vinyl Floor Over Tile

Installing Laminate Tile Over Ceramic Diy Floors Wonderhowto

Installing Laminate Tile Flooring Diy Instructions

Can You Put Laminate Or Vinyl Plank Flooring Over Tile
Related Posts