How To Install Sheet Vinyl Flooring On Concrete Basement
Installing sheet vinyl flooring on a concrete basement is a cost-effective and practical way to transform a cold, damp space into a warm and inviting area. Sheet vinyl, unlike traditional tile or wood flooring, offers a seamless, water-resistant surface that withstands moisture, making it particularly suitable for basements. This guide will provide a step-by-step explanation of the installation process, ensuring a successful project.
Preparing the Concrete Subfloor
A successful sheet vinyl installation hinges on a well-prepared subfloor. The concrete surface must be clean, level, and free of imperfections. Here’s how to prepare the subfloor:
- Clean the Surface: Begin by cleaning the concrete floor thoroughly. Sweep away any loose debris, and use a shop vacuum to remove dust particles. For stubborn stains, use a concrete cleaner following the manufacturer's instructions.
- Patch Cracks and Holes: Inspect the subfloor for cracks, holes, or uneven areas. Patch any cracks wider than 1/8 inch with an epoxy patching compound. Use a concrete patching compound for holes and depressions, ensuring a smooth, even surface.
- Level the Concrete: If the floor is uneven, consider using a self-leveling compound to create a smooth foundation. Apply the compound according to the manufacturer's instructions, ensuring proper coverage and even distribution.
- Apply a Moisture Barrier: To prevent moisture from permeating the subfloor and damaging the vinyl flooring, apply a moisture barrier. Use a 6-mil polyethylene sheet for this purpose. Overlap the sheets by at least 6 inches and secure them with tape. This layer acts as a barrier against moisture, protecting the vinyl flooring from potential damage.
Planning and Measuring for Cutting
With the subfloor prepped, it's time to plan the layout and measure for cutting. Proper planning ensures efficient material usage and a seamless installation.
- Determine the Layout: Decide on the direction of the vinyl planks. Typically, it's best to run the planks perpendicular to the main light source to minimize visible seams. Mark the starting point on the wall with a chalk line.
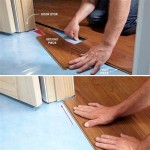
- Measure and Cut: Carefully measure the length and width of the room. Account for any irregularities or protrusions. Use a utility knife or a flooring cutter to cut the sheet vinyl according to your measurements. Consider using a straight edge and a pencil to mark cutting lines for accuracy.
- Leaving Expansion Gaps: When cutting the sheet vinyl, leave 1/4-inch expansion gaps around the perimeter of the room. This space allows the vinyl to expand and contract with temperature fluctuations, preventing buckling and warping. Use spacers or tape to maintain these gaps.
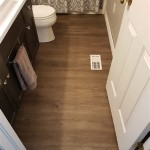
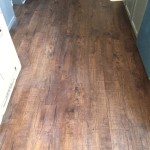
Installing the Sheet Vinyl Flooring
Once the subfloor is prepared and the vinyl is measured and cut, it's time to install the sheet vinyl flooring.
- Lay the First Piece: Starting from the wall opposite the main doorway, carefully lay the first sheet of vinyl. Align it with the chalk line and use spacers to maintain the expansion gap. Secure it with adhesive or use a double-sided tape for a removable installation.
- Seaming: Install each subsequent sheet of vinyl, aligning the seams perfectly. Use a seam roller to firmly press the seams together, ensuring a tight bond. Consider using a seam sealer for extra security, especially in areas with high traffic.
- Trim and Finish: Once the flooring is laid, trim any excess vinyl along the walls and around obstacles using a utility knife. Ensure a clean, flush fit. Use transition strips or molding to create a smooth transition between the vinyl flooring and other floor surfaces in the room.
Additional Considerations
Consider these points for a successful installation:
- Ventilation: Ensure adequate ventilation in the basement to prevent moisture buildup, which can affect the vinyl flooring. Use a dehumidifier if needed.
- Temperature: Sheet vinyl performs best in temperatures between 65°F and 85°F. Allow the vinyl to acclimate to the basement temperature for at least 24 hours before installation.
- Professional Installation: If you're unsure about any part of the installation process, consider seeking professional help. A qualified installer can ensure proper installation and prevent potential issues.
With careful planning and preparation, installing sheet vinyl flooring on a concrete basement is a doable project. By following these steps, you can transform your basement into a functional and comfortable space that complements your home.

Concrete Subfloor Preparation For The Vinyl Floor Installation How To Diy Mryoucandoityourself

How To Install Vinyl Or Laminate Floors In A Basement Over Concrete Slab

Tips For Installing Vinyl Plank Over Concrete Floors Lemon Thistle

How To Prepare A Concrete Floor For Vinyl Flooring Parrys

How To Install Vinyl Plank Flooring On Concrete Step By Guide

How To Install Vinyl Or Laminate Floors In A Basement Over Concrete Slab

Vinyl Sheet Floor Installation

Best How To Install Vinyl Plank Flooring Four Generations One Roof

How To Lay Vinyl Flooring Sheets Tiles And Planks Tarkett

Vinyl Plank Flooring On Concrete Basement Pros Cons
Related Posts