Staining Hardwood Floors Darker: A Guide to Achieving a Richer Look
Hardwood floors can be a beautiful and timeless addition to any home. But what if you yearn for a more dramatic, sophisticated look? Staining your hardwood floors darker can transform your space, adding depth, warmth, and a touch of elegance. This guide will delve into the process of staining hardwood floors darker, outlining the necessary steps, considerations, and tips to achieve a professional, long-lasting finish.
Understanding the Process: From Light to Dark
Staining hardwood floors changes their color by applying a pigmented solution that penetrates the wood's pores. The depth of the stain and the final color depend on the type of wood, the stain's color, and the application technique. It's essential to understand that staining doesn't change the wood's grain pattern; it enhances it by adding a layer of color.
Preparing the Floor for Success: Essential Steps
Before staining, thorough preparation is crucial. This involves:
- Cleaning: Remove all dirt, dust, and debris from the floor using a vacuum cleaner and a damp mop. This ensures that the stain adheres evenly to the wood surface.
- Sanding: Sanding is crucial to create a smooth surface for the stain to penetrate. Start with coarse-grit sandpaper (80-grit) to remove any existing finish, followed by progressively finer grits (120, 150, and 220) for a smooth finish.
- Dusting: After sanding, remove all sanding dust using a vacuum cleaner with a brush attachment. Failing to remove dust will result in a uneven stain.
- Tacking: Tacking is the final step before staining. Using a tack cloth, wipe the surface thoroughly to remove any remaining dust particles.
Choosing the Right Stain: Factors to Consider
Selecting the right stain for your hardwood floors is a key decision. Consider these factors:
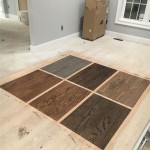
- Color: Choose a stain color that complements your home decor and creates the desired mood. Consider the undertones of your chosen color. For example, a reddish-brown stain will create a warmer feel, while a grey-toned stain will offer a more modern, contemporary vibe.
- Type: The type of stain influences the final finish. Oil-based stains are known for their deep penetration, rich tones, and durability. Water-based stains offer a faster drying time, less odor, and are typically water-resistant.
- Finish: Consider whether you want a matte, semi-gloss, or gloss finish. A matte finish creates a natural, subtle look, while a gloss finish adds more shine and highlights the wood's grain.
Staining Techniques for a Professional Finish
The application technique plays a significant role in achieving a consistent and even stain. Follow these steps:
- Prepare the stain: Read the manufacturer's instructions carefully before applying any stain. Some stains may require thinning, while others require mixing.
- Apply the stain: Use a brush or a rag to apply the stain evenly to the floor. Work in small sections, ensuring consistent coverage.
- Wipe excess stain: After applying the stain, using a clean rag, wipe off any excess stain within the recommended time frame. This prevents a muddy or blotchy finish.
- Repeat application: Depending on the desired depth of color, you may need to apply additional coats of stain. Allow each coat to dry completely before applying the next.
Protecting Your Investment: Finishing Touches
After the stain has dried completely, apply a protective coating to seal the floor. Polyurethane is a popular choice, offering durability and protection against scratches, stains, and moisture. Choose a finish that matches your desired sheen level and apply it evenly to the floor using a brush or roller. Allow the polyurethane to cure completely before placing furniture or rugs on the floor.
Maintenance and Care: Keeping Your Floors Radiant
Proper maintenance is essential to preserve the beauty and longevity of your stained floors. Regularly sweep or vacuum the floor to remove dust and debris. Clean spills immediately to prevent staining. Avoid using harsh cleaners, as they can damage the finish. Consider using a specialized hardwood floor cleaner to maintain the shine and protect the stain.
Staining hardwood floors darker can significantly enhance the aesthetics of your home. By understanding the process, selecting the right stain, and practicing proper application techniques, you can achieve a professional, long-lasting finish that adds beauty and value to your space. With careful preparation and maintenance, your newly stained hardwood floors will continue to shine for years to come.

Thinking Of Staining Your Hardwood Floors A Dark Color

Thinking Of Staining Your Hardwood Floors A Dark Color

Thinking Of Staining Your Hardwood Floors A Dark Color

Thinking Of Staining Your Hardwood Floors A Dark Color

Thinking Of Staining Your Hardwood Floors A Dark Color

2 Ways To Create A Dark Wood Floor Carlisle Wide Plank Floors

Refinishing Wooden Floor Light Vs Dark Stains

My Refinished Hardwood Floors Dark Walnut Stain Refinshing With

What Color Should I Stain My Wood Floors

Choosing Stain Color For Hardwood Floors Na Flooring
Related Posts