Installing vinyl flooring with a kit is a great way to add style and functionality to any room, while also saving time and money. Vinyl flooring comes in a variety of colors and styles, making it easy to find the perfect fit for any home. With an install kit, you can easily install your own vinyl flooring, and have it look professionally done. In this article, we’ll walk you through the steps to install your own vinyl flooring with an install kit.
Choosing the Right Vinyl Flooring
The first step in installing vinyl flooring with a kit is to choose the right type of vinyl for your project. Vinyl comes in a variety of styles, colors, and textures, so it’s important to choose the one that best suits your needs. Consider the type of traffic your floor will receive, as well as how much wear and tear it will endure. You’ll also want to choose a color that complements the rest of your decor.
Gathering Your Materials
Once you’ve chosen the right type of vinyl for your project, it’s time to gather the materials you’ll need to complete the job. Most install kits come with all the materials you’ll need, including adhesive, trowels, and a roller. You’ll also need to purchase a good pair of scissors and a utility knife to make clean, precise cuts. Make sure you have everything you need before you begin.
Prepping the Area
Before installing your vinyl flooring, you’ll need to prepare the area. Start by removing any existing flooring, such as carpets or tiles. Using a vacuum cleaner, make sure the space is free of dirt and debris. Be sure to check the subfloor for any irregularities or damage that could affect the installation. Make any necessary repairs before proceeding.
Laying the Vinyl
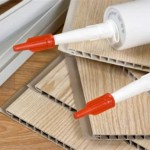
Once the area is prepped and ready, it’s time to start laying the vinyl. Start by applying the adhesive to the floor according to the instructions on the install kit. Using a trowel, spread the adhesive evenly across the floor. Then, place the vinyl on top of the adhesive, making sure it’s straight and aligned. Use the roller to press the vinyl into the adhesive, creating an even surface.
Cutting and Sealing the Edges
Once the vinyl is laid, you’ll need to cut and seal the edges. Use a utility knife to trim the excess vinyl, making sure to cut accurately and leave a clean edge. Once all the edges are trimmed, use a sealant to protect the vinyl from water damage. Make sure the sealant is applied evenly and completely.
Enjoy Your New Vinyl Flooring
Once the sealant has fully dried, your vinyl flooring installation is complete. You can now enjoy your new vinyl flooring, knowing that it was professionally installed with an install kit. With proper care and maintenance, your vinyl flooring will last for years to come.


Related Posts