Vinyl flooring is an affordable and durable option for many homes and businesses. It’s easy to install and maintain, making it a great choice for DIYers. Whether you’re installing vinyl flooring in a kitchen, bathroom, or other room, this guide will help you get the job done quickly and easily.
Step 1: Prepare the Subfloor
Before you can begin laying down vinyl flooring, you must prepare the subfloor. Start by making sure the subfloor is clean, dry, and level. If there are any loose boards or nails, make sure to repair them. If the subfloor is too high or low, use a self-leveling compound to level it out.
Step 2: Measure and Cut the Vinyl Plank
Once the subfloor is ready, you can start measuring and cutting the vinyl plank. Measure the length and width of the room, then cut the plank accordingly. Make sure to leave at least a 1/4-inch gap between the wall and the planks for any expansion or contraction. Use a straight edge and a utility knife to cut the planks.
Step 3: Install the Underlayment
Before you start laying down the vinyl planks, you need to install the underlayment. This helps create a smooth, even surface for the planks to rest on. Make sure to roll out the underlayment in the same direction as the planks and ensure there are no gaps or overlaps. Use a stapler or tape to secure the underlayment in place.
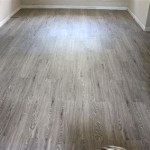
Step 4: Start Laying the Planks
Now you can start laying the vinyl planks. Begin in the corner of the room, then work your way out. Make sure to leave a 1/4-inch gap between the planks and the wall to allow for expansion and contraction. Use a rubber mallet or tapping block to make sure the planks are securely attached.
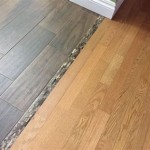
Step 5: Trim the Edges
Once all of the planks are laid, you need to trim the edges. Use a utility knife to cut along the walls and cabinets. Make sure to leave a 1/4-inch gap between the wall and the planks for any expansion or contraction. Use a straight edge to ensure a clean, professional cut.
Step 6: Seal the Seams
Finally, you need to seal the seams. This helps prevent water from seeping into the seams and damaging the floor. Use a good quality vinyl seam sealer and follow the manufacturer’s instructions for application. Make sure to allow the sealer to dry completely before using the floor.
Conclusion
Putting down vinyl flooring is a fairly simple task that just about anyone can do. Just follow the steps outlined in this guide and you’ll have a beautiful, durable floor in no time. With a little patience and effort, you can enjoy a beautiful new vinyl floor in your home or business.


:max_bytes(150000):strip_icc()/easy-install-plank-vinyl-flooring-1822808-09-a1f83db7bdf74f279f45594b897de82d.jpg)

/cdn.vox-cdn.com/uploads/chorus_image/image/65891755/howto_vinylfloor_05.0.jpg)


Related Posts